AWS EKS使用Spot实例
EKS 是 AWS 的商业化 Kubernetes 云产品,其于2020年底增加了支持增加 spot EC2 节点做为node节点的功能特性。该特性可以大大降低云服务的费用开销,按官方说法是可以让客户比按需价格节省高达 90%。。
一、环境配置
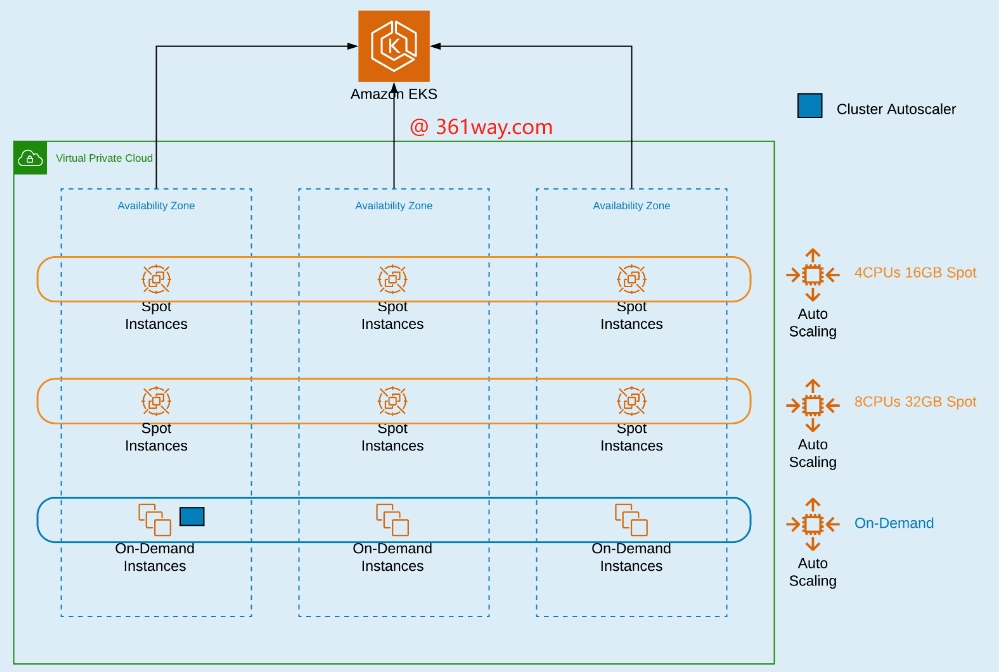
可以先看下如下的架构图,我们创建完 EKS 后,可以创建不同的 Node 组,比如一个按需组,两个 Spot 竞价实例组,分别分布在三个不同的AZ里。
AWS EKS 的创建管理通常都是通过命令配置,所以我们可以先配置下对应的环境。可以先创建一台 EC2 实例,安装上 eksctl 和 kubectl 软件。当然在此之前我们需要先有一个IAM帐号,并且该帐号有创建EC2实例的权限,可以通过配置 ~/.aws/credentials 实现鉴权认证。
1. 安装 eksctl
在 Linux 的配置脚本如下:
 1# for ARM systems, set ARCH to: `arm64`, `armv6` or `armv7`
 2ARCH=amd64
 3PLATFORM=$(uname -s)_$ARCH
 4
 5curl -sLO "https://github.com/eksctl-io/eksctl/releases/latest/download/eksctl_$PLATFORM.tar.gz"
 6
 7# (Optional) Verify checksum
 8curl -sL "https://github.com/eksctl-io/eksctl/releases/latest/download/eksctl_checksums.txt" | grep $PLATFORM | sha256sum --check
 9
10tar -xzf eksctl_$PLATFORM.tar.gz -C /tmp && rm eksctl_$PLATFORM.tar.gz
11
12sudo mv /tmp/eksctl /usr/local/bin
除了 Linux,其也支持在windows 和 Macos 上安装,具体可以参看官方文档。
2. 安装 kubectl
kubectl 是 k8s的管理工具,不论开源还是商业版本,基本都是支持通过该指令进行管理的。这里以1.27版为例,安装指令如下:
1curl -O https://s3.us-west-2.amazonaws.com/amazon-eks/1.27.1/2023-04-19/bin/linux/amd64/kubectl
2chmod +x ./kubectl
3mkdir -p $HOME/bin && cp ./kubectl $HOME/bin/kubectl && export PATH=$HOME/bin:$PATH
4echo 'export PATH=$HOME/bin:$PATH' >> ~/.bashrc
5kubectl version --short --client
二、创建集群
eksctl 指令可以直接以命令方式创建集群,也可以通过yaml文件指定创建信息并创建集群。eksctl命令执行后,后台会使用cloudformation服务自动创建所需的资源(VPC、EC2、EIP等)。
1. 直接命令创建
1# 创建按需集群
2eksctl create cluster --name=eks-spot-managed-node-groups --instance-types=m5.xlarge,m5a.xlarge,m5d.xlarge --managed --nodes=2 --asg-access --nodegroup-name on-demand-4vcpu-16gb
3
4# 创建竞价实例集群
5eksctl create nodegroup --cluster eks-spot-managed-node-groups --instance-types m5.xlarge,m4.xlarge,m5a.xlarge,m5d.xlarge,m5n.xlarge,m5ad.xlarge,m5dn.xlarge --managed --spot --name spot-4vcpu-16gb --asg-access --nodes-max 20
注意:这里可以看到后面的实例类型是可以跟多个的,但这些实例类型实际上是具有相同的CPU和内存大小的,aws 有个工具 ec2-instance-selector 可以根据条件筛选符合要求的EC2实例。
2. YAML文件创建
创建cluster.yaml文件,内容如下:
 1apiVersion: eksctl.io/v1alpha5
 2kind: ClusterConfig
 3
 4metadata:
 5  name: basic-cluster
 6  region: eu-north-1
 7
 8nodeGroups:
 9  - name: ng-1
10    instanceType: m5.large
11    desiredCapacity: 10
12    volumeSize: 80
13    ssh:
14      allow: true # will use ~/.ssh/id_rsa.pub as the default ssh key
15  - name: ng-2
16    instanceType: m5.xlarge
17    desiredCapacity: 2
18    volumeSize: 100
19    ssh:
20      publicKeyPath: ~/.ssh/ec2_id_rsa.pub
运行如下命令就可以完成一个新EKS集群的创建
1eksctl create cluster -f cluster.yaml
创建一个竞价实例的集群,对应的YAML文件内容如下:
 1# An example of ClusterConfig showing nodegroups with mixed instances (spot and on demand):
 2---
 3apiVersion: eksctl.io/v1alpha5
 4kind: ClusterConfig
 5
 6metadata:
 7    name: cluster-8
 8    region: eu-central-1
 9
10nodeGroups:
11    - name: ng-1
12      minSize: 2
13      maxSize: 5
14      instancesDistribution:
15        maxPrice: 0.017
16        instanceTypes: ["t3.small", "t3.medium"] # At least one instance type should be specified
17        onDemandBaseCapacity: 0
18        onDemandPercentageAboveBaseCapacity: 50
19        spotInstancePools: 2
如果在一个已经存在的 VPC下创建,可以使用如下配置
 1apiVersion: eksctl.io/v1alpha5
 2kind: ClusterConfig
 3
 4metadata:
 5  name: cluster-in-existing-vpc
 6  region: eu-north-1
 7
 8vpc:
 9  subnets:
10    private:
11      eu-north-1a: { id: subnet-0ff156e0c4a6d300c }
12      eu-north-1b: { id: subnet-0549cdab573695c03 }
13      eu-north-1c: { id: subnet-0426fb4a607393184 }
14
15nodeGroups:
16  - name: ng-1-workers
17    labels: { role: workers }
18    instanceType: m5.xlarge
19    desiredCapacity: 10
20    privateNetworking: true
21  - name: ng-2-builders
22    labels: { role: builders }
23    instanceType: m5.2xlarge
24    desiredCapacity: 2
25    privateNetworking: true
26    iam:
27      withAddonPolicies:
28        imageBuilder: true
更多示例可以参看 eksctl github页 。
三、应用部署
在创建nodegroup时,对于spot竞价实例组里的主机,我们也可以给其打上labels标签,这样部署应用的时候就可以方便的给应用通过nodeSelector选择器选择相应的主机组。
 1apiVersion: eksctl.io/v1alpha5
 2kind: ClusterConfig
 3metadata:
 4    name: spotcluster-eksctl
 5    region: <YOUR REGION>
 6nodeGroups:
 7    - name: ng-4vcpu-16gb-spot
 8      minSize: 0
 9      maxSize: 5
10      desiredCapacity: 1
11      instancesDistribution:
12        instanceTypes: ["m5.xlarge", "m5n.xlarge", "m5d.xlarge", "m5dn.xlarge","m5a.xlarge", "m4.xlarge"]
13        onDemandBaseCapacity: 0
14        onDemandPercentageAboveBaseCapacity: 0
15        spotAllocationStrategy: capacity-optimized
16      labels:
17        lifecycle: Ec2Spot
18        intent: apps
19        aws.amazon.com/spot: "true"
20      tags:
21        k8s.io/cluster-autoscaler/node-template/label/lifecycle: Ec2Spot
22        k8s.io/cluster-autoscaler/node-template/label/intent: apps
23      iam:
24        withAddonPolicies:
25          autoScaler: true
26          albIngress: true
27    - name: ng-8vcpu-32gb-spot
28      minSize: 0
29      maxSize: 5
30      desiredCapacity: 1
31      instancesDistribution:
32        instanceTypes: ["m5.2xlarge", "m5n.2xlarge", "m5d.2xlarge", "m5dn.2xlarge","m5a.2xlarge", "m4.2xlarge"]
33        onDemandBaseCapacity: 0
34        onDemandPercentageAboveBaseCapacity: 0
35        spotAllocationStrategy: capacity-optimized
36      labels:
37        lifecycle: Ec2Spot
38        intent: apps
39        aws.amazon.com/spot: "true"
40      tags:
41        k8s.io/cluster-autoscaler/node-template/label/lifecycle: Ec2Spot
42        k8s.io/cluster-autoscaler/node-template/label/intent: apps
43      iam:
44        withAddonPolicies:
45          autoScaler: true
46          albIngress: true
比如上面的示例中创建了两个竞价实例主机组,都打上了 lifecycle: Ec2Spot 标签,这样应用创建的时候就可以通过该标签来实现对应的应用调度到该主机组里。
注意:这里配置了minSize和maxSize,所以还需要安装autoscaler支持,这部分可以参考官方文档。
应用部署的yaml文件内容如下:
 1apiVersion: apps/v1
 2kind: Deployment
 3metadata:
 4  name: web-stateless
 5spec:
 6  replicas: 3
 7  selector:
 8    matchLabels:
 9      app: nginx
10  template:
11    metadata:
12      labels:
13        service: nginx
14        app: nginx
15    spec:
16      containers:
17      - image: nginx
18        name: web-stateless
19        resources:
20          limits:
21            cpu: 1000m
22            memory: 1024Mi
23          requests:
24            cpu: 1000m
25            memory: 1024Mi
26      nodeSelector:
27        lifecycle: Ec2Spot
28---
29apiVersion: apps/v1
30kind: Deployment
31metadata:
32  name: web-stateful
33spec:
34  replicas: 2
35  selector:
36    matchLabels:
37      app: redis
38  template:
39    metadata:
40      labels:
41        service: redis
42        app: redis
43    spec:
44      containers:
45      - image: redis:3.2-alpine
46        name: web-stateful
47        resources:
48          limits:
49            cpu: 1000m
50            memory: 1024Mi
51          requests:
52            cpu: 1000m
53            memory: 1024Mi
54      nodeSelector:
55        lifecycle: OnDemand
使用如下命令部署时,就调度到不同的主机组里去:
1kubectl apply -f web-app.yaml
四、其他
1. 弹性伸缩
可以使用以下组件实现弹性伸缩目标:
| Component | Role | Details | Deployment Method |
| Cluster Autoscaler | Scales EC2 instances automatically according to pods running in the cluster | Open Source | A Deployment on On-Demand Instances |
| EC2 Auto Scaling group | Provisions and maintains EC2 instance capacity | AWS | Cloudformation via eksctl |
| AWS Node Termination Handler | Detects EC2 Spot interruptions and automatically drains nodes | Open Source | A DaemonSet on Spot and On-Demand Instances |
2. 集群删除
删除节点组
1eksctl delete nodegroup ng-4vcpu-16gb-spot --cluster spotcluster-eksctl
2eksctl delete nodegroup ng-8vcpu-32gb-spot --cluster spotcluster-eksctl
删除集群
1eksctl delete cluster --name spotcluster-eksctl
捐赠本站(Donate)
 如您感觉文章有用,可扫码捐赠本站!(If the article useful, you can scan the QR code to donate))
- Author: shisekong
- Link: https://blog.361way.com/2023/12/aws-eks-spot.html
- License: This work is under a 知识共享署名-非商业性使用-禁止演绎 4.0 国际许可协议. Kindly fulfill the requirements of the aforementioned License when adapting or creating a derivative of this work.