Picgo配置github图床
PicGo 是一款开源免费的图片上传工具,支持Windows、macOS和Linux系统。它能够快速将本地图片上传到多种图床服务,并提供丰富的图片管理功能。PicGo还支持插件系统,用户可根据需求扩展其功能。
github配置
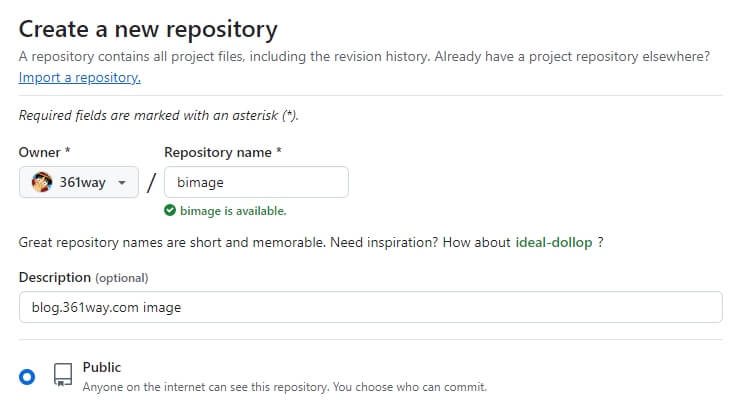
登录github,创建一个新的空的仓库
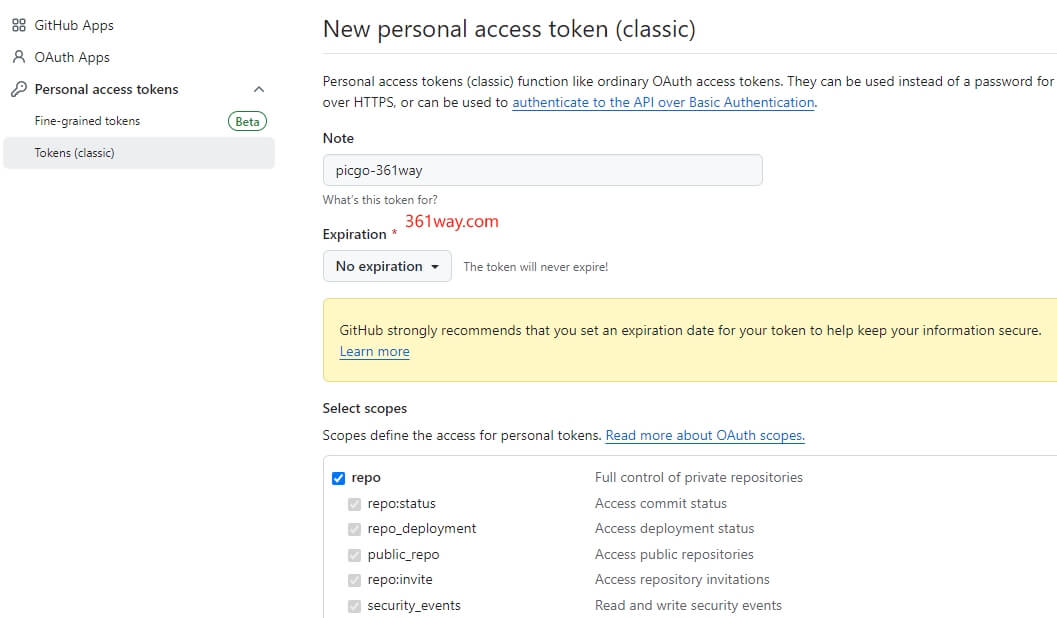
Settings — Developer settings — 个人访问令牌 — 生成新令牌
PicGo 配置
复制token密钥,只展示一次,切记保存!!! 如果忘记了就再新建即可。
https://github.com/Molunerfinn/picgo/releases
- 设置仓库名:
用户名/仓库名 - 设定分支名:之前默认是
master,现在是main - 设定Token:就是刚才复制的那一段令牌密钥
- 下面两个非必填
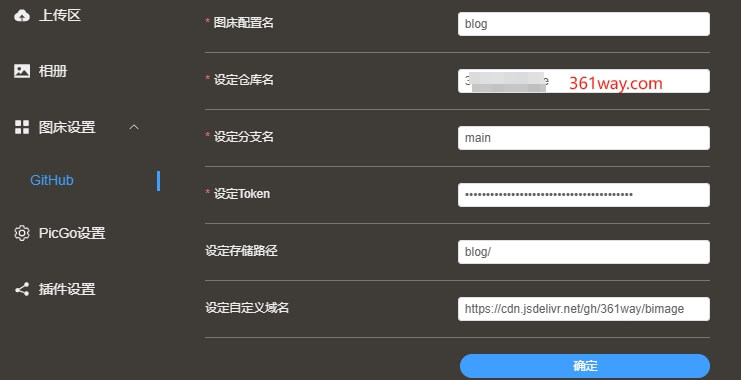
注意这里的自定义域名部分配置了Jsdelivr cdn加速地址,默认使用github的链接有时候不稳定,毕竟是外网
https://raw.githubsercontent.com/用户名/仓库名/分支
我们修改成cdn加速的
https://cdn.jsdelivr.net/gh/GitHub用户名/仓库名
如果担心图片重名,可以在Picgo的设置界面开启:上传前重命名 或 时间戳重命名
Picgo常见问题
Picgo配置文件
Picgo配置完成后,对应的仓库配置文件在 C:\Users\用户名\AppData\Roaming\picgo 目录下, 对应的文件名为 data.json ,如果主机重装或迁移,可以通过复制该文件进行迁移。
相册显示问题
如果Picgo对接的是一个已经存在的github仓库,已经存在的图片文件发现无法在相册中查看到。如果需要在相册上显示需要在本地数据库是增加对应的内容。对应的数据文件名是picgo.db。 看到这个名字我以为是使用的SQLite数据格式,发现通过 SQLite 无法打开。
1yang@361way:/mnt/d$ file picgo.db
2picgo.db: gzip compressed data
通过file命令查看,发现是压缩文件,通过winrar打开后,发现里面也是json格式。通过 PicGo store 项目也可以查看到其存储的格式。这里只列取其中一条,对应的格式类似如下:
1{"fileName":"toad-world.svg","width":242,"height":205,"extname":".svg","imgUrl":"https://img.361way.com/navimg/toad-world.svg","type":"s3","id":"8f28d2fe-de38-4fdf-904e-0d5e32638633","createdAt":,"updatedAt":}
不建议直接修改该文件内容,可以通过 github clone 先将存在图片的仓库拉取到本地,并执行 PicGo upload 命令进行上传操作,上传过程中,如果目标的github仓库中已经存在对应的该文件,实际上并不会执行上传动作,但会在本地的 picgo.db里更新对应的配置信息。
1# 打印所有图片文件
2Get-ChildItem -Path "D:\mysite\navimg" -Recurse -File | ForEach-Object { Write-Output $_.FullName }
3
4# 使用 picgo upload进行上传
5Get-ChildItem -Path "D:\mysite\navimg" -Recurse -File | ForEach-Object { & 'C:\Program Files\PicGo\PicGo.exe' upload $_.FullName }
同样的也可以通过picgo server进行上传,以下是python通过读取github目录内文件,并通过picgo server进行上传的脚本(脚本上半部分执行可以成功,后面格式还需要调整成picgo server要求的格式,由于命令方式直接可以解决,后面这半部分懒得调了,有兴趣的可以在此基础上更新)。
 1yang@361way:/mnt/d/mysite/r2img$ cat readapi.py
 2import requests
 3import json
 4
 5# 获取 GitHub 仓库中的图片链接
 6def get_github_images(username, repo, path, token):
 7    url = f"https://api.github.com/repos/{username}/{repo}/contents/{path}"
 8    headers = {
 9        "Authorization": f"token {token}",
10        "Accept": "application/vnd.github.v3+json"
11    }
12
13    response = requests.get(url, headers=headers)
14    if response.status_code == 200:
15        files = response.json()
16        image_urls = [file['download_url'] for file in files if file['name'].endswith(('.png', '.jpg', '.jpeg', '.gif', '.svg'))]
17        return image_urls
18    else:
19        print(f"Error fetching files: {response.status_code}")
20        return []
21
22# 通过 PicGo API 上传图片
23def upload_images_to_picgo(image_urls):
24    url = 'http://127.0.0.1:36677/upload'
25    headers = {'Content-Type': 'application/json'}
26    data = {"list": image_urls}
27
28    response = requests.post(url, headers=headers, data=json.dumps(data))
29    if response.status_code == 200:
30        print("Images uploaded successfully!")
31        print(response.json())  # 返回上传结果
32    else:
33        print(f"Error uploading images: {response.status_code}")
34
35# 配置 GitHub 和 PicGo 信息
36username = '361way'
37repo = 'r2img'
38path = 'navimg'  # 存储图片的路径
39token = 'github token'
40
41# 获取 GitHub 图片链接
42image_urls = get_github_images(username, repo, path, token)
43
44#print(image_urls)
45
46# 上传图片到 PicGo
47if image_urls:
48    upload_images_to_picgo(image_urls)
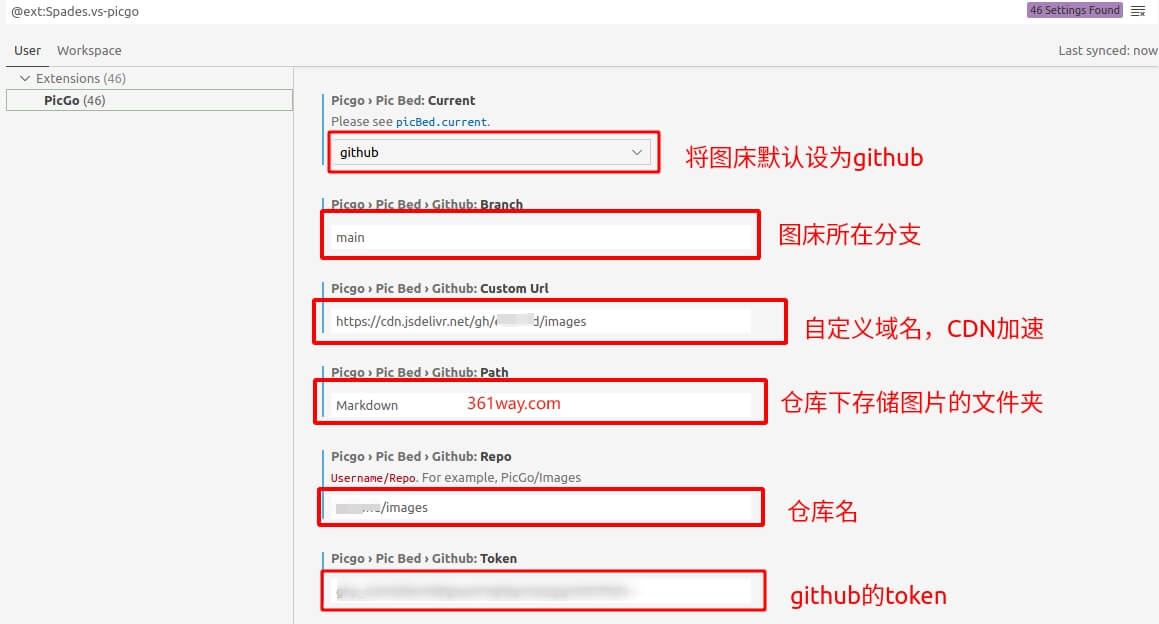
vscode集成
Picgo 对应的也有 vscode 插件,可以直接在vscode上集成 Picgo的能力,其配置如下:
从使用体验上来讲,picgo 直接客户端操作比 vscode 集成体验要好。vscode上没有直接的操作界面,可以通过以下快捷键进行操作:
| OS | Uploading an image from clipboard | Uploading images from explorer | Uploading an image from input box |
|---|---|---|---|
| Windows/Unix | Ctrl + Alt + U | Ctrl + Alt + E | Ctrl + Alt + O |
| OsX | Cmd + Opt + U | Cmd + Opt + E | Cmd + Opt + O |
捐赠本站(Donate)
 如您感觉文章有用,可扫码捐赠本站!(If the article useful, you can scan the QR code to donate))
- Author: shisekong
- Link: https://blog.361way.com/2024/08/picgo-github.html
- License: This work is under a 知识共享署名-非商业性使用-禁止演绎 4.0 国际许可协议. Kindly fulfill the requirements of the aforementioned License when adapting or creating a derivative of this work.