bearychat+hubot搭建chatops机器人
一、nodejs安装
这里使用的是官方二进制包进行的安装,因为yum源(epel源)里带的nodejs版本太老了。官方下载地址:
1[root@361way src]# xz -d node-v8.10.0-linux-x64.tar.xz
2[root@361way src]# tar xvf node-v8.10.0-linux-x64.tar
3[root@361way src]# mv node-v8.10.0-linux-x64 /usr/local/nodejs
然后打开/etc/profile 文件,增加如下内容:
1export NODE_HOME=/usr/local/nodejs
2export PATH=$NODE_HOME/bin:$PATH
source /etc/profile ,使当前环境变量生效。可以通过如下命令进行验证:
1[root@361way src]# npm -version
25.6.0
3[root@361way src]# node  -v
4v8.10.0
二、安装hubot
 1[root@361way home]# useradd www
 2[root@361way home]# su - www
 3[www@361way ~]$ mkdir myhubot && cd myhubot
 4[www@361way myhubot]$ yo hubot
 5? ==========================================================================
 6We're constantly looking for ways to make yo better!
 7May we anonymously report usage statistics to improve the tool over time?
 8More info: https://github.com/yeoman/insight & http://yeoman.io
 9========================================================================== Yes
10                     _____________________________
11                    /                             \
12   //\              |      Extracting input for    |
13  ////\    _____    |   self-replication process   |
14 //////\  /_____\   \                             /
15 ======= |[^_/\_]|   /----------------------------
16  |   | _|___@@__|__
17  +===+/  ///     \_\
18   | |_\ /// HUBOT/\\
19   |___/\//      /  \\
20         \      /   +---+
21          \____/    |   |
22           | //|    +===+
23            \//      |xx|
24? Owner [email protected]
25? Bot name myhubot
26? Description A simple helpful robot for your Company
27? Bot adapter campfire
28   create bin/hubot
29   create bin/hubot.cmd
30   create Procfile
31   create README.md
32   create external-scripts.json
33   create hubot-scripts.json
34   create .gitignore
35   create package.json
36   create scripts/example.coffee
37   create .editorconfig
38                     _____________________________
39 _____              /                             \
40 \    \             |   Self-replication process   |
41 |    |    _____    |          complete...         |
42 |__\\|   /_____\   \     Good luck with that.    /
43   |//+  |[^_/\_]|   /----------------------------
44  |   | _|___@@__|__
45  +===+/  ///     \_\
46   | |_\ /// HUBOT/\\
47   |___/\//      /  \\
48         \      /   +---+
49          \____/    |   |
50           | //|    +===+
51            \//      |xx|
52npm WARN deprecated [email protected]: CoffeeScript on NPM has moved to "coffeescript" (no hyphen)
53npm WARN deprecated [email protected]: connect 2.x series is deprecated
54npm notice created a lockfile as package-lock.json. You should commit this file.
55npm WARN [email protected] requires a peer of coffee-script@^1.12.6 but none is installed. You must install peer dependencies yourself.
56+ [email protected]
57+ [email protected]
58+ [email protected]
59+ [email protected]
60+ [email protected]
61+ [email protected]
62+ [email protected]
63+ [email protected]
64+ [email protected]
65+ [email protected]
66+ [email protected]
67+ [email protected]
68added 151 packages in 16.318s
注:此处建议切换为普通用户安装hubot,因为使用root用户,会有Error: EACCES: permission denied, mkdir ‘/root/.config’这样的提示,所以上面的操作中,我新建了一个www用户。如果一定要使用root用户,还需要给.config目录修改权限才能搞定。
最后通过安装adapter hubot-bearychat完成安装,命令如下:
1[www@361way myhubot]$ npm install hubot-bearychat --save
三、hubot shell模块的安装使用
1[www@361way myhubot]$ npm install hubot-script-shellcmd
2+ [email protected]
3added 1 package in 3.152s
4[www@361way myhubot]$ cp -R node_modules/hubot-script-shellcmd/bash ./
修改一下external-scripts.json,添加模块:hubot-script-shellcmd
 1[root@361way myhubot]# cat external-scripts.json
 2[
 3  "hubot-diagnostics",
 4  "hubot-help",
 5  "hubot-heroku-keepalive",
 6  "hubot-google-images",
 7  "hubot-google-translate",
 8  "hubot-pugme",
 9  "hubot-maps",
10  "hubot-redis-brain",
11  "hubot-rules",
12  "hubot-shipit",
13  "hubot-script-shellcmd"  //新增部分
14]
15[root@361way myhubot]# cd bash/handlers/
16[root@361way handlers]# ls
17helloworld  update
18新增脚本
19[root@361way handlers]# cat disk
20#!/bin/bash
21ansible $1 -m shell -a 'df -hP'
22[root@361way handlers]# chmod +x disk
四、添加bearychat机器人
打开https://www.bearychat.com 并注册一个帐号。找到机器人管理 —- 添加自定义机器人 —– 并找到hubot,如下:

点开hubot项后,会进入如下的配置界面:
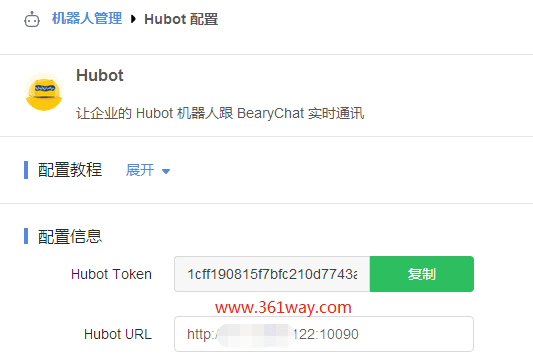
上面的hubot url里的端口号是可以随意定义的。
五、启动hubot
复制Hubot Token,执行下面的命令启动hubot机器人:
1[www@361way myhubot]# export HUBOT_BEARYCHAT_TOKENS=18ff191266f7bfc210d7743ab6108fdd
2[www@361way myhubot]# export HUBOT_BEARYCHAT_MODE=rtm
3[www@361way myhubot]# export EXPRESS_PORT=10090
4[www@361way myhubot]# nohup ./bin/hubot -a bearychat 2&1> hubot.log
5[www@361way myhubot]# netstat -tnlp|grep 10090
6tcp        0      0 0.0.0.0:10090            0.0.0.0:*               LISTEN
注意,此处token如果有多个可以使用逗号分隔。为了以后启动方便可以直接将上面的变量信息写入当前用户的环境变量:
1$ tail -3 .bash_profile
2export HUBOT_BEARYCHAT_TOKENS=18ff191266f7bfc210d7743ab6108fdd
3export HUBOT_BEARYCHAT_MODE=rtm
4export EXPRESS_PORT=10090
六、chatops测试
下载bearychat客户端或者直接使用网页版,找到刚刚的机器人,发送消息进行测试,如下:

同时也可以健入help或者其他指今返回可用的帮助信息,由于help返回的信息过多,就不截图了,这里只截图下shellcmd返回的可用模块:

这里只是简单的脚本调用,先不涉及CoffeeScript的编写吧。
捐赠本站(Donate)
 如您感觉文章有用,可扫码捐赠本站!(If the article useful, you can scan the QR code to donate))
- Author: shisekong
- Link: https://blog.361way.com/bearychat-hubot/5663.html
- License: This work is under a 知识共享署名-非商业性使用-禁止演绎 4.0 国际许可协议. Kindly fulfill the requirements of the aforementioned License when adapting or creating a derivative of this work.