k8s总结(三)kubectl命令
kubectl是用来管理Kubernetes集群的指令,平时我们日常对k8s资源所有的操作在命令行都是通过该指令完成的。本篇就总结下kubectl命令的常见使用方法。
一、kubectl语法
 1kubectl
 2command:
 3        create/delete/get/describe/apply
 4type:
 5     资源对象类型,严格区分大小写
 6     daemonsets 缩写ds
 7     deployments
 8     events 缩写ev
 9     endpoints 缩写ep
10     horizontalpodautoscalers 缩写hpa 水平扩展
11     ingresses 缩写ing
12     jobs
13     nodes 缩写no
14     pods 缩写po
15     namespaces 缩写ns
16     persistentvolumes 缩写pv
17     persistentvolumes 缩写pvc 创建卷组
18     resourcequotas 缩写quota
19     replicationcontrollers 缩写 rc
20     secrets
21     service 缩写svc
22     serviceaccounts 缩写sa
23name:
24     资源对象名称,严格区分大小写
25flags:
26      可选参数
27      -n 指定namespace
kubectl子命令如下:
 1annotate 添加或更新资源对象的信息
 2apply 从配置文件更新资源对象
 3      kubectl apply -f
 4attach 连接一个正在运行的pod到container
 5      kubectl attach pod -c
 6cluster-info 显示集群信息
 7      kubectl cluster-info
 8completion 输出shell命令执行后的返回码
 9      kubectl completion bash
10config 修改kubeconfig配置文件
11create 从配置文件创建资源对象
12      kubectl create -f xxxx.yml
13delete 从配置文件删除资源对象
14      kubectl delete -f xxxx.yml
15describe 查看资源对象详细信息
16      kubectl describe pods -n <命名空间名>
17edit 编辑资源对象属性
18      kubectl edit sa admin -n kube-system
19exec 执行一个容器中的命令
20      kubectl exec  ls -n <命名空间名称>
21      kubectl exec coredns-7688bbffb9-4rd6j ls -n kube-system
22label 为了资源对象创建label 方便调度
23      kubectl label node node1.example.com hello
24      查看 kubectl get nodes --show-labels
二、查看显示类指令示例
查看所有 pod 列表, -n 后跟 namespace, 查看指定的命名空间
 1kubectl get pod
 2kubectl get pod -n kube-system    #查看指定命名空间的pod
 3kubectl get pod -o wide    #查看更详细的信息,比如pod所在节点
 4kubectl get pod --show-labels    #获取pod并查看pod的标签
 5查看 RC 和 service 列表, -o wide 查看详细信息
 6kubectl get rc,svc
 7kubectl get pod,svc -o wide
 8kubectl get pod  -o yaml
 9显示 Node 的详细信息
10kubectl describe node 192.168.0.212 #可以跟Node IP或者主机名
11显示 Pod 的详细信息, 特别是查看 pod 无法创建的时候的日志
12kubectl describe pod
13eg:
14kubectl describe pod redis-master-tqds9
三、执行删除类指令示例
根据 yaml 创建资源, apply 可以重复执行,create 不行
 1kubectl create -f pod.yaml
 2kubectl apply -f pod.yaml
 3基于 pod.yaml 定义的名称删除指定资源
 4kubectl delete -f pod.yaml
 5删除所有包含某个 label 的pod 和 service
 6kubectl delete pod,svc -l name=
 7删除默认命名空间下的所有 Pod
 8kubectl delete pod --all
 9执行 pod 命令
10kubectl exec  -- date
11kubectl exec  -- bash
12kubectl exec  -- ping 10.24.51.9
13通过bash获得 pod 中某个容器的TTY,相当于登录容器
14kubectl exec -it  -c  -- bash
15eg:
16kubectl exec -it redis-master-cln81 -- bash
17重启 pod
18kubectl get pod  -n  -o yaml | kubectl replace --force -f -
四、日志labels查看类
查看容器的日志
1kubectl logs
2kubectl logs -f  # 实时查看日志
3kubectl log    -c  # 若 pod 只有一个容器,可以不加 -c
4kubectl logs -l app=frontend # 返回所有标记为 app=frontend 的 pod 的合并日志。
5查看节点 labels
6kubectl get node --show-labels
五、重启重建类
 1重启 pod
 2kubectl get pod  -n  -o yaml | kubectl replace --force -f -
 3创建命令
 4kubectl apply -f ./my-manifest.yaml           # 创建资源
 5kubectl apply -f ./my1.yaml -f ./my2.yaml     # 使用多个文件创建
 6kubectl apply -f ./dir                        # 基于目录下的所有清单文件创建资源
 7kubectl apply -f https://git.io/vPieo         # 从 URL 中创建资源
 8kubectl create deployment nginx --image=nginx # 启动单实例 nginx
 9kubectl explain pods,svc                      # 获取 pod 清单的文档说明
10# 从标准输入创建多个 YAML 对象
11cat <<EOF | kubectl apply -f -
12apiVersion: v1
13kind: Pod
14metadata:
15  name: busybox-sleep
16spec:
17  containers:
18  - name: busybox
19    image: busybox
20    args:
21    - sleep
22    - "1000000"
23---
24apiVersion: v1
25kind: Pod
26metadata:
27  name: busybox-sleep-less
28spec:
29  containers:
30  - name: busybox
31    image: busybox
32    args:
33    - sleep
34    - "1000"
35EOF
36# 创建有多个 key 的 Secret
37cat <<EOF | kubectl apply - f -
38apiVersion: v1
39kind: Secret
40metadata:
41  name: mysecret
42type: Opaque
43data:
44  password: $(echo -n "s33msi4" | base64 -w0)
45  username: $(echo -n "jane" | base64 -w0)
46EOF
六、查看查找资源
 1# get 命令的基本输出
 2kubectl get services                          # 列出当前命名空间下的所有 services
 3kubectl get pods --all-namespaces             # 列出所有命名空间下的全部的 Pods
 4kubectl get pods -o wide                      # 列出当前命名空间下的全部 Pods,并显示更详细的信息
 5kubectl get deployment my-dep                 # 列出某个特定的 Deployment
 6kubectl get pods                              # 列出当前命名空间下的全部 Pods
 7kubectl get pod my-pod -o yaml                # 获取一个 pod 的 YAML
 8# describe 命令的详细输出
 9kubectl describe nodes my-node
10kubectl describe pods my-pod
11# 列出当前名字空间下所有 Services,按名称排序
12kubectl get services --sort-by=.metadata.name
13# 列出 Pods,按重启次数排序
14kubectl get pods --sort-by='.status.containerStatuses[0].restartCount'
15# 列举所有 PV 持久卷,按容量排序
16kubectl get pv --sort-by=.spec.capacity.storage
17# 获取包含 app=cassandra 标签的所有 Pods 的 version 标签
18kubectl get pods --selector=app=cassandra -o \
19  jsonpath='{.items[*].metadata.labels.version}'
20# 获取所有工作节点(使用选择器以排除标签名称为 'node-role.kubernetes.io/master' 的结果)
21kubectl get node --selector='!node-role.kubernetes.io/master'
22# 获取当前命名空间中正在运行的 Pods
23kubectl get pods --field-selector=status.phase=Running
24# 获取全部节点的 ExternalIP 地址
25kubectl get nodes -o jsonpath='{.items[*].status.addresses[?(@.type=="ExternalIP")].address}'
26# 列出属于某个特定 RC 的 Pods 的名称
27# 在转换对于 jsonpath 过于复杂的场合,"jq" 命令很有用;可以在 https://stedolan.github.io/jq/ 找到它。
28sel=${$(kubectl get rc my-rc --output=json | jq -j '.spec.selector | to_entries | .[] | "\(.key)=\(.value),"')%?}
29echo $(kubectl get pods --selector=$sel --output=jsonpath={.items..metadata.name})
30# 显示所有 Pods 的标签(或任何其他支持标签的 Kubernetes 对象)
31kubectl get pods --show-labels
32# 检查哪些节点处于就绪状态
33JSONPATH='{range .items[*]}{@.metadata.name}:{range @.status.conditions[*]}{@.type}={@.status};{end}{end}' \
34 && kubectl get nodes -o jsonpath="$JSONPATH" | grep "Ready=True"
35# 列出被一个 Pod 使用的全部 Secret
36kubectl get pods -o json | jq '.items[].spec.containers[].env[]?.valueFrom.secretKeyRef.name' | grep -v null | sort | uniq
37# 列举所有 Pods 中初始化容器的容器 ID(containerID)
38# Helpful when cleaning up stopped containers, while avoiding removal of initContainers.
39kubectl get pods --all-namespaces -o jsonpath='{range .items[*].status.initContainerStatuses[*]}{.containerID}{"\n"}{end}' | cut -d/ -f3
40# 列出事件(Events),按时间戳排序
41kubectl get events --sort-by=.metadata.creationTimestamp
42# 比较当前的集群状态和假定某清单被应用之后的集群状态
43kubectl diff -f ./my-manifest.yaml
七、更新资源
 1kubectl set image deployment/frontend www=image:v2               # 滚动更新 "frontend" Deployment 的 "www" 容器镜像
 2kubectl rollout history deployment/frontend                      # 检查 Deployment 的历史记录,包括版本
 3kubectl rollout undo deployment/frontend                         # 回滚到上次部署版本
 4kubectl rollout undo deployment/frontend --to-revision=2         # 回滚到特定部署版本
 5kubectl rollout status -w deployment/frontend                    # 监视 "frontend" Deployment 的滚动升级状态直到完成
 6kubectl rollout restart deployment/frontend                      # 轮替重启 "frontend" Deployment
 7cat pod.json | kubectl replace -f -                              # 通过传入到标准输入的 JSON 来替换 Pod
 8# 强制替换,删除后重建资源。会导致服务不可用。
 9kubectl replace --force -f ./pod.json
10# 为多副本的 nginx 创建服务,使用 80 端口提供服务,连接到容器的 8000 端口。
11kubectl expose rc nginx --port=80 --target-port=8000
12# 将某单容器 Pod 的镜像版本(标签)更新到 v4
13kubectl get pod mypod -o yaml | sed 's/\(image: myimage\):.*$/\1:v4/' | kubectl replace -f -
14kubectl label pods my-pod new-label=awesome                      # 添加标签
15kubectl annotate pods my-pod icon-url=http://goo.gl/XXBTWq       # 添加注解
16kubectl autoscale deployment foo --min=2 --max=10                # 对 "foo" Deployment 自动伸缩容
八、部分更新资源
 1# 部分更新某节点
 2kubectl patch node k8s-node-1 -p '{"spec":{"unschedulable":true}}'
 3# 更新容器的镜像;spec.containers[*].name 是必须的。因为它是一个合并性质的主键。
 4kubectl patch pod valid-pod -p '{"spec":{"containers":[{"name":"kubernetes-serve-hostname","image":"new image"}]}}'
 5# 使用带位置数组的 JSON patch 更新容器的镜像
 6kubectl patch pod valid-pod --type='json' -p='[{"op": "replace", "path": "/spec/containers/0/image", "value":"new image"}]'
 7# 使用带位置数组的 JSON patch 禁用某 Deployment 的 livenessProbe
 8kubectl patch deployment valid-deployment  --type json   -p='[{"op": "remove", "path": "/spec/template/spec/containers/0/livenessProbe"}]'
 9# 在带位置数组中添加元素
10kubectl patch sa default --type='json' -p='[{"op": "add", "path": "/secrets/1", "value": {"name": "whatever" } }]'
九、删除资源
1kubectl delete -f ./pod.json                                              # 删除在 pod.json 中指定的类型和名称的 Pod
2kubectl delete pod,service baz foo                                        # 删除名称为 "baz" 和 "foo" 的 Pod 和服务
3kubectl delete pods,services -l name=myLabel                              # 删除包含 name=myLabel 标签的 pods 和服务
4kubectl delete pods,services -l name=myLabel --include-uninitialized      # 删除包含 label name=myLabel 标签的 Pods 和服务
5kubectl -n my-ns delete po,svc --all                                      # 删除在 my-ns 名字空间中全部的 Pods 和服务
6# 删除所有与 pattern1 或 pattern2 awk 模式匹配的 Pods
7kubectl get pods  -n mynamespace --no-headers=true | awk '/pattern1|pattern2/{print $1}' | xargs  kubectl delete -n mynamespace pod
十、Pod常用操作
 1kubectl logs my-pod                                 # 获取 pod 日志(标准输出)
 2kubectl logs -l name=myLabel                        # 获取含 name=myLabel 标签的 Pods 的日志(标准输出)
 3kubectl logs my-pod --previous                      # 获取上个容器实例的 pod 日志(标准输出)
 4kubectl logs my-pod -c my-container                 # 获取 Pod 容器的日志(标准输出, 多容器场景)
 5kubectl logs -l name=myLabel -c my-container        # 获取含 name=myLabel 标签的 Pod 容器日志(标准输出, 多容器场景)
 6kubectl logs my-pod -c my-container --previous      # 获取 Pod 中某容器的上个实例的日志(标准输出, 多容器场景)
 7kubectl logs -f my-pod                              # 流式输出 Pod 的日志(标准输出)
 8kubectl logs -f my-pod -c my-container              # 流式输出 Pod 容器的日志(标准输出, 多容器场景)
 9kubectl logs -f -l name=myLabel --all-containers    # 流式输出含 name=myLabel 标签的 Pod 的所有日志(标准输出)
10kubectl run -i --tty busybox --image=busybox -- sh  # 以交互式 Shell 运行 Pod
11kubectl run nginx --image=nginx -n mynamespace      # 在指定名字空间中运行 nginx Pod
12kubectl run nginx --image=nginx                     # 运行 ngins Pod 并将其规约写入到名为 pod.yaml 的文件
13  --dry-run=client -o yaml > pod.yaml
14kubectl attach my-pod -i                            # 挂接到一个运行的容器中
15kubectl port-forward my-pod 5000:6000               # 在本地计算机上侦听端口 5000 并转发到 my-pod 上的端口 6000
16kubectl exec my-pod -- ls /                         # 在已有的 Pod 中运行命令(单容器场景)
17kubectl exec my-pod -c my-container -- ls /         # 在已有的 Pod 中运行命令(多容器场景)
18kubectl top pod POD_NAME --containers               # 显示给定 Pod 和其中容器的监控数据
十一、节点操作
1kubectl cordon my-node                                                # 标记 my-node 节点为不可调度
2kubectl drain my-node                                                 # 对 my-node 节点进行清空操作,为节点维护做准备
3kubectl uncordon my-node                                              # 标记 my-node 节点为可以调度
4kubectl top node my-node                                              # 显示给定节点的度量值
5kubectl cluster-info                                                  # 显示主控节点和服务的地址
6kubectl cluster-info dump                                             # 将当前集群状态转储到标准输出
7kubectl cluster-info dump --output-directory=/path/to/cluster-state   # 将当前集群状态输出到 /path/to/cluster-state
8# 如果已存在具有指定键和效果的污点,则替换其值为指定值
9kubectl taint nodes foo dedicated=special-user:NoSchedule
十二、格式化输出
要以特定格式将详细信息输出到终端窗口,可以将 -o 或 –output 参数添加到支持的 kubectl 命令
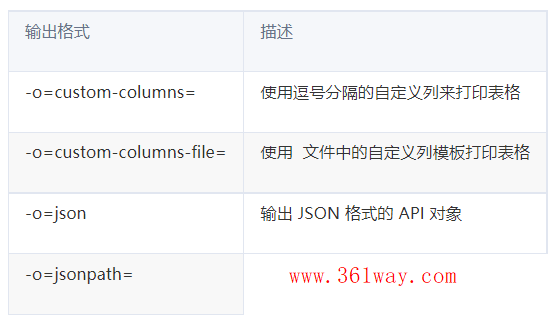
使用 -o=custom-columns 的示例:
1# 集群中运行着的所有镜像
2kubectl get pods -A -o=custom-columns='DATA:spec.containers[*].image'
3 # 除 "k8s.gcr.io/coredns:1.6.2" 之外的所有镜像
4kubectl get pods -A -o=custom-columns='DATA:spec.containers[?(@.image!="k8s.gcr.io/coredns:1.6.2")].image'
5# 输出 metadata 下面的所有字段,无论 Pod 名字为何
6kubectl get pods -A -o=custom-columns='DATA:metadata.*'
捐赠本站(Donate)
 如您感觉文章有用,可扫码捐赠本站!(If the article useful, you can scan the QR code to donate))
- Author: shisekong
- Link: https://blog.361way.com/k8s-kubectl/6631.html
- License: This work is under a 知识共享署名-非商业性使用-禁止演绎 4.0 国际许可协议. Kindly fulfill the requirements of the aforementioned License when adapting or creating a derivative of this work.