linux终端下的SecureCRT sshc
这个程序纯属是偶然看到的,看博客上显示的语言来看,应该是一个俄罗斯的技术大拿写的。程序非常小,适合在终端下使用,在centos/redhat平台下测试OK,不过在ubuntu下测试时有问题,也没细究,还是直接上内容吧。
一、下载安装
 1[root@localhost src] wget http://cronylab.pl/codes/sshc-0.8.tar.gz
 2[root@localhost src] tar zxvf sshc-0.8.tar.gz
 3[root@localhost src] cd ssh_connector-0.8
 4[root@localhost ssh_connector-0.8]# sh install.sh
 5[#] Uncompressing iniparser-2.17.tar.gz
 6[#] Iniparser compilation in progress...
 7compiling src/iniparser.c ...
 8compiling src/dictionary.c ...
 9compiling src/strlib.c ...
10a - src/iniparser.o
11a - src/dictionary.o
12a - src/strlib.o
13[#] Installing sshc in /usr/bin/ ...
14ssh_connector.c:24:21: error: ncurses.h: No such file or directory
15ssh_connector.c:28:18: error: menu.h: No such file or directory
16ssh_connector.c:50: error: expected ‘=’, ‘,’, ‘;’, ‘asm’ or ‘__attribute__’ before ‘*’ token
17ssh_connector.c:58: error: expected ‘=’, ‘,’, ‘;’, ‘asm’ or ‘__attribute__’ before ‘*’ token
18ssh_connector.c:59: error: expected ‘=’, ‘,’, ‘;’, ‘asm’ or ‘__attribute__’ before ‘*’ token
19ssh_connector.c:63: error: expected ‘)’ before ‘*’ token
20ssh_connector.c: In function ‘heart’:
如上所示,安装时会报错。因为所需的ncurses.h头文件不存在 ,直接yum安装:
1[root@localhost ssh_connector-0.8]# yum -y install ncurses ncurses-devel
安装完再重新执行安装:
 1[root@localhost ssh_connector-0.8]# sh install.sh
 2[#] Uncompressing iniparser-2.17.tar.gz
 3[#] Iniparser compilation in progress...
 4compiling src/iniparser.c ...
 5compiling src/dictionary.c ...
 6compiling src/strlib.c ...
 7a - src/iniparser.o
 8a - src/dictionary.o
 9a - src/strlib.o
10[#] Installing sshc in /usr/bin/ ...
11[#] Installation completed
12[#] Example config was created in /root/.ssh/ssh_connector.conf and it must be there! (already copied;] )
二、使用
编译配置文件,如下:
 1[root@localhost .ssh]# cat /root/.ssh/ssh_connector.conf
 2[test1]
 3hostname = testowy1.test.pl
 4username = test
 5port = 22
 6auth = password
 7[www]
 8hostname = 192.168.10.12
 9username = test
10port = 321
11auth = password
12[1.200]
13hostname = 192.168.1.200
14username = root
15port = 22
16auth = password
注:认证方式这里选择的是密码方式 ,key方式没试 。
配置完配置文件后,直接运行sshc命令,调出如下的界面:
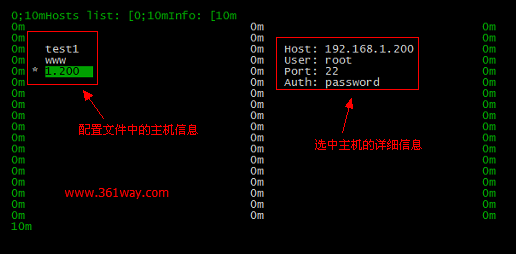
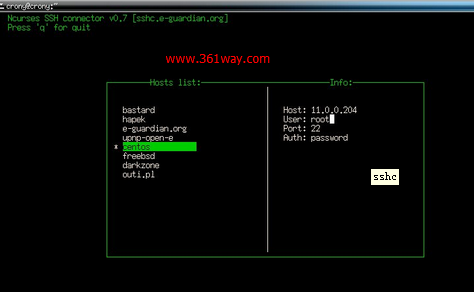
由于我这个图是在SecureCRT连接的服务器安装的截图,所以旁边会有乱码显示,再给一个直接在gnome、xfce桌面环境下终端的一个截图:
捐赠本站(Donate)
 如您感觉文章有用,可扫码捐赠本站!(If the article useful, you can scan the QR code to donate))
- Author: shisekong
- Link: https://blog.361way.com/linux-term-securecrt-sshc/3293.html
- License: This work is under a 知识共享署名-非商业性使用-禁止演绎 4.0 国际许可协议. Kindly fulfill the requirements of the aforementioned License when adapting or creating a derivative of this work.