nagios map功能
nagios自身有个map功能,十分强大,配置也也十分简单 。只需要简单的配置就可以理由网络架构。直接先上两个图先:
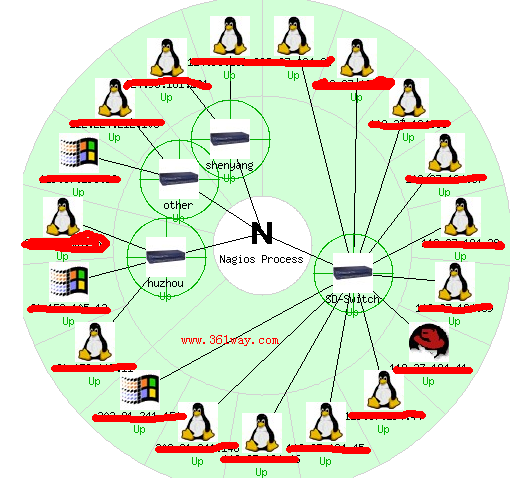

如上图所示,可以直接一目了然了解网企业的网络架构。在nagios里想要实现上图的效果非常简单,只需要两个配置参数即可。一个是parents,用于定义其上层节点;一个是statusmap_image,用于指定该节点使用的图片名称,其图片默认从/App/nagios/share/images/logos位置获取。具体配置如下:
1、先定义一个交换机或防火墙(也可以是其他设备)
 1define host{
 2        use                     linux-server
 3        host_name               huzhou
 4        alias                   huzhou
 5        statusmap_image         switch40.jpg
 6        address                 61.153.XXX.X
 7        notification_interval   0
 8        process_perf_data       1
 9        action_url              /pnp4nagios/graph?host=$HOSTNAME$
10        }
2、在一个主机的配置里定义其父节点的名字,并配图
 1define host{
 2        use                     linux-server
 3        host_name               361way
 4        statusmap_image         linux40.jpg
 5        parents                 huzhou
 6        alias                   192.168.8.7
 7        address                 192.168.8.7
 8        notification_interval 60
 9        process_perf_data       1
10        action_url              /pnp4nagios/graph?host=$HOSTNAME$
11        }
另外,需要提醒的是,此处配置的图片最好是GD格式的,这一点在nagios的cgi.cfg 文件里有相关说明:
 1# STATUSMAP BACKGROUND IMAGE
 2# This option allows you to specify an image to be used as a
 3# background in the statusmap CGI.  It is assumed that the image
 4# resides in the HTML images path (i.e. /usr/local/nagios/share/images).
 5# This path is automatically determined by appending "/images"
 6# to the path specified by the 'physical_html_path' directive.
 7# Note:  The image file may be in GIF, PNG, JPEG, or GD2 format.
 8# However, I recommend that you convert your image to GD2 format
 9# (uncompressed), as this will cause less CPU load when the CGI
10# generates the image.
捐赠本站(Donate)
 如您感觉文章有用,可扫码捐赠本站!(If the article useful, you can scan the QR code to donate))
- Author: shisekong
- Link: https://blog.361way.com/nagios-map/2457.html
- License: This work is under a 知识共享署名-非商业性使用-禁止演绎 4.0 国际许可协议. Kindly fulfill the requirements of the aforementioned License when adapting or creating a derivative of this work.