zabbix小结(十八)zabbix 微信告警
微信告警早已不是什么新鲜功能,早在分早之前就已可通过公众信进行实现,由于公众号针对的是所有关注的用户推送信息,所以信息私密性不强,所以后来的微信消息基本都是通过企业微信实现的,这点和dingding是类似的,其可以通过一个API 通过post请求发给单个人、分组或者所有人,比较灵活。本篇就简单记录下实现过程。
一、注册企业微信
打开以下链接注册微信企业号:https://work.weixin.qq.com/wework_admin/register_wx?from=myhome
个人信息页面会让输入手机号进行验证。超过200人以上的,需要营业执行进行注册。注册成功会要求下载企业微信,并通过页面链接可以进入管理后台并创建应用。
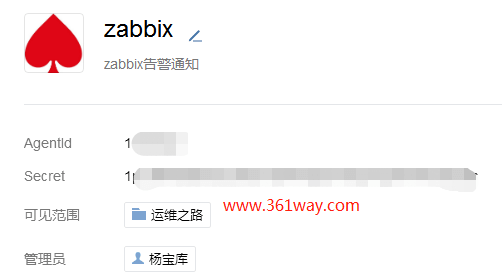
创建页面如下:
二、微信消息发送
微信消息发送第两步,第一步是获取token 信息,第二步是post消息并加上token信息发给api server 。具体如下:
https://work.weixin.qq.com/api/doc#90000/90135/91039 (获取access_token)
https://work.weixin.qq.com/api/doc#90000/90135/90236 (发送应用消息)
请求方式: GET HTTPS
请求地址: https://qyapi.weixin.qq.com/cgi-bin/gettoken?corpid=ID&corpsecret=SECRET
注:此处标注大写的单词ID和SECRET,为需要替换的变量,根据实际获取值更新。其它接口也采用相同的标注,不再说明。
参数说明:
| 参数 | 必须 | 说明 |
|---|---|---|
| corpid | 是 | 企业ID,获取方式参考:术语说明-corpid |
| corpsecret | 是 | 应用的凭证密钥,获取方式参考:术语说明-secret |
其中corpid 可以在管理后台—- 我的企业,页面的最底部获取。corpsecret 可以从应用程序详细页面找到:
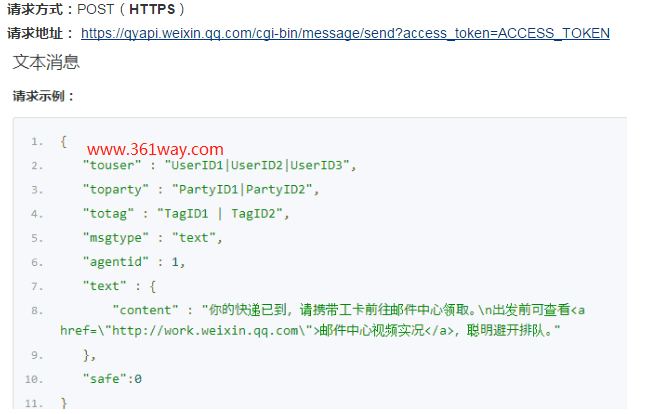
通过该get方式获取acess_token以后,可以通过如下方式送给相应的人:
上面touser、toparty、totag必须要有一个在。
三、脚本调用
这里以python为例吧(其他语言也是一样的):
 1#!/usr/bin/env python
 2# encoding: utf-8
 3import urllib,urllib2
 4import json
 5import sys
 6#import simplejson
 7reload(sys)
 8sys.setdefaultencoding('utf8')
 9def gettoken(corpid,corpsecret):
10    gettoken_url = 'https://qyapi.weixin.qq.com/cgi-bin/gettoken?corpid=' + corpid + '&corpsecret=' + corpsecret
11    print  gettoken_url
12    try:
13        token_file = urllib2.urlopen(gettoken_url)
14    except urllib2.HTTPError as e:
15        print e.code
16        print e.read().decode("utf8")
17        sys.exit()
18    token_data = token_file.read().decode('utf-8')
19    token_json = json.loads(token_data)
20    token_json.keys()
21    token = token_json['access_token']
22    return token
23def senddata(access_token,user,subject,content):
24    send_url = 'https://qyapi.weixin.qq.com/cgi-bin/message/send?access_token=' + access_token
25    send_values = {
26        "touser":user,    #企业号中的用户帐号,在zabbix用户Media中配置,如果配置不正常,将按部门发送。
27        "toparty":"",     #企业号中的部门id。
28        "msgtype":"text", #消息类型。
29        "agentid":"1000002",    #企业号中的应用id。
30        "text":{
31            "content":subject + '\n' + content
32           },
33        "safe":"0"
34        }
35    send_data = json.dumps(send_values, ensure_ascii=False)
36#    send_data = simplejson.dumps(send_values, ensure_ascii=False).encode('utf-8')
37    send_request = urllib2.Request(send_url, send_data)
38    response = json.loads(urllib2.urlopen(send_request).read())
39    print str(response)
40if __name__ == '__main__':
41    user = str(sys.argv[1])     #zabbix传过来的第一个参数
42    subject = str(sys.argv[2])  #zabbix传过来的第二个参数
43    content = str(sys.argv[3])  #zabbix传过来的第三个参数
44    corpid =  'ww9cd'   #CorpID是企业号的标识
45    corpsecret = 'N5iLqi8h'  #corpsecretSecret是管理组凭证密钥
46    try:
47        accesstoken = gettoken(corpid,corpsecret)
48        senddata(accesstoken,user,subject,content)
49    except Exception as e:
50        print 'Exception: ', e
不过这个每次都会去取一次access_token,因为access_token的有效期是7200秒,实际上没必要每次都重新去取,所以也可以优化下该调用方式,将token值存在一个地方,发现调用不成功时,再重新获取token的方式进行操作,更改后的脚本如下:
 1import requests
 2import json
 3import sys
 4# 企业号及应用相关信息
 5corp_id = 'xxxxxxx'
 6corp_secret = 'xxxxxxx'
 7agent_id = xxxxxx
 8# 存放access_token文件路径
 9file_path = '/tmp/access_token.log'
10def get_access_token_from_file():
11    try:
12        f = open(file_path,'r+')
13        this_access_token = f.read()
14        print('get success %s' % this_access_token)
15        f.close()
16        return this_access_token
17    except Exception as e:
18        print(e)
19# 获取token函数,文本里记录的token失效时调用
20def get_access_token():
21    get_token_url = 'https://qyapi.weixin.qq.com/cgi-bin/gettoken?corpid=%s&corpsecret=%s' % (corp_id, corp_secret)
22    print(get_token_url)
23    r = requests.get(get_token_url)
24    request_json = r.json()
25    this_access_token = request_json['access_token']
26    print(this_access_token)
27    r.close()
28    # 把获取到的access_token写入文本
29    try:
30        f = open(file_path,'w+')
31        f.write(this_access_token)
32        f.close()
33    except Exception as e:
34        print(e)
35    # 返回获取到的access_token值
36    return this_access_token
37# snedMessage
38# 死循环,直到消息成功发送
39flag = True
40while(flag):
41    # 从文本获取access_token
42    access_token = get_access_token_from_file()
43    try:
44        to_user = '@all'
45        message = sys.argv[3]
46        send_message_url = 'https://qyapi.weixin.qq.com/cgi-bin/message/send?access_token=%s' % access_token
47        print(send_message_url)
48        message_params = {
49                            "touser":to_user,
50                            "msgtype":"text",
51                            "agentid":agent_id,
52                            "text":{
53                                "content" : message
54                            },
55                            "safe":0
56                        }
57        r = requests.post(send_message_url, data=json.dumps(message_params))
58        print('post success %s ' % r.text)
59        # 判断是否发送成功,如不成功则跑出异常,让其执行异常处理里的函数
60        request_json = r.json()
61        errmsg = request_json['errmsg']
62        if errmsg != 'ok': raise
63        # 消息成功发送,停止死循环
64        flag = False
65    except Exception as e:
66        print(e)
67        access_token = get_access_token()
可以在不和zabbix结合前,先调用该脚本发几条消息测试下。这里以touser为例,如果要发送给所有人是@all ,只发送给某人,是该用户的账户名该,该名称在通信录里点开该人的详细信息里有,一般都是字母或字母加数字。
四、zabbix部署
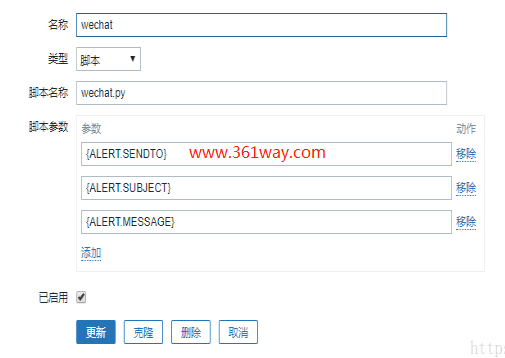
连接zabbix server主机,找到server配置文件的AlertScriptsPath行,进入告警脚本存放目录,将上面的脚本存放在该目录 。登陆zabbix web界面,增加告警媒介,如下:
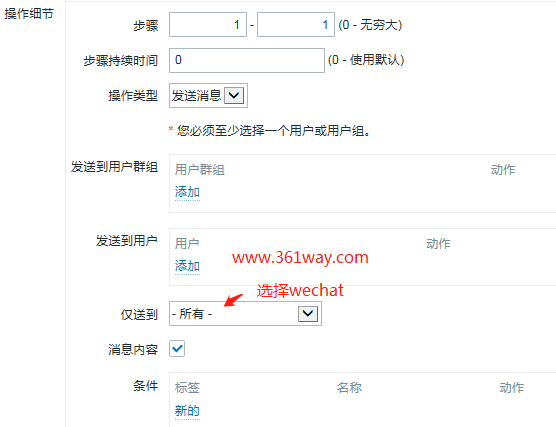
在配置—action里在操作,如下:
用户和组选择目前帐户里存在的。如果不存在,新增就OK了。
捐赠本站(Donate)
 如您感觉文章有用,可扫码捐赠本站!(If the article useful, you can scan the QR code to donate))
- Author: shisekong
- Link: https://blog.361way.com/qywechat-zabbix/6114.html
- License: This work is under a 知识共享署名-非商业性使用-禁止演绎 4.0 国际许可协议. Kindly fulfill the requirements of the aforementioned License when adapting or creating a derivative of this work.


