rhel7 pcs+pacemaker+corosync配置主从高可用
相较于rhel6/centos6 下的HA配置,rhel7下使用pcs 取代了原先的ccs和luci ,本篇就结合pcs+pacemaker+corosyn+httpd做一个简单的HA配置测试 。
一、主机规划
1node1.361way.com : 192.168.122.80
2node1.361way.com : 192.168.122.81
3VIP : 192.168.122.85
二、软件安装与主机配置
1、先关闭selinux和防火墙并进行时间同步(步骤略)
2、设置主机名
1[root@localhost ~]# hostnamectl set-hostname node1.361way.com
另一个节点上用同样的方法配置 。并在/etc/hosts文件内增加如下内容:
1192.168.122.80  node1.361way.com  node1
2192.168.122.81  node2.361way.com  node2
3、安装httpd与pacemaker行装软件
1[root@localhost ~]# yum -y install httpd
2[root@localhost ~]# yum install -y pacemaker pcs fence-agents-all
上面软件安装过程中,会自动安装依赖包corosyn 。
三、pcs配置
1、密码配置及pcs服务启动
软件安装完成后,主机上会自动增加有hacluster用户,修改hacluster用户密码:
1[root@localhost ~]# cat /etc/passwd|grep hacluster
2hacluster:x:189:189:cluster user:/home/hacluster:/sbin/nologin
3[root@node1 ~]# echo "redhat" |passwd --stdin hacluster
4[root@node2 ~]# echo "redhat" |passwd --stdin hacluster
分别在两个节点上启用pcsd服务:
1[root@node1 ~]# systemctl start pcsd.service
2[root@node1 ~]# systemctl status pcsd.service
此处服务不用enable,后面有命令可以直接将三个服务enable掉。
2、HA认证及配置文件生成
认证配置和conf文件生成只需要在一个节点上执行,另一个节点会自动产生该文件:
1[root@node1 ~]# pcs cluster auth node1 node2 -u hacluster -p redhat
2node1: Authorized
3node2: Authorized
4[root@node1 ~]# pcs cluster setup --name mycluster node1 node2
操作完成后,可以查看下corosync.conf文件,如下:
 1[root@node1 ~]# cat /etc/corosync/corosync.conf
 2totem {
 3    version: 2
 4    secauth: off
 5    cluster_name: mycluster
 6    transport: udpu
 7}
 8nodelist {
 9    node {
10        ring0_addr: node1
11        nodeid: 1
12    }
13    node {
14        ring0_addr: node2
15        nodeid: 2
16    }
17}
18quorum {
19    provider: corosync_votequorum
20    two_node: 1
21}
22logging {
23    to_logfile: yes
24    logfile: /var/log/cluster/corosync.log
25    to_syslog: yes
26}
另一个节点查看,同样有该文件存在。
3、pcs集群服务启动
 1[root@node1 ~]# pcs status
 2Error: cluster is not currently running on this node
 3[root@node1 ~]# pcs cluster start --all
 4node2: Starting Cluster...
 5node1: Starting Cluster...
 6[root@node2 ~]# pcs status
 7Cluster name: mycluster
 8WARNING: no stonith devices and stonith-enabled is not false
 9Last updated: Wed Nov  9 08:18:17 2016          Last change: Wed Nov  9 08:17:06 2016 by hacluster via crmd on node1
10Stack: corosync
11Current DC: node1 (version 1.1.13-10.el7-44eb2dd) - partition with quorum
122 nodes and 0 resources configured
13Online: [ node1 node2 ]
14Full list of resources:
15PCSD Status:
16  node1: Online
17  node2: Online
18Daemon Status:
19  corosync: active/disabled
20  pacemaker: active/disabled
21  pcsd: active/enabled
设置开机自启动:
1[root@node1 ~]# pcs cluster enable --all
2node1: Cluster Enabled
3node2: Cluster Enabled
配置完成后,通过pcs status再查看,会发现corosync 、pacemaker两个服务会变成开机自启动 。
4、resource资源配置
resource资源同样只需要在其中一个节点上执行即可:
1[root@node1 ~]# pcs resource create VirtIP IPAddr ip=192.168.122.85 cidr_netmask=24 op monitor interval=30s
2[root@node1 ~]# pcs resource create Httpd apache configfile="/etc/httpd/conf/httpd.conf" op monitor interval=30s
再次查看 pcs状态:
 1[root@node1 ~]# pcs status
 2Cluster name: mycluster
 3WARNING: no stonith devices and stonith-enabled is not false
 4Last updated: Wed Nov  9 08:29:54 2016          Last change: Wed Nov  9 08:29:20 2016 by root via cibadmin on node1
 5Stack: corosync
 6Current DC: node1 (version 1.1.13-10.el7-44eb2dd) - partition with quorum
 72 nodes and 2 resources configured
 8Online: [ node1 node2 ]
 9Full list of resources:
10 VirtIP (ocf::heartbeat:IPaddr):        Stopped
11 Httpd  (ocf::heartbeat:apache):        Stopped
12PCSD Status:
13  node1: Online
14  node2: Online
15Daemon Status:
16  corosync: active/enabled
17  pacemaker: active/enabled
18  pcsd: active/enabled
同样,也可以到2号点执行pcs status查看 。
5、启用resource资源
 1[root@node1 ~]# pcs status resources
 2 VirtIP (ocf::heartbeat:IPaddr):        Stopped
 3 Httpd  (ocf::heartbeat:apache):        Stopped
 4[root@node1 ~]#
 5[root@node1 ~]# pcs constraint colocation add Httpd with VirtIP INFINITY
 6[root@node1 ~]# pcs property set stonith-enabled=false
 7[root@node1 ~]# pcs property set no-quorum-policy=ignore
 8[root@node1 ~]# pcs property set default-resource-stickiness="INFINITY"
 9[root@node1 ~]# pcs status resources
10 VirtIP (ocf::heartbeat:IPaddr):        Started node1
11 Httpd  (ocf::heartbeat:apache):        Started node1
节点2上同样也可以执行pcs status resources进行查看,两边获取的结果是一致的。
分别在两个节点上执行ip a s 确认发现VIP只在其中一个节点上。
四、测试及其他
将其中的主用节点的服务停掉或主机关机,IP停掉,可以发现备用节点可以快速的提供服务 。具体步骤略过。
另外pcsd服务还提供了web管理页面,默认其监听的是ipv6下的2224端口,如果想要使用该服务进行web界面管理,可以分别修改两个节点的/usr/lib/pcsd/ssl.rb文件:
1webrick_options = {
2  :Port               => 2224,
3  #:BindAddress        => '::',
4  :BindAddress        => '0.0.0.0',
5  #:Host               => '::',
6  :Host               => '0.0.0.0',
当前注释的为默认配置,将其修改监听为0.0.0.0 。修改完成后需要重启pscd服务生效。
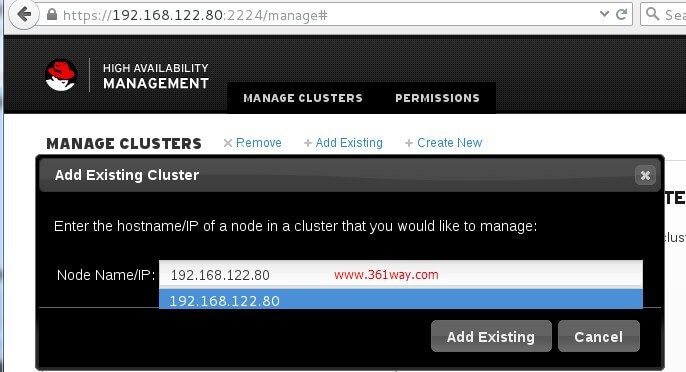
虽然刚刚我们通过命令行的方式配置过两个节点,不过默认web界面上并不会显示 。这里选择增加一个存在的集群,并将节点IP输入后,其会自动识别并可以进行管理。
捐赠本站(Donate)
 如您感觉文章有用,可扫码捐赠本站!(If the article useful, you can scan the QR code to donate))
- Author: shisekong
- Link: https://blog.361way.com/rhel7-pcsd-ha/5260.html
- License: This work is under a 知识共享署名-非商业性使用-禁止演绎 4.0 国际许可协议. Kindly fulfill the requirements of the aforementioned License when adapting or creating a derivative of this work.
