testlink1.9.4的安装及集成(二)
在testlink的安装及集成(一)里,完成了testlink的安装及与openldap的整个。本部分承接上文,完成同jira的整合。最新版本的testlink1.9.4的整合和以往版本的整合方法略有不同,我们不需要去更改配置文件,可以直接在testlink后台管理里完成整合。
四、testlink与jira的整合
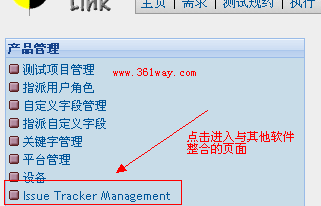
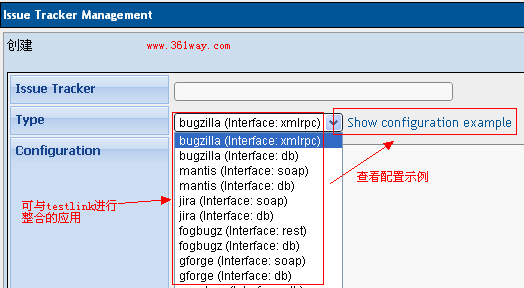
整合步骤如下:点击Issue Tracker Management ——> create(创建) ——>在jira整合类型中选择soap类型。
点击Show configuration example 显示配置示例,按照其配置示例配置。
1<issuetracker>
2<username>testroot</username>
3<password>password</password>
4<uribase>https://blog.361way.com/jira/</uribase>
5<uriwsdl>https://blog.361way.com/jira/rpc/soap/jirasoapservice-v2?wsdl</uriwsdl>
6<uriview>https://blog.361way.com/jira/browse/</uriview>
7<uricreate>https://blog.361way.com/jira/secure/CreateIssue!default.jspa</uricreate>
8</issuetracker>
配置示例如上所示,其中用户名和密码为jira处登录的用户名密码。配置完成后,在测试项目中点选存在的测试项目(或新建)——>找到Issue Tracker Integration找到Issue Tracker项,在其下拉选择中打到刚刚配置的jira集成项,并保存。

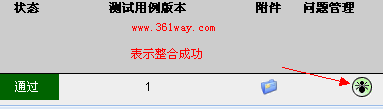
如下图所示,选择完测试产品,并选择扫行测试,选择测试项目,查看是否整合成功

出现下面的小虫子标志,表示整合成功。点击小虫子标子,并输入相应的编号,我们可以将测试bug提交给jira 。
在jira整合配置文件正确的情况下,也可能会整合不成功,其提示可能如下:
1Attention Please:
2Something is preventing connection to Bug Tracking System,
3and is going to create performance issues.
4Please contact your TestLink Administrator
该问题也困扰了我好久,在公司老大的帮忙下,查到了问题原因。jira(soap)整合会调用到php的soap函数库。需要安装php-soap才能通过。直接yum安装可通过yum -y install php-soap安装。同上面和ldap集成部分,最后在/usr/lib64/php/modules里查看是否有soap.so模块生成。通过源码安装的可通过编译时直接加相关参数,也可以在安装好后通动态增加,步骤不再提供。
捐赠本站(Donate)
 如您感觉文章有用,可扫码捐赠本站!(If the article useful, you can scan the QR code to donate))
- Author: shisekong
- Link: https://blog.361way.com/testlink-jira/2032.html
- License: This work is under a 知识共享署名-非商业性使用-禁止演绎 4.0 国际许可协议. Kindly fulfill the requirements of the aforementioned License when adapting or creating a derivative of this work.