华为CCE安装isito实现ASM服务网格
华为云在国内上线的有商业版的服务网格产品ASM(基于isito的商业产品),不过在海外regions没有上线,刚好遇的一个项目需要在华为云CCE上使用服务网格,跟同事简单沟通了下客户需求,就手动安装了一个isito实现服务网格。
一、安装istio
istio的安装配置需要使用到istioctl指令,这里使用官方方法,比较简单:
1curl -L https://istio.io/downloadIstio | sh -
2# 可以通过以下参数指定版本和平台
3curl -L https://istio.io/downloadIstio | ISTIO_VERSION=1.13.3 TARGET_ARCH=x86_64 sh -
上面的步骤是把isito下载到本地目录并解压,需要将istioctl指令放到/usr/local/bin目录,或者配置直接通过环境变量配置实现生效:
1export PATH=$PWD/bin:$PATH
istio profile有几个选择,简单一点可以选择demo方式安装,具体的差别见下表:
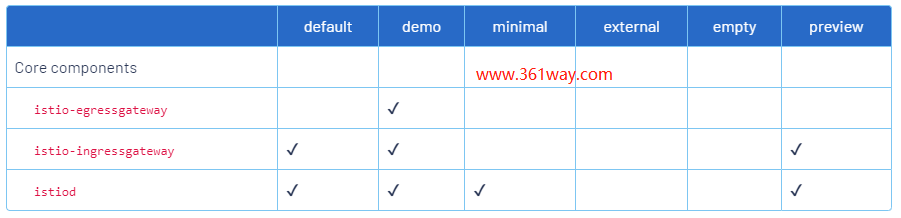
该表的官方链接为:https://istio.io/latest/docs/setup/additional-setup/config-profiles/ 。
出于测试目的,这里选择demo安装,并给default namespace打上相关lable:
1$ istioctl install --set profile=demo -y
2$ kubectl label namespace default istio-injection=enabled
二、安装bookinfo测试应用
bookinfo是istio进行功能测试的一个微服务程序,其在第一步执行的curl目录里已经附带了,如果没有,也可以通过 https://github.com/istio/istio.git 链接拿到。
应用安装:
 1[root@testcce-68506-l3jp4 istio]# kubectl apply -f samples/bookinfo/platform/kube/bookinfo.yaml
 2service/details created
 3serviceaccount/bookinfo-details created
 4deployment.apps/details-v1 created
 5service/ratings created
 6serviceaccount/bookinfo-ratings created
 7deployment.apps/ratings-v1 created
 8service/reviews created
 9serviceaccount/bookinfo-reviews created
10deployment.apps/reviews-v1 created
11deployment.apps/reviews-v2 created
12deployment.apps/reviews-v3 created
13service/productpage created
14serviceaccount/bookinfo-productpage created
15deployment.apps/productpage-v1 created
16
17[root@testcce-68506-l3jp4 istio]# kubectl get services
18NAME          TYPE        CLUSTER-IP       EXTERNAL-IP   PORT(S)          AGE
19details       ClusterIP   10.247.188.112   <none>        9080/TCP         32s
20kubernetes    ClusterIP   10.247.0.1       <none>        443/TCP          7d18h
21productpage   ClusterIP   10.247.129.177   <none>        9080/TCP         32s
22ratings       ClusterIP   10.247.126.86    <none>        9080/TCP         32s
23reviews       ClusterIP   10.247.43.118    <none>        9080/TCP         32s
24
25[root@testcce-68506-l3jp4 istio]# kubectl get pods
26NAME                              READY   STATUS    RESTARTS   AGE
27details-v1-79f774bdb9-xmsw9       2/2     Running   0          3m1s
28productpage-v1-699b85f86b-wdx6r   2/2     Running   0          3m1s
29ratings-v1-b6994bb9-wtwmg         2/2     Running   0          3m
30reviews-v1-6ff96557f5-s7xgw       2/2     Running   0          3m1s
31reviews-v2-7f87f9d489-phvv6       2/2     Running   0          3m1s
32reviews-v3-7f59677cc9-gff95       2/2     Running   0          3m1s
33</none></none></none></none></none>
安装完成后,可以通过容器内部地址访问,命令如下:
1[root@testcce-68506-l3jp4 istio]# kubectl exec "$(kubectl get pod -l app=ratings -o jsonpath='{.items[0].metadata.name}')" -c ratings -- curl -sS productpage:9080/productpage | grep -o "<title>.*</title>"
2<title>Simple Bookstore App</title>
三、外部访问配置
外部访问需要使用到 Istio Ingress Gateway,这个可以通过如下指令进行安装:
1[root@testcce-68506-l3jp4 istio]# kubectl apply -f samples/bookinfo/networking/bookinfo-gateway.yaml
2gateway.networking.istio.io/bookinfo-gateway created
3virtualservice.networking.istio.io/bookinfo created
4
5# 以下指令确认没有报错
6[root@testcce-68506-l3jp4 istio]# istioctl analyze
7
8✔ No validation issues found when analyzing namespace: default.
这个时候在华为CCE上查看会发现还会有问题,因为对应的ELB地址会一直获取不到,如下:
1[root@testcce-68506-l3jp4 istio]# kubectl get svc istio-ingressgateway -n istio-system
2NAME                   TYPE           CLUSTER-IP      EXTERNAL-IP   PORT(S)                                                                      AGE
3istio-ingressgateway   LoadBalancer   10.247.224.23   <pending>     15021:30371/TCP,80:31414/TCP,443:32343/TCP,31400:31843/TCP,15443:32645/TCP   71m
4</pending>
会发现其状态一直是pending状态,其实这个问题,官方已经在相关文档中做了说明:
If the EXTERNAL-IP value is set, your environment has an external load balancer that you can use for the ingress gateway. If the EXTERNAL-IP value is
(or perpetually ), your environment does not provide an external load balancer for the ingress gateway. In this case, you can access the gateway using the service’s node port.
上面是告诉我们需要配置一个外部LB地址,如果LoadBalancer不行,可以换为node port 。而华为云CCE是支持ELB配置的,这在isito的文档中也进行了特别的说明:https://istio.io/latest/docs/setup/platform-setup/huaweicloud/

这里我先在华为云上创建了一个ELB,点开最前面的名称(elb-361way)就可以拿到id等详细信息,这部分一会儿我们需要进行替换配置:
1kubectl apply -f -
注意这里需要修改的地方有三部分,除了官方文档标注的ELB的两部分外,还需要修改clusterIP的地址,应用生效后,我们可以再查看下SVC信息:
1[root@testcce-68506-l3jp4 istio]# kubectl get svc istio-ingressgateway -n istio-system
2NAME                   TYPE           CLUSTER-IP      EXTERNAL-IP     PORT(S)                                                                      AGE
3istio-ingressgateway   LoadBalancer   10.247.224.23   110.238.85.11   15021:32484/TCP,80:30294/TCP,443:31301/TCP,31400:30229/TCP,15443:32028/TCP   158m
四、验证确认
这时候我们可以通过内部变量获取访问信息,可以直接在浏览器上访问,也可以在命令行下验证:
 1[root@testcce-68506-l3jp4 istio]# export INGRESS_HOST=$(kubectl -n istio-system get service istio-ingressgateway -o jsonpath='{.status.loadBalancer.ingress[0].ip}')
 2 -n istio-system get service istio-ingressgateway -o jsonpath='{.spec.ports[?(@.name=="http2")].port}')
 3export SECURE_INGRESS_PORT=$(kubectl -n istio-system get service istio-ingressgateway -o jsonpath='{.spec.ports[?(@.name=="https")].port}')
 4[root@testcce-68506-l3jp4 istio]# export INGRESS_PORT=$(kubectl -n istio-system get service istio-ingressgateway -o jsonpath='{.spec.ports[?(@.name=="http2")].port}')
 5[root@testcce-68506-l3jp4 istio]# export SECURE_INGRESS_PORT=$(kubectl -n istio-system get service istio-ingressgateway -o jsonpath='{.spec.ports[?(@.name=="https")].port}')
 6[root@testcce-68506-l3jp4 istio]# export GATEWAY_URL=$INGRESS_HOST:$INGRESS_PORT
 7[root@testcce-68506-l3jp4 istio]# echo "$GATEWAY_URL"
 8110.238.85.11:80
 9[root@testcce-68506-l3jp4 istio]# echo "http://$GATEWAY_URL/productpage"
10http://110.238.85.11:80/productpage
11[root@testcce-68506-l3jp4 istio]# curl "http://$GATEWAY_URL/productpage"
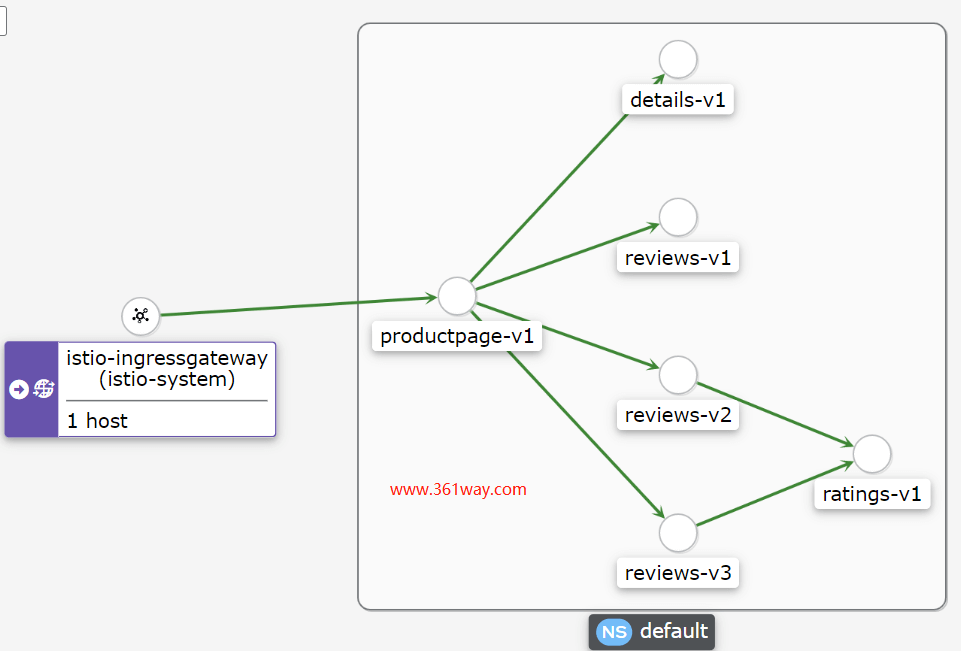
还可以通过Kiali的界面来查看具体的调用链拓扑和访问信息。这里需要先安装下相关配套插件:
 1[root@testcce-68506-l3jp4 istio]# kubectl apply -f samples/addons
 2serviceaccount/grafana created
 3configmap/grafana created
 4service/grafana created
 5deployment.apps/grafana created
 6configmap/istio-grafana-dashboards created
 7configmap/istio-services-grafana-dashboards created
 8deployment.apps/jaeger created
 9service/tracing created
10service/zipkin created
11service/jaeger-collector created
12serviceaccount/kiali created
13configmap/kiali created
14clusterrole.rbac.authorization.k8s.io/kiali-viewer created
15clusterrole.rbac.authorization.k8s.io/kiali created
16clusterrolebinding.rbac.authorization.k8s.io/kiali created
17role.rbac.authorization.k8s.io/kiali-controlplane created
18rolebinding.rbac.authorization.k8s.io/kiali-controlplane created
19service/kiali created
20deployment.apps/kiali created
21serviceaccount/prometheus created
22configmap/prometheus created
23Warning: kubectl apply should be used on resource created by either kubectl create --save-config or kubectl apply
24clusterrole.rbac.authorization.k8s.io/prometheus configured
25Warning: kubectl apply should be used on resource created by either kubectl create --save-config or kubectl apply
26clusterrolebinding.rbac.authorization.k8s.io/prometheus configured
27service/prometheus created
28deployment.apps/prometheus created
29[root@testcce-68506-l3jp4 istio]# kubectl rollout status deployment/kiali -n istio-system
30Waiting for deployment "kiali" rollout to finish: 0 of 1 updated replicas are available...
31deployment "kiali" successfully rolled out
安装完成后,将 kiali 服务的管理界面暴漏出去:
1[root@testcce-68506-l3jp4 ~]# istioctl dashboard kiali --address 0.0.0.0
2http://0.0.0.0:20001/kiali
3Failed to open browser; open http://0.0.0.0:20001/kiali in your browser.
因为需求公网访问,我这里把监听地址改成了0.0.0.0,这里需要注意下,需要在云SG安全策略里开下20001端口的访问,这里需要注意下,这里监听的地址不是ELB的地址,是node节点的公网或私网地址。
通过如下命令进行压测:
1for i in $(seq 1 10000); do curl -s -o /dev/null "http://$GATEWAY_URL/productpage"; done
这里通过graph查看下几个图,这里看下workload图,如下:
如果需要查看进一步测试istio的功能,可以查看 https://istio.io/latest/docs/setup/getting-started/#next-steps 链接里的demo示例,可以对应的测试功能如下:
- Request routing
- Fault injection
- Traffic shifting
- Querying metrics
- Visualizing metrics
- Accessing external services
- Visualizing your mesh
五、删除
清理战场的命令如下:
1kubectl delete -f samples/addons
2istioctl manifest generate --set profile=demo | kubectl delete --ignore-not-found=true -f -
3istioctl tag remove default
4kubectl delete namespace istio-system
5kubectl label namespace default istio-injection-
捐赠本站(Donate)
 如您感觉文章有用,可扫码捐赠本站!(If the article useful, you can scan the QR code to donate))
- Author: shisekong
- Link: https://blog.361way.com/huaweicloud-cce-isito/6705.html
- License: This work is under a 知识共享署名-非商业性使用-禁止演绎 4.0 国际许可协议. Kindly fulfill the requirements of the aforementioned License when adapting or creating a derivative of this work.