k8s StatefulSet启用Redis Cluster搭建
一、安装和配置Redis
1、无数据持久化的redis
这里先根据启用一个最简单的 Redis 服务:
 1apiVersion: apps/v1
 2kind: StatefulSet
 3metadata:
 4  name: redis
 5spec:
 6  selector:
 7    matchLabels:
 8      app: redis
 9  serviceName: redis
10  replicas: 3
11  template:
12    metadata:
13      labels:
14        app: redis
15    spec:
16      containers:
17      - name: redis
18        image: redis:latest
19        ports:
20        - containerPort: 6379
21        volumeMounts:
22        - name: data
23          mountPath: /data
24  volumeClaimTemplates:
25    - metadata:
26        name: data
27      spec:
28        accessModes: ['ReadWriteOnce']
29        storageClassName: "csi-disk"
30        resources:
31          requests:
32            storage: 1Gi
启动登录后,会发现在/data 目录下没有数据,因为默认情况下redis是不进行数据持久化的,其只保留内存数据。
2、启用数据持久化
需要启用数据持久化也比较简单,增加一个command配置,在启动时使用相关参数就行了:
1containers:
2- name: redis
3  image: redis:latest
4  command:
5  - redis-server
6  - --save 60 1
7  ports:
8  - containerPort: 6379
这里的 --save 60 1 指定在多长时间内,有多少次更新操作,就将数据同步到数据文件,这里指60秒内有1次更新操作就写文件,这里是支持可以多个条件配合的,比如:
1save 900 1
2save 300 10
3save 60 10000
分别表示 900 秒(15 分钟)内有 1 个更改,300 秒(5 分钟)内有 10 个更改以及 60 秒内有 10000 个更改就更新数据文件。
1# 更新配置文件
2
3[root@testcce-92497 redis]# kubectl apply -f redis-save.yaml
4statefulset.apps/redis configured
5[root@testcce-92497 redis]# kubectl get  pods
6NAME      READY   STATUS              RESTARTS   AGE
7redis-0   1/1     Running             0          4m56s
8redis-1   1/1     Running             0          4m51s
9redis-2   0/1     ContainerCreating   0          3s
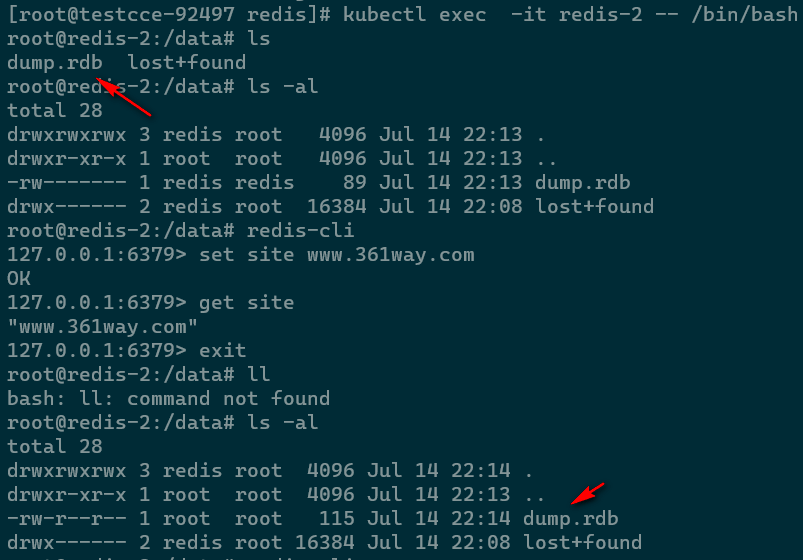
上图中我们看到的 dump.rdb 文件就是导出的数据文件。
3、使用 redis.conf 配置文件
如果自定义配置改动比较多,使用command命令不停的加参数显然不是一个好的选择,显然需要通过一个配置文件承载相关配置,直接使用 docker 容器比较简单,直接指定一个本地文件就可以了:
1docker run -v /myredis/conf:/usr/local/etc/redis --name myredis redis redis-server /usr/local/etc/redis/redis.conf
在 k8s 里实际操作也差不多,只不过需要通过configmap的方式存配置文件,再通过 volume 卷的方式挂载到容器里。
1[root@testcce-92497 redis]# vim redis.conf
2[root@testcce-92497 redis]# kubectl create configmap example-redis-config --from-file=redis-conf
3configmap/example-redis-config created
4[root@testcce-92497 redis]# kubectl get configmaps example-redis-config -o yaml
配置文件的挂载方式可以参看 k8s 官方文档,使用如下yaml挂载:
 1apiVersion: apps/v1
 2kind: StatefulSet
 3metadata:
 4  name: redis
 5spec:
 6  selector:
 7    matchLabels:
 8      app: redis
 9  serviceName: redis
10  replicas: 3
11  template:
12    metadata:
13      labels:
14        app: redis
15    spec:
16      containers:
17      - name: redis
18        image: redis:latest
19        command:
20        - redis-server
21        - "/redis-master/redis.conf"
22        ports:
23        - containerPort: 6379
24        volumeMounts:
25        - name: data
26          mountPath: /data
27        - name: config
28          mountPath: /redis-master
29      volumes:
30        - name: config
31          configMap:
32            name: example-redis-config
33            items:
34            - key: redis-conf
35              path: redis.conf
36
37  volumeClaimTemplates:
38    - metadata:
39        name: data
40      spec:
41        accessModes: ['ReadWriteOnce']
42        storageClassName: "csi-disk"
43        resources:
44          requests:
45            storage: 1Gi
注意,这里使用的 key: redis-conf 要和 kubectl get configmap example-redis-config -o yaml 里查到的 data 下的值保持一致,不然会找不到相应的 configmap 内容,会报错 MountVolume.SetUp failed for volume "config" : configmap references non-existent config key: redis.config 。
正确执行的话,可以在挂载的目录看到相应的配置文件:
1[root@testcce-92497 ~]# kubectl exec -it redis-2 -- /bin/bash
2root@redis-2:/data# ls /redis-master/
3redis.conf
二、安装配置redis cluster
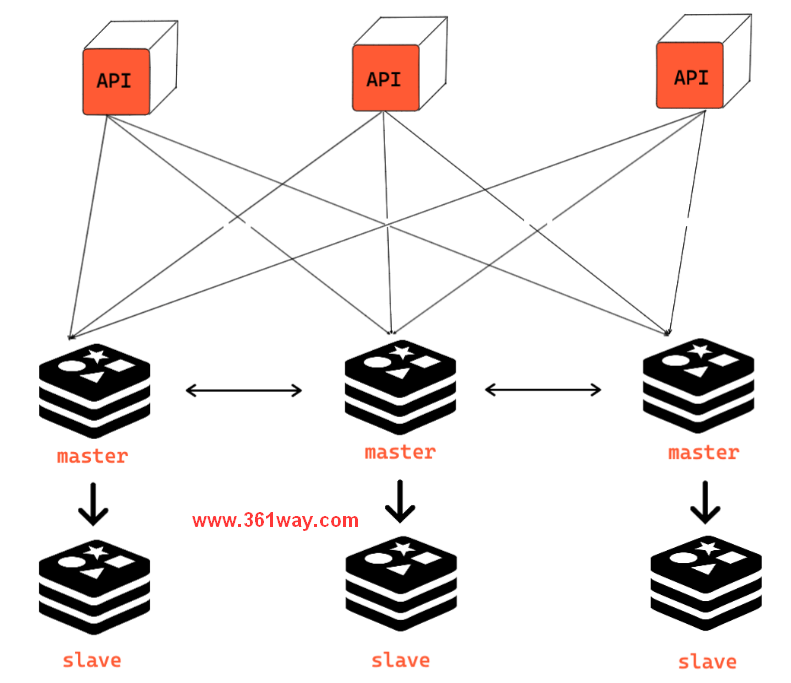
redis 有两种高可用模式:Redis Cluster 和 Redis Sentinel , 本篇幅重点是讲 Cluster 模式,其架构图如下所示,需要 6 个节点完成一个集群配置。

1、configmap配置
 1apiVersion: v1
 2kind: ConfigMap
 3metadata:
 4  name: redis-cluster
 5  namespace: redis
 6data:
 7  update-node.sh: |
 8    #!/bin/sh
 9    REDIS_NODES="/data/nodes.conf"
10    sed -i -e "/myself/ s/[0-9]\{1,3\}\.[0-9]\{1,3\}\.[0-9]\{1,3\}\.[0-9]\{1,3\}/${POD_IP}/" ${REDIS_NODES}
11    exec "$@"
12  redis.conf: |+
13    cluster-enabled yes
14    cluster-require-full-coverage no
15    cluster-node-timeout 15000
16    cluster-config-file /data/nodes.conf
17    cluster-migration-barrier 1
18    appendonly yes
19    protected-mode no
2、StatefulSet实例配置
 1apiVersion: apps/v1
 2kind: StatefulSet
 3metadata:
 4  name: redis-cluster
 5  namespace: redis
 6spec:
 7  serviceName: redis-cluster
 8  replicas: 6
 9  selector:
10    matchLabels:
11      app: redis-cluster
12  template:
13    metadata:
14      labels:
15        app: redis-cluster
16    spec:
17      containers:
18      - name: redis
19        image: redis:alpine
20        ports:
21        - containerPort: 6379
22          name: client
23        - containerPort: 16379
24          name: gossip
25        command: ["/conf/update-node.sh", "redis-server", "/conf/redis.conf"]
26        env:
27        - name: POD_IP
28          valueFrom:
29            fieldRef:
30              fieldPath: status.podIP
31        volumeMounts:
32        - name: conf
33          mountPath: /conf
34          readOnly: false
35        - name: data
36          mountPath: /data
37          readOnly: false
38      volumes:
39      - name: conf
40        configMap:
41          name: redis-cluster
42          defaultMode: 0755
43  volumeClaimTemplates:
44  - metadata:
45      name: data
46    spec:
47      storageClassName: csi-disk
48      accessModes: [ "ReadWriteOnce" ]
49      resources:
50        requests:
51          storage: 1Gi
3、service配置
 1apiVersion: v1
 2kind: Service
 3metadata:
 4  name: redis-cluster
 5  namespace: redis
 6spec:
 7  type: ClusterIP
 8  ports:
 9  - port: 6379
10    targetPort: 6379
11    name: client
12  - port: 16379
13    targetPort: 16379
14    name: gossip
15  selector:
16    app: redis-cluster
4、使用kubectl指令配置生效
执行前需要注意,这里使用的都是redis这个namespace,所以需要先通过kubectl create ns redis创建对应的命名空间。
1kubectl create -f redis-config-map.yaml
2kubectl create -f redis-sts.yaml
3kubectl create -f redis-service.yaml
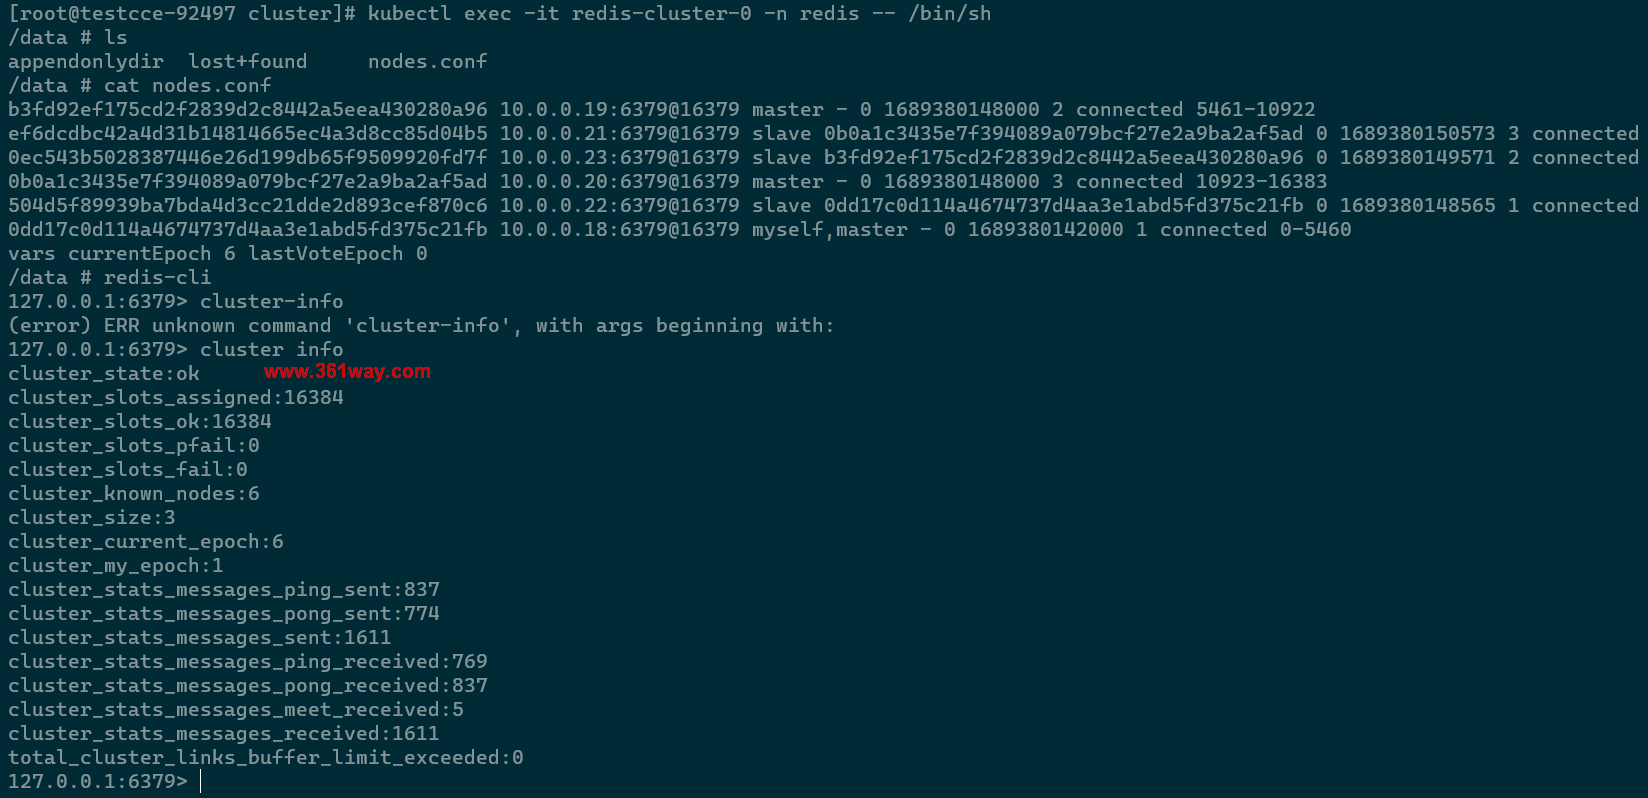
这时候还没完成集群激活操作,可以使用如下脚本执行完成集群激活操作:
1#!/bin/bash
2# Find ClusterIPs of Redis nodes
3export REDIS_NODES=$(kubectl get pods  -l app=redis-cluster -n redis -o json | jq -r '.items | map(.status.podIP) | join(":6379 ")'):6379
4# Activate the Redis cluster
5kubectl exec -it redis-cluster-0 -n redis -- redis-cli --cluster create --cluster-replicas 1 ${REDIS_NODES}
6# Check if all went well
7for x in $(seq 0 5); do echo "redis-cluster-$x"; kubectl exec redis-cluster-$x -n redis -- redis-cli role; echo; done
注意,该脚本运行需要依赖 jq 指令,需要提前完成安装 。
捐赠本站(Donate)
 如您感觉文章有用,可扫码捐赠本站!(If the article useful, you can scan the QR code to donate))
- Author: shisekong
- Link: https://blog.361way.com/k8s-redis-cluster/8579.html
- License: This work is under a 知识共享署名-非商业性使用-禁止演绎 4.0 国际许可协议. Kindly fulfill the requirements of the aforementioned License when adapting or creating a derivative of this work.

