letsencrypt免费SSL安全证书申请
Let’s Encrypt是国外一个公共的免费SSL项目,由 Linux 基金会托管,它的来头不小,由Mozilla、思科、Akamai、IdenTrust和EFF等组织发起,目的就是向网站自动签发和管理免费证书,以便加速互联网由HTTP过渡到HTTPS,目前Facebook等大公司开始加入赞助行列。其自动化发行证书,但是证书只有90天的有效期。适合个人使用或者临时使用,不用再忍受自签发证书不受浏览器信赖的提示。
一、certbot工具安装
其证书申请比较简单,无需在其网站进行注册,而且其提供了自动化的申请工具certbot 。这里以nginx/centos7为例(其他版本在certbot站点上也可以选择),在操作前需要配置epel 源 。配置完成后按如下命令进行安装:
1$ yum -y install yum-utils
2$ yum-config-manager --enable rhui-REGION-rhel-server-extras rhui-REGION-rhel-server-optional
3$ yum install python-certbot-nginx
不过按上面的命令进行安装的时候会遇到问题,因为默认yum源里的pyOpenSSL版本是0.13.1,而certbot要求的pyOpenSSL最低版本是0.14。所以这里采用的是区线救国的方法,使用pip工具进行安装:
1$ pip install certbot
二、生成证书
证书生成命令如下:
1certbot certonly --webroot -w /usr/share/nginx/html/ -d your.domain.com
这里使用的webroot模式,这里我不想使用CertBot的standalone模式,这个模式虽然可以配置好服务器,但是以后Renew的时候,需要让服务停止一下,再启动。因此抛弃这个模式,我们使用Webroot配置模式。因为,CertBot在验证服务器域名的时候,会生成一个随机文件,然后CertBot的服务器会通过HTTP访问你的这个文件,因此要确保你的Nginx配置好,以便可以访问到这个文件。
在使用上面的命令生成的时候,可能会遇到一系统的错误,这里给下解决方法。
错误1:403错误
Let’s Encrypt的验证机制是会生成一个临时文件,放到我们站点的对应目录,并通过http进行访问,确认该域名确认是该站点的。访问成功后,会生成相应的证书文件。由于我的站点在配置时,使用了如下一条策略:
1location ~ /\. {
2        deny all;
3}
Let’s Encrypt生成的目录刚好是一个隐藏目录.well-known/acme-challenge ,所以会造成http访问的时候出现403错误。解决方法如下:
1# 在deny all策略上面加上如下策略:
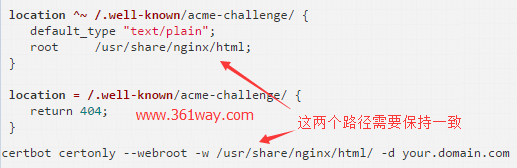
2location ^~ /.well-known/acme-challenge/ {
3 default_type "text/plain";
4 root /usr/share/nginx/html;
5}
6location = /.well-known/acme-challenge/ {
7 return 404;
8}
注意:上面的root,我们让他指向了/usr/share/nginx/html目录,而不是我站点的root路径下,是由于其验证时只是临时使用的一个目录,使有完成后,还会将该目录下的内容清空。所以这里我选择了一个临时目录进行保存。
错误2:404错误
刚开始根据我的理解,certbot 的-w参数是指定的证书生成的路径和nginx里的配置路径不一定一致,结果发现这个理解是错误的。在使用certbot生成时,会提示404的相关错误。解决方法如下:
上面的问题解决后,生成成功的时候,会给出如下提示:
 1IMPORTANT NOTES:
 2 - Congratulations! Your certificate and chain have been saved at
 3   /etc/letsencrypt/live/your.domain.com/fullchain.pem. Your cert
 4   will expire on 20XX-XX-XX. To obtain a new or tweaked version of
 5   this certificate in the future, simply run certbot again. To
 6   non-interactively renew *all* of your certificates, run "certbot
 7   renew"
 8 - If you like Certbot, please consider supporting our work by:
 9   Donating to ISRG / Let's Encrypt:   https://letsencrypt.org/donate
10   Donating to EFF:                    https://eff.org/donate-le
证书生成其他:
1单域名生成证书:
2certbot certonly --email [email protected] --agree-tos --no-eff-email --webroot -w /usr/share/nginx/html -d www.361way.com
3多域名单目录生成单证书:(即一个网站多个域名使用同一个证书)
4certbot certonly --email [email protected] --agree-tos --no-eff-email --webroot -w /usr/share/nginx/html -d www.361way.com -d dh.361way.com
5多域名多目录生成一个证书:(即一次生成多个域名的一个证书)
6certbot certonly --email [email protected] --agree-tos --no-eff-email --webroot -w /usr/share/nginx/html -d www.361way.com -d dh.361way.com -w /home/wwwroot/books.361way.com -d book.361way.com -d 361way.com
三、nginx SSL配置
 1server {
 2        listen 443 ssl;
 3        server_name    dh.361way.com;
 4        #listen [::]:443 ssl ipv6only=on;
 5        ssl_certificate /etc/letsencrypt/live/dh.361way.com/fullchain.pem;
 6        ssl_certificate_key /etc/letsencrypt/live/dh.361way.com/privkey.pem;
 7        ssl_trusted_certificate /etc/letsencrypt/live/dh.361way.com/chain.pem;
 8        root /data1/dh;
 9        index index.html index.htm;
10        include restrictions.conf;
11}
默认生成后ssl 证书生成的位置是/etc/letsencrypt/live/yourdomain.com ,不建议修改这个证书生成的位置,因为默认这个证书只有90天的有效期,后面还会涉及自动更新证书的操作。所以该位置最好保持默认。
四、自动更新
通过crontab可以自动更新证书,具体操作如下:
130 2 1 * * /usr/bin/certbot renew >> /var/log/le-renew.log
这样每月1号的凌晨2:30会自动更新证书。
捐赠本站(Donate)
 如您感觉文章有用,可扫码捐赠本站!(If the article useful, you can scan the QR code to donate))
- Author: shisekong
- Link: https://blog.361way.com/letsencrypt/5486.html
- License: This work is under a 知识共享署名-非商业性使用-禁止演绎 4.0 国际许可协议. Kindly fulfill the requirements of the aforementioned License when adapting or creating a derivative of this work.