CL280 openshift搭建与使用
本篇所在总结的内容本来是一个过时的东西,不过由于当下红帽考试仍使用的这个旧的版本,这里还是简单总结下openshift2.x的配置和使用。openshift是红帽的paas 应用,想要和cloudfoundry之类的paas类产品竞争,不过从当前市场占用份额上来看,cloudfoundry处于行业主宰者,龙头地位。openshit2.x是基于红帽自己搞的gear技术---可以看做是类似沙箱的一种技术,和docker一样也是基于lxc基础上做的封装。当前openshitf3.x 版本较openshitf2.x 做了几乎完全的改变。openshit3.x是基于docker和k8s的,后面有时间会单独拉出来一些章节对openshit3.x做介绍。本篇对理论不做过多的讲解,还是从实战出发。
一、主机规划
broker.domain1.example.com: 172.25.6.10
node1.domain1.example.com: 172.25.6.11
dev.domain1.example.com: 172.25.6.12
不过由于我实验环境是和openshit 课程环境一致的,只有两台主机,这里会让a主机做broker,同时又做dev主机名,b主机做node主机。
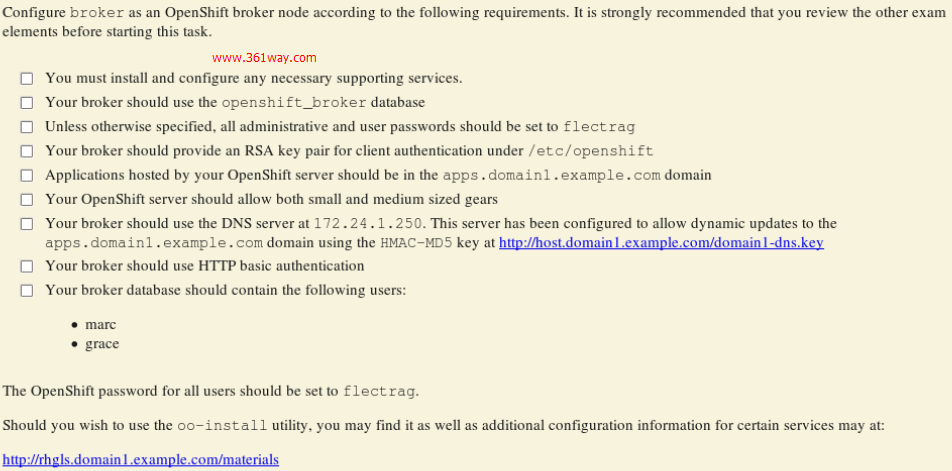
二、broker节点配置与安装
  1[root@server6-a ~]# ssh-keygen
  2[root@server6-a ~]# ssh-copy-id root@server6-a
  3[root@server6-a ~]# ssh-copy-id root@server6-b
  4[root@server6-a ~]# mkdir oo-install
  5[root@server6-a ~]# cd  oo-install/
  6[root@server6-aoo-install]#wget http://classroom.example.com/materials/ex280/oo-install-ose.tgz
  7[root@server6-a oo-install]# gunzip oo-install-ose.tgz
  8[root@server6-a oo-install]# tar xvf oo-install-ose.tar
  9[root@server6-a oo-install]# yum install ruby –y
 10[root@server6-a oo-install]# ./oo-install-ose
 11Select from the following installation scenarios.
 12You can also type '?' for Help or 'q' to Quit:
 131. Install OpenShift Enterprise
 142. Add a Node to OpenShift Enterprise
 15Type a selection and press <return>: 1
 16First things first: do you already have a running Broker? (y/n/q) n
 17What domain do you want to use for applications that are hosted by
 18this OpenShift deployment? |example.com| apps6.example.com
 19Do you want to register DNS entries for your OpenShift hosts with the
 20same OpenShift DNS service that will be managing DNS records for the
 21hosted applications? (y/n/q) n
 22Hostname (the FQDN that other OpenShift hosts will use to connect to
 23the host that you are describing): server6-a.example.com
 24Hostname / IP address for SSH access to server6-a.example.com from the
 25host where you are running oo-install. You can say 'localhost' if you
 26are running oo-install from the system that you are describing:
 27|server6-a.example.com|
 28Username for SSH access to server6-a.example.com: |root|
 29Detected multiple network interfaces for this host:
 30* 172.25.6.10 on interface eth0
 31* 172.25.106.10 on interface eth1
 32Do you want Nodes to use one of these IP addresses to reach this
 33Broker? (y/n/q/?) y
 34The following network interfaces were found on this host. Choose the
 35one that it uses for communication on the local subnet.:
 361. 172.25.6.10 on interface eth0
 372. 172.25.106.10 on interface eth1
 38Type a selection and press <return>: 1
 39If that will work in your deployment, press <enter> to accept the
 40default value. Otherwise, provide an alternate IP address that will
 41enable other OpenShift components to reach the BIND DNS service on the
 42Broker: |172.25.6.10|
 43Valid Gear Sizes for this deployment: |small|
 44Default Gear Capabilties for new users: |small|
 45Default Gear Size for new applications: |small|
 46Do you want to specify usernames and passwords for services configured
 47on this host? Otherwise default usernames and randomized passwords
 48will be configured. (y/n/q) n
 49That's everything we need to know right now for the Broker. Moving on
 50to the next role.
 51----------------------------------------------------------------------
 52Node Configuration
 53----------------------------------------------------------------------
 54Do you already have a running Node? (y/n/q) n
 55Do you want to assign the Node role to server6-a.example.com?
 56(y/n/q/?) n <span style="color:#E53333;">--->如果想要让broker节点也同时是node节点,这里可以选择yes</span> Okay, please provide information about the Node host.
 57Hostname (the FQDN that other OpenShift hosts will use to connect to
 58the host that you are describing): server6-b.example.com
 59Hostname / IP address for SSH access to server6-b.example.com from the
 60host where you are running oo-install. You can say 'localhost' if you
 61are running oo-install from the system that you are describing:
 62|server6-b.example.com|
 63Username for SSH access to server6-b.example.com: |root|
 64Detected multiple network interfaces for this host:
 65* 172.25.6.11 on interface eth0
 66* 172.25.106.11 on interface eth1
 67Do you want to use one of these as the public IP information for this
 68Node? (y/n/q/?) y
 69The following network interfaces were found on this host. Choose the
 70one that it uses for communication on the local subnet.:
 711. 172.25.6.11 on interface eth0
 722. 172.25.106.11 on interface eth1
 73Type a selection and press <return>: 1
 74A gear profile, or gear size, specifies the parameters of the gears
 75provided by a node host. Note, this only sets the name of the profile.
 76For more information about gear profiles see:
 77https://access.redhat.com/site/documentation/en-US/OpenShift_Enterpris
 78e/2/html/Deployment_Guide/sect-Gear_Profiles_Sizes.html
 79Known Profiles: small
 80Gear profile for this host: |small|
 81Known Districts:
 82District this host should belong to: |default-small| <span style="color:#E53333;">small_district  ---></span> Do you want to specify usernames and passwords for services configured
 83on this host? Otherwise default usernames and randomized passwords
 84will be configured. (y/n/q) n
 85Note: ActiveMQ, MongoDB and named will all be installed on the Broker.
 86For more flexibility, rerun the installer in advanced mode (-a).
 87DNS Settings
 88  * App Domain: apps6.example.com
 89  * Register OpenShift components with OpenShift DNS? No
 90Role Assignments
 91+--------+-----------------------+
 92| Broker | server6-a.example.com |
 93| Node   | server6-b.example.com |
 94+--------+-----------------------+
 95Host Information
 96+---------------------------+--------------------------------------+
 97| Host                      | server6-a.example.com                |
 98| Roles                     | Broker                               |
 99| SSH Host                  | server6-a.example.com                |
100| User                      | root                                 |
101| IP Addr                   | 172.25.6.10                          |
102| BIND DNS Addr             | 172.25.6.10                          |
103| Install Status            | new                                  |
104| Valid Gear Sizes          | small                                |
105| Default Gear Capabilities | small                                |
106| Default Gear Size         | small                                |
107| District Mappings         | small_district:server6-b.example.com |
108| MCollective User          | mcollective                          |
109| MCollective Password      | Q1EjZrJToYPVwz5IgUO0JA               |
110| MongoDB Broker User       | openshift                            |
111| MongoDB Broker Password   | yA7Yu1uWdtk5ZYrwY5fWA                |
112| OpenShift User            | demo                                 |
113| OpenShift Password        | VrgnRcuYUxRYhVe7Qmrwww               |
114+---------------------------+--------------------------------------+
115+----------------------+------------------------+
116| Host                 | server6-b.example.com  |
117| Roles                | Node                   |
118| SSH Host             | server6-b.example.com  |
119| User                 | root                   |
120| IP Addr              | 172.25.6.11            |
121| IP Interface         | eth0                   |
122| Install Status       | new                    |
123| Node Profile         | small                  |
124| District             | small_district         |
125| MCollective User     | mcollective            |
126| MCollective Password | Q1EjZrJToYPVwz5IgUO0JA |
127+----------------------+------------------------+
128Do you want to change the deployment info? (y/n/q/?) y
129Choose from the following deployment configuration options:
1301. Change the DNS configuration
1312. Move an OpenShift role to a different host
1323. Modify the information for an existing host
1334. Add another Node host
1345. Finish editing the deployment configuration
135Type a selection and press <return>: 5
136Here is the subscription configuration that the installer will use for
137this deployment.
138+---------+-------+
139| Setting | Value |
140+---------+-------+
141| type    | none  |
142+---------+-------+
143Do you want to make any changes to the subscription info in the
144configuration file? (y/n/q/?) n
145Do you want to set any temporary subscription settings for this
146installation only? (y/n/q/?) n
接下来会有10-20分钟左右的等待,完装完成后,按上面的提示---网内有其他主机充当DNS主机,所以这里将broker主机上的DNS停用掉,并将加密方式改为MD5。

1[root@server6-a oo-install]# service named stop
2[root@server6-a oo-install]# chkconfig named off
3[root@server6-a oo-install]# vi /etc/openshift/ plugins.d/ openshift-origin-dns-nsupdate.conf
4修改DNS及MD5,修改内容参见上图
5[root@server6-a oo-install]#/etc/init.d/openshift-broker restart
6[root@server6-a plugins.d]# htpasswd -b /etc/openshift/htpasswd marc flectrag
7Adding password for user marc
8[root@server6-a plugins.d]# htpasswd -b /etc/openshift/htpasswd grace flectrag
9Adding password for user grace
三、配置命令行开发访问

本部操作理论上来讲是在开者主机上配置的,也就是上面所提到的dev主机。这里的操作需要用到rhc命令,该命令可以通过yum -y install rhc安装。该命令类似于appfog平台下的af命令,cloudfoundry下的cf命令。
 1[root@server6-a ~]# useradd marc
 2[root@server6-a ~]# useradd grace
 3[root@server6-a ~]# su – marc
 4[marc@server6-a ~]$ rhc setup
 5If you have your own OpenShift server, you can specify it now. Just hit enter to use: server6-a.example.com.
 6Enter the server hostname: |server6-a.example.com|
 7Connect without checking the certificate? (yes|no): y
 8Login to server6-a.example.com: marc
 9Password: ********
10OpenShift can create and store a token on disk which allows to you to access the server without using your password. The key is stored in your home
11directory and should be kept secret.  You can delete the key at any time by running 'rhc logout'.
12Generate a token now? (yes|no) y
13Your public SSH key must be uploaded to the OpenShift server to access code.  Upload now? (yes|no) y
14Please enter a namespace (letters and numbers only) |<none>|: scaled
15Your domain 'scaled' has been successfully created
16[root@server6-a ~]# su - grace
17[grace@server6-a ~]$ rhc setup
18If you have your own OpenShift server, you can specify it now. Just hit enter to use: server6-a.example.com.
19Enter the server hostname: |server6-a.example.com|
20Connect without checking the certificate? (yes|no): yes
21Login to server6-a.example.com: grace
22Password: ********
23OpenShift can create and store a token on disk which allows to you to access the server without using your password. The key is stored in your home
24directory and should be kept secret.  You can delete the key at any time by running 'rhc logout'.
25Generate a token now? (yes|no) yes
26Your public SSH key must be uploaded to the OpenShift server to access code.  Upload now? (yes|no) yes
27Please enter a namespace (letters and numbers only) |<none>|: ex280
28Your domain 'ex280' has been successfully created
注意这里输入的密码,不是系统用户的密码,而是broker安装时通过htpasswd命令生成出的密码。通过与远程broker通信,可以创建基于key认证的开发环境 ,以后只需要通过git上传开发的包,并通过rhc命令启停应用就行了。
四、配置资源限制

 1[root@server6-a ~]# oo-admin-ctl-user -l marc
 2User marc:
 3                            plan:
 4                consumed domains: 1
 5                     max domains: 10
 6                  consumed gears: 0
 7                       max gears: 100
 8    max tracked storage per gear: 0
 9  max untracked storage per gear: 0
10                       max teams: 0
11viewing all global teams allowed: false
12                      gear sizes: small
13            sub accounts allowed: false
14private SSL certificates allowed: false
15              inherit gear sizes: false
16                      HA allowed: false
17[root@server6-a ~]# oo-admin-ctl-user -l marc --setmaxgears 25
18[root@server6-a ~]# oo-admin-ctl-user -l grace --setmaxgears 50
而增加 medium 型的gear类型,是需要在配置文件中启用的。gears类型预设的有small 、medium、larage三种。可以通过下面的方式修改增加。
 1[root@server6-a ~]# vi /etc/openshift/broker.conf
 2# Comma-separated list of valid gear sizes
 3# Eg: "small,medium,large"
 4VALID_GEAR_SIZES="small,medium"
 5# Default gear sizes (comma-separated) allowed to a new user
 6DEFAULT_GEAR_CAPABILITIES="small,medium"
 7[root@server6-a ~]# /etc/init.d/openshift-broker  restart
 8[root@server6-a ~]# oo-admin-ctl-user -l marc --addgearsize medium
 9Adding gear size medium for user marc... Done.
10User marc:
11                            plan:
12                consumed domains: 1
13                     max domains: 10
14                  consumed gears: 0
15                       max gears: 25
16    max tracked storage per gear: 0
17  max untracked storage per gear: 0
18                       max teams: 0
19viewing all global teams allowed: false
20                      gear sizes: small, medium
21            sub accounts allowed: false
22private SSL certificates allowed: false
23              inherit gear sizes: false
24                      HA allowed: false
五、配置districts
districts 是一个逻辑层面的东西,不太好描述,其作用就是出现多个node节点时,在相同的dictricts下,可以保证gear可以在不同的node里迁移,而且保证gear之间有相同的资源限制。
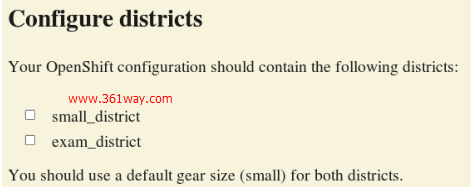
由于在第一步安装broker里,我们已经创建了一个small_district,这里需要在创建一个,创建前后我们可以通过oo-admin-ctl-district 查看,发现在创建后,会多出一个district来。
 1[root@server6-a ~]# oo-admin-ctl-district   --->会输出small_district的信息,这里略过输出
 2[root@server6-a ~]# oo-admin-ctl-district -c create -n exam_district -p small
 3[root@server6-a ~]# oo-admin-ctl-district
 4{"_id"=>"56da4df5d9b5eb6025000001",
 5 "active_servers_size"=>1,
 6 "available_capacity"=>6000,
 7 "available_uids"=>"<6000 uids hidden>",
 8 "created_at"=>2016-03-05 03:09:41 UTC,
 9 "gear_size"=>"small",
10 "max_capacity"=>6000,
11 "max_uid"=>6999,
12 "name"=>"small_district",
13 "platform"=>"Linux",
14 "servers"=>
15  [{"_id"=>"56da4df6d9b5eb6025000002",
16    "active"=>true,
17    "name"=>"server6-b.example.com",
18    "unresponsive"=>false}],
19 "updated_at"=>2016-03-05 03:09:41 UTC,
20 "uuid"=>"56da4df5d9b5eb6025000001"}
21{"_id"=>"56da5670d9b5eb39c6000001",
22 "uuid"=>"56da5670d9b5eb39c6000001",
23 "available_uids"=>"<6000 uids hidden>",
24 "name"=>"exam_district",    --->多出来的exam_district
25 "platform"=>"linux",
26 "gear_size"=>"small",
27 "available_capacity"=>6000,
28 "max_uid"=>6999,
29 "max_capacity"=>6000,
30 "active_servers_size"=>0,
31 "updated_at"=>2016-03-05 03:45:52 UTC,
32 "created_at"=>2016-03-05 03:45:52 UTC}
六、发布一个应用

这里默认虽然没有指定的发布应用使用的类型,不过在后面的要求需要附加属性时会有要求是php-5.3,所以这会创建php-5.3应用---因为默认还有php-5.4的应用可选。
还需注意的是,这个操作本身是开发人员已经有paas帐号了,可以写好代码直接上传平台并展示,所以是在dev主机上进行的操作。
1[grace@server6-a ~]$ rhc app create -a welcomeapp -t php-5.3
2[grace@server6-a ~]$ cd welcomeapp/
3[grace@server6-a welcomeapp]$ echo "<?phpinfo();?>" >welcome.php
4[grace@server6-a welcomeapp]$ ls
5index.php  welcome.php
6[grace@server6-a welcomeapp]$ git add .
7[grace@server6-a welcomeapp]$ git commit -am "add welcome php"
8[grace@server6-a welcomeapp]$ git push
七、配置cartridge
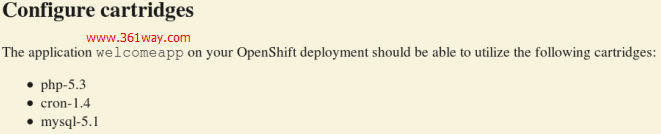
cartidge 就是可以选择的应用类型,这个比较容易理解。
 1[grace@server6-a welcomeapp]$ rhc cartridge list
 2jenkins-1        Jenkins Server           web
 3nodejs-0.10      Node.js 0.10             web
 4perl-5.10        Perl 5.10                web
 5php-5.3          PHP 5.3                  web
 6php-5.4          PHP 5.4                  web
 7python-2.6       Python 2.6               web
 8python-2.7       Python 2.7               web
 9python-3.3       Python 3.3               web
10ruby-1.8         Ruby 1.8                 web
11ruby-1.9         Ruby 1.9                 web
12jbossews-1.0     Tomcat 6 (JBoss EWS 1.0) web
13jbossews-2.0     Tomcat 7 (JBoss EWS 2.0) web
14diy-0.1          Do-It-Yourself 0.1       web
15cron-1.4         Cron 1.4                 addon
16jenkins-client-1 Jenkins Client           addon
17mongodb-2.4      MongoDB 2.4              addon
18mysql-5.1        MySQL 5.1                addon
19mysql-5.5        MySQL 5.5                addon
20postgresql-8.4   PostgreSQL 8.4           addon
21postgresql-9.2   PostgreSQL 9.2           addon
22haproxy-1.4      Web Load Balancer        addon
23[grace@server6-a welcomeapp]$ rhc cartridge add cron-1.4  -a welcomeapp
24Adding cron-1.4 to application 'welcomeapp' ... done
25[grace@server6-a welcomeapp]$ rhc cartridge add mysql-5.1  -a welcomeapp
八、配置一个自增应用
在线应用的一个理想装状是什么?就是可以根据负载量和访问量进行线型的增长。配置这个scale应用就可以实现这个功能,其底层实际上还是基于haproxy实现的。

1[marc@server6-a ~]$ rhc app create scaledapp -t php-5.3 –s
其中-s参数就是scale的含义。
九、配置watchman监控

watchman服务是运行在node节点上的,其会都gear的一些常用指标进行监控,这里假设只需要监控cpu信息,并设置刷新频率,可以通过下面的方法配置。
 1[root@server6-b ~]#/etc/init.d/openshift-watchman status
 2[root@server6-b ~]#vi /etc/openshift/node.conf
 3修改90行至181行,关于watchman的选项都开启,特别需要注意以下两行:
 4WATCHMAN_METRICS_INTERVAL=60
 5CGROUPS_METRICS_KEYS="cpu.stat"
 6[root@server6-b ~]#vi /etc/sysconfig/watchman
 7修改两处
 8GEAR_RETRIER=10
 9SATE_CHANGE_DELAY=60
10[root@server6-b ~]#/etc/init.d/openshift-watchman restart
十、配置自定义的cartidge

1[root@server6-b~]# oo-admin-cartridge --action install --source ex280_cart
2[root@server6-b~]/etc/init.d/ruby193-mcollective restart
3[root@server6-a oo-install]# oo-admin-ctl-cartridge  -c import-node --activate
4[root@server6-a oo-install]# oo-admin-console-cache  --clear
5[root@server6-a oo-install]# oo-admin-ctl-cartridge -c list
这里有三点需要注意:
1、下载下来的.tgz包需要先gunzip,再使用tar xvf解压,使用–source可以指定绝对路径,也可以使用当前目录下的相对路径;
2、需要先在node节点上安装,并且需要重启服务;
3、激活操作是在broker节点上,另外需要特别注意参数,有一个import参数,还有一个 –active参数 ,和上面用的参数是很空间混淆的。
十一、使用自定义cartidge创建应用

 1[root@server6-a oo-install]# su - grace
 2[grace@server6-a ~]$ rhc cartridge list
 3ex280-httpd-0.1  HTTPD Cartridge for EX280 web
 4jenkins-1        Jenkins Server            web
 5nodejs-0.10      Node.js 0.10              web
 6perl-5.10        Perl 5.10                 web
 7php-5.3          PHP 5.3                   web
 8php-5.4          PHP 5.4                   web
 9python-2.6       Python 2.6                web
10python-2.7       Python 2.7                web
11python-3.3       Python 3.3                web
12ruby-1.8         Ruby 1.8                  web
13ruby-1.9         Ruby 1.9                  web
14jbossews-1.0     Tomcat 6 (JBoss EWS 1.0)  web
15jbossews-2.0     Tomcat 7 (JBoss EWS 2.0)  web
16diy-0.1          Do-It-Yourself 0.1        web
17cron-1.4         Cron 1.4                  addon
18jenkins-client-1 Jenkins Client            addon
19mongodb-2.4      MongoDB 2.4               addon
20mysql-5.1        MySQL 5.1                 addon
21mysql-5.5        MySQL 5.5                 addon
22postgresql-8.4   PostgreSQL 8.4            addon
23postgresql-9.2   PostgreSQL 9.2            addon
24haproxy-1.4      Web Load Balancer         addon
25[grace@server6-a ~]$ rhc app create -a customapp -t ex280-httpd-0.1
十二、通过API 获取console数据
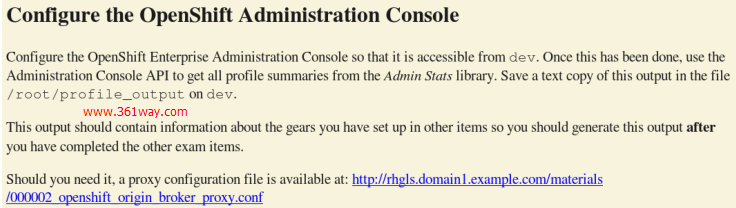
需要注意的是console api 获取的数据默认只能在broker节点上才可以查看。
1[root@server6-a ~]# cd /etc/httpd/conf.d/
2[root@server6-a conf.d]# mv 000002_openshift_origin_broker_proxy.conf 000002_openshift_origin_broker_proxy.conf.bak
3[root@server6-a conf.d]# wget http://classroom.example.com/materials/ex280/000002_openshift_origin_broker_proxy.conf
4[root@server6-a conf.d]# yum install curl
5[root@server6-a conf.d]# curl
6http://localhost:8080/admin-console/capacity/profiles.json |python -m json.tool >profile_output
捐赠本站(Donate)
 如您感觉文章有用,可扫码捐赠本站!(If the article useful, you can scan the QR code to donate))
- Author: shisekong
- Link: https://blog.361way.com/rh280-openshift/5048.html
- License: This work is under a 知识共享署名-非商业性使用-禁止演绎 4.0 国际许可协议. Kindly fulfill the requirements of the aforementioned License when adapting or creating a derivative of this work.