华为云日志如何集成到splunk cloud(二)实现篇
在 《API调用实现华为云OBS对象的调用》篇里我已经完成了主要逻辑代码的验证,所以本篇就结合FunctionGraph、CTS、LTS一起完成相关代码内容的编写和配置。
一、CTS tracker配置
通过点击operation下的configure配置对应的lts日志流以及存储所在的OBS桶信息。
配置完成后就可以在lts界面通过各种条件检索日志了,比如下面截图的这条就是ECS远程登录操作的记录。
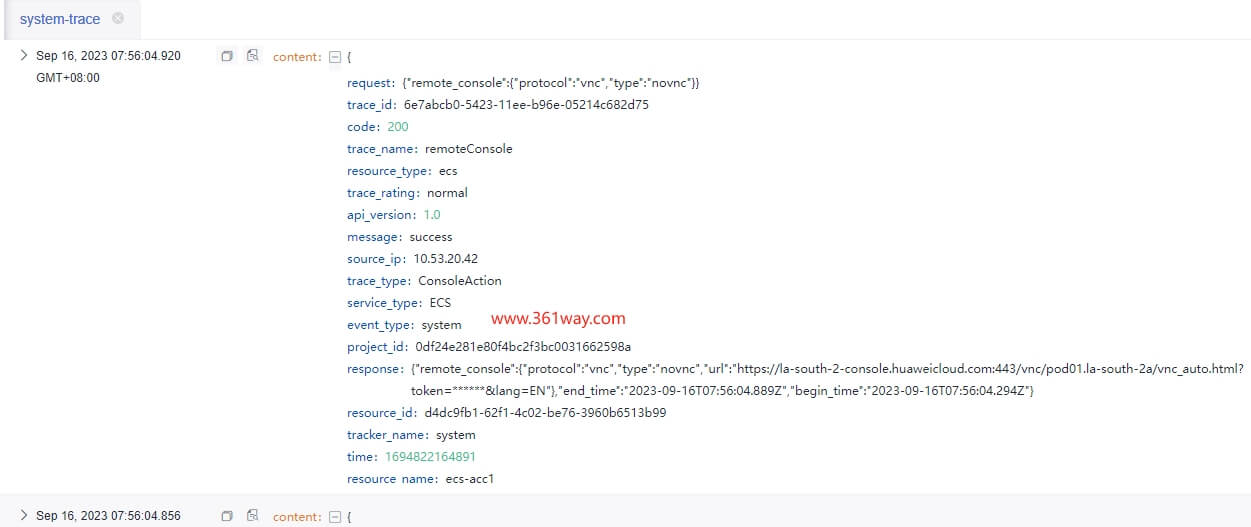
同样也可以到OBS目录去查看对应的对象结构,其是以年/月/日/服务 的结构存储相关日志。
二、FunctionGraph配置
创建一个FG函数,对应的代码如下:
  1# -*- coding:utf-8 -*-
  2import json,gzip,requests,uuid,os
  3import sys
  4import hashlib
  5import hmac
  6import binascii
  7#from datetime import datetime,timedelta,fromtimestamp
  8import datetime
  9import urllib.request
 10import urllib.parse
 11
 12def handler(event, context):
 13    #print(event)
 14    #token = context.getToken()
 15    #ak = context.getAccessKey()
 16    #sk = context.getSecretKey()
 17    ak = 'myak'
 18    sk = 'mysk'
 19
 20    # Reads a bucket name and file name based on trigger events.
 21    (bucket, obj_name) = get_obs_obj_info(event)
 22    obj_name = urllib.parse.unquote(obj_name)
 23    httpMethod = "GET"
 24    contentmd5 = ""
 25    contentType = ""
 26    now = datetime.datetime.utcnow()
 27    plus = datetime.timedelta(days=1)
 28    dateplus = now + plus
 29    date = dateplus.strftime('%a, %d %b %Y %H:%M:%S GMT')
 30    date_stamp = get_str_timestamp(dateplus)
 31
 32    canonicalizedHeaders = ""
 33    CanonicalizedResource = "/ctslogstorage/" + obj_name
 34    canonical_string = httpMethod + "\n" + contentmd5 + "\n" + contentType + "\n" + str(date_stamp) + "\n" + canonicalizedHeaders + CanonicalizedResource
 35    hashed = hmac.new(sk.encode('UTF-8'), canonical_string.encode('UTF-8'),hashlib.sha1)
 36    encode_canonical = binascii.b2a_base64(hashed.digest())[:-1].decode('UTF-8')
 37    url = 'https://ctslogstorage.obs.la-south-2.myhuaweicloud.com/' + obj_name + '?AccessKeyId=' + ak + '&Expires=' + str(date_stamp) + '&Signature=' + urllib.request.quote(encode_canonical)
 38    print("bucket:" + bucket)
 39    print("objName:" + obj_name)
 40    print(url)
 41    outfile = '/tmp/' + str(uuid.uuid4()) + '.json.gz'
 42    r = requests.get(url)
 43    with open(outfile, "wb") as f:
 44        f.write(r.content)
 45    ls_tmp()
 46
 47    with gzip.open(outfile, 'r') as f:
 48        content = f.read()
 49    json_data = json.loads(content)
 50    print(json_data)
 51
 52    rm_with_wildcard("/tmp/", "*.json.gz")
 53    #rm(outfile)
 54    return 'ok'
 55
 56def get_str_timestamp(date):
 57    # date = datetime.datetime.now()
 58    return int(date.timestamp())
 59
 60def get_obs_obj_info(event):
 61    if 's3' in event['Records'][0]:
 62        s3 = event['Records'][0]['s3']
 63        return (s3['bucket']['name'], s3['object']['key'])
 64        with gzip.open(objName, 'r') as f:
 65            content = f.read()
 66        json_data = json.loads(content)
 67        print('--------------')
 68        print(json_data)
 69        print('--------------')
 70    else:
 71        obsInfo = event['Records'][0]['obs']
 72        return (obsInfo['bucket']['name'], obsInfo['object']['key'])
 73
 74def ls_tmp():
 75    """
 76    使用 Python 实现 ls 查看 /tmp/ 目录
 77
 78    :return: /tmp/ 目录下的文件和目录列表
 79    """
 80    # 获取 /tmp/ 目录下的文件和目录列表
 81    files_and_dirs = os.listdir("/tmp")
 82
 83    # 遍历文件和目录列表,并打印输出
 84    for file_or_dir in files_and_dirs:
 85        # 如果是文件,则打印文件名
 86        if os.path.isfile(os.path.join("/tmp", file_or_dir)):
 87            print(file_or_dir)
 88        # 如果是目录,则打印目录名
 89        else:
 90            print("|--", file_or_dir)
 91
 92def rm_with_wildcard(path, pattern):
 93    """
 94    使用 Python 指定目录实现 rm 通配符删除
 95
 96    :param path: 要删除文件或目录的路径
 97    :param pattern: 通配符模式
 98    """
 99
100    # 获取指定目录下的所有文件和目录
101    files_and_dirs = os.listdir(path)
102
103    # 遍历文件和目录列表,并删除匹配通配符的文件或目录
104    for file_or_dir in files_and_dirs:
105        # 如果是文件,则直接删除
106        if os.path.isfile(os.path.join(path, file_or_dir)) and file_or_dir.endswith(pattern):
107            os.remove(os.path.join(path, file_or_dir))
108        # 如果是目录,则递归删除
109        elif os.path.isdir(os.path.join(path, file_or_dir)) and file_or_dir.endswith(pattern):
110            shutil.rmtree(os.path.join(path, file_or_dir))
FG主函数是handler,这部分代码主要实现了OBS事件触发后,函数会下载相应的json.gz文件,并通过json解析读取文件内的内容。
创建触发器,界面如下:
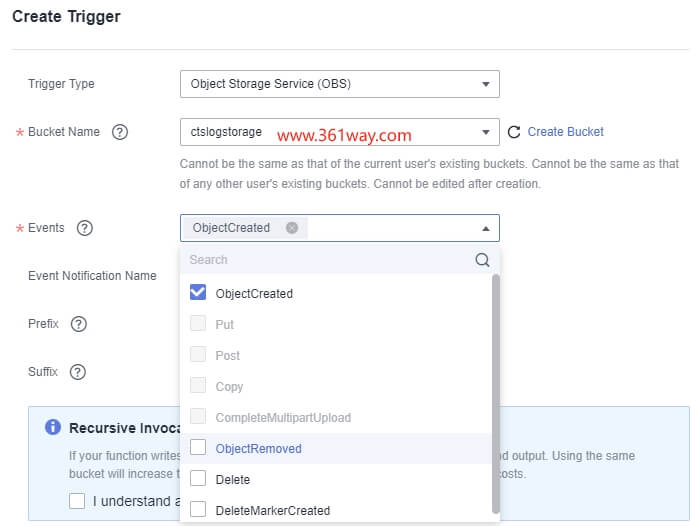
如果需要使用临时AK/SK,还需要配置对应的委托,在函数里可通过context.getAccessKey、context.getSecretKey获取对应的值。
三、增加splunk发送代码
修改FunctionGrap代码,增加通过HEC向splunk发送数据的代码。
 1    for each in json_data:
 2
 3        # decode base64 data
 4        log = base64.b64decode(each["data"])
 5
 6
 7        # TO-DO: generate X-Splunk-Request-Channel ID
 8        resp = requests.post(
 9            'https://inputs.prd-p-abcde.splunkcloud.com:8088/services/collector/raw',
10            data=log,
11            headers={
12                "Authorization": "Splunk xxxx-xx-xx-xx-xxxx",
13                "X-Splunk-Request-Channel": "xxxx-xx-xx-xx-xxxx"
14            },
15            verify=False
16        )
17
18    return {
19        'statusCode': 200,
20        'body': json.dumps(resp.text),
21        "headers": {
22            'content-type': 'application/json'
23        }
24    }
当然splunkcloud侧还需要配置,具体步骤为:
HTTP Event Collector (HEC) —> Go to the Setting menu, choose Data Inputs —> Click HTTP Event Collector(Choose Global Settings, ensure All tokens is enabled, and then choose Save) —> Choose Global Settings —> Ensure All Tokens is enabled —> Choose Save —> Choose New Token to create a new HEC endpoint and token .
四、其他
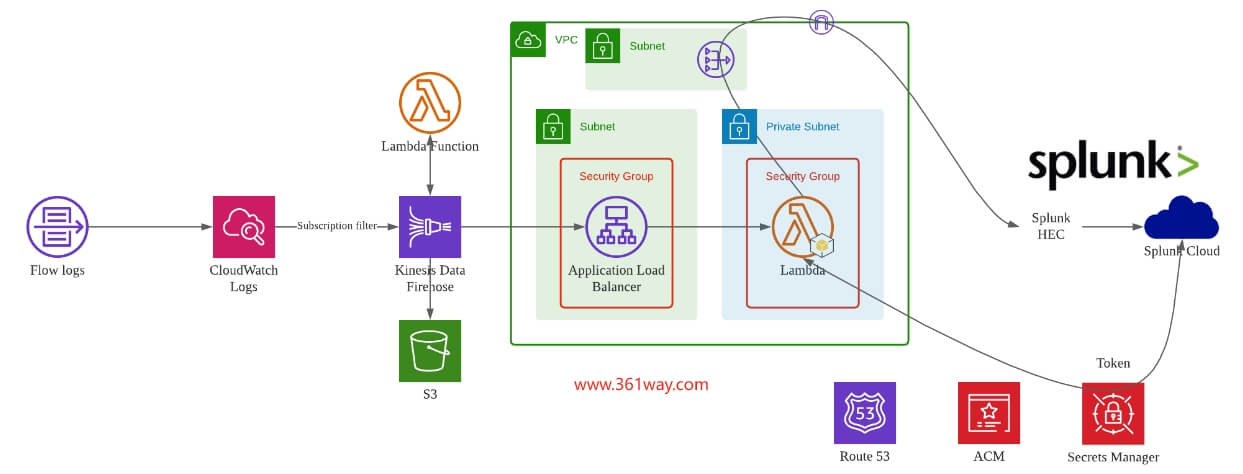
AWS上配置的步骤也差不多,这里贴个图
捐赠本站(Donate)
 如您感觉文章有用,可扫码捐赠本站!(If the article useful, you can scan the QR code to donate))
- Author: shisekong
- Link: https://blog.361way.com/functiongraph-hec-splunkcloud/8992.html
- License: This work is under a 知识共享署名-非商业性使用-禁止演绎 4.0 国际许可协议. Kindly fulfill the requirements of the aforementioned License when adapting or creating a derivative of this work.