RH254小结(二)postfix邮件服务器的搭建
一、邮件服务原理
邮件服务是我们日常生活中最常用的服务之一,在老的发行版中默认使用的邮件服务是sendmail ,从centos6以后的版本中默认使用的发送服务是postfix 。在进行postfix配置之前还需要通过第三方DNS或内部DNS配置mx记录。在进行进一步的配置之前,我们先理清三个概念:MTA、 MUA、 MDA 。
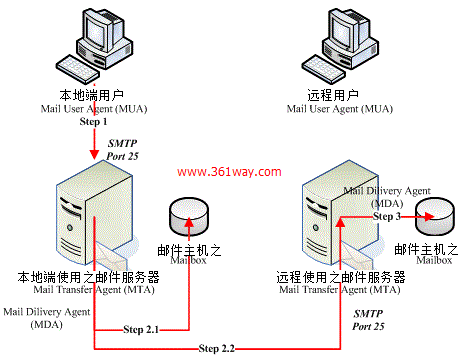
先来看一张邮件发送图:
- MUA (Mail User Agent) --- 邮件用户代理,除非你可以直接利用类似 telnet 的软件直接登入邮件服务器主动发出信件,否则您就得要透过 MUA 来帮你送信到邮件服务器。常见的MUA有:foxmail、outlook、Thunderbird、kmail等。
- MTA (Mail Transfer Agent) --- 邮件传输代理,如果一台服务器能帮用户将邮件寄出去,他就是一台MTA 。MTA 主要提供两方面的功能:1、通过SMTP(简单邮件传送协议)收受邮件;2、转发邮件。如本篇讲到的postfix、sendmail 就是一个MTA功能软件。
- MDA (Mail Delivery Agent) ---邮件传递代理人,其是MTA下的一个小功能程序。其主要功能是分析由MTA所收到的邮件表头或内容等,再通过相关策略决定邮件的去向。如上面提到的邮件转发功能就是由MDA实现的。其主要作为用:邮件过滤、自动回复 。除了上面提到的sendmail 、postfix 自身具有MDA的功能外,也有一些第三方MDA工具,如procmail 、Mailscanner + Spamassassion 等。
所以根据上面的流程程图,可以了解到MUA想要向某个邮箱帐号发送一封邮件的步骤有:
1、具有某MTA的一个账号和密码 ,一般可以通过在线申请如163、sina、139等邮箱帐号;
2、使用MUA编写邮件后,传送到MTA;
3、若该信的目标是本地MTA,则MDA透过MDA将邮件送到mailbox ,若目的是其他MTA,则开始relay 邮件转发;
4、对方MTA服务器收受邮件。
除此之外,我们还有必要了解下MRA (Mail Retrieval Agent)--- 邮件接受代理。MTA提供的SMTP协议可以进行邮件的发收,不过这个所谓的收是存放到相应帐户的mailbox中,需要到服务器上以后才能查看。我们不可能每个用户都要登陆到服务器上才能查看自己的邮件。MRA的功能就是解决这个问题的,其通过POP3或IMAP协议可以通过客户端软件登陆服务器将mailbox邮件取到本地阅读查看,MRA不是本节的重点,后面有机会再提。
二、常用配置文件及指令
1、配置文件
postfix的主要配置文件都在/etc/postfix目录,具体如下:
 1# rpm -qc postfix
 2/etc/pam.d/smtp.postfix
 3/etc/postfix/access
 4/etc/postfix/canonical
 5/etc/postfix/generic
 6/etc/postfix/header_checks
 7/etc/postfix/main.cf
 8/etc/postfix/master.cf
 9/etc/postfix/relocated
10/etc/postfix/transport
11/etc/postfix/virtual
12/etc/sasl2/smtpd.conf
这里我们选取几个主要文件做下注解。
main.cf ---postfix 的主配置文件,几乎所有的配置都在这里修改。修改完需要重启postfix 进程;
master.cf --- 主要规定了postfix 程序的运行参数,一般不需要更改;
access --- 设定开放 Relay 或拒绝联机的来源或目标地址等信息的外部配置文件,不过这个档案要生效还需要在 /etc/postfix/main.cf 启用。且设定完毕后需要以 postmap 来生成数据库;
virtual --- 虚拟别名域库文件,需要在main.cf 文件中启用;
header_checks --- 主要用于邮件头内容过滤,通过正则匹配确认策略,也可以将该文件复制设置body过滤;
还有一个文件/etc/aliases ,做为邮件别名或邮件群组设定使用,不过其不是postfix 中带的文件,其是setup包中的文件,使用时还需要postalias 或 newaliases 生成数据文件。
2、postfix 相关指令
/usr/sbin/postconf --- 列出当前postfix的配置文件,默认情况下默认值也会显示出来。如果想要列出非默认值(即手动修改值),可以通过postconf -n 获取配置。
/usr/sbin/postfix --- postfix 的主程序文件,常用方法如下:
1# postfix check   <==检查 postfix 相关的档案、权限等是否正确!
2# postfix start   <==开始 postfix 的执行
3# postfix stop    <==关闭 postfix
4# postfix flush   <==强制将目前正在邮件队列的邮件寄出!
5# postfix reload  <==重新读入配置文件,也就是 /etc/postfix/main.cf
/usr/sbin/postalias --- 别名数据库生成指令,执行后会依据/etc/aliases 文件生成 /etc/aliases.db ,具体如下:
1# postalias hash:/etc/aliases
/usr/sbin/postcat --- 用于查看邮件队列中的邮件内容。查询方法类似如下:
1# postcat /var/spool/postfix/maildrop/F36DDC08FF
/usr/sbin/postmap --- 该文件用法类似于postalias ,只不过其用于生成access文件为数据库文件:
1# postmap hash:/etc/postfix/access
/usr/sbin/postqueue --- 常用方法为postqueue -p,其输出类似于mailq 。
三、postfix 服务搭建
假设在局域网中我们有两台服务器,一个DNS,另一台为postfix mail 服务器,如下:
DNS服务器:192.168.0.109
mail 服务器:192.168.0.110
1、DNS配置
在DNS 服务器etc/unbound/unbound.conf文件的域名配置部分增加如下配置:
1local-data: "361way.com. IN MX 5 mail.361way.com"
2local-data: "mail.361way.com. IN A 192.168.0.110"
dns 配置具体可以参看 RH254小结(一)unbound DNS服务器的搭建 。
2、postfix 配置
修改/etc/hostname主机名为mail.361way.com ,然后修改本机的DNS为192.168.0.109 ,通过本机ping mail.361way.com 和 MX 解析出的IP为192.168.0.110 就对了。
修改/etc/postfix/main.cf 文件中的以下几部分:
 1# postconf -n
 2alias_database = hash:/etc/aliases
 3alias_maps = hash:/etc/aliases  //设定邮件别名
 4command_directory = /usr/sbin
 5config_directory = /etc/postfix
 6daemon_directory = /usr/libexec/postfix
 7data_directory = /var/lib/postfix
 8debug_peer_level = 2
 9debugger_command = PATH=/bin:/usr/bin:/usr/local/bin:/usr/X11R6/bin ddd $daemon_directory/$process_name $process_id & sleep 5
10html_directory = no
11inet_interfaces = all   //监听接口,默认为127.0.0.1 ,设成all可以监听所有接口
12inet_protocols = all   //如果没ipv6地址,可以设成ipv4
13mail_owner = postfix
14mailq_path = /usr/bin/mailq.postfix
15manpage_directory = /usr/share/man
16mydestination = $myhostname, $mydomain, localhost  //设定能够收信的主机名,
17mydomain = 361way.com           //邮件头上面的 mail from 的地址 ,仅有写入这个设定值的名称才能作为 email 的主机地址。
18myhostname = mail.361way.com    //设定主机名
19myorigin = $mydomain
20newaliases_path = /usr/bin/newaliases.postfix
21queue_directory = /var/spool/postfix
22readme_directory = /usr/share/doc/postfix-2.10.1/README_FILES
23sample_directory = /usr/share/doc/postfix-2.10.1/samples
24sendmail_path = /usr/sbin/sendmail.postfix
25setgid_group = postdrop
26unknown_local_recipient_reject_code = 550
3、防火墙配置
1[root@mail ~]# firewall-cmd  --permanent --add-service=smtp
2success
3[root@mail ~]# firewall-cmd  --add-service=smtp
4success
4、邮件测试
新建两个用户testa ,testb,切换到testa用户后,进行如下测试:
1[testa@mail ~]$ echo 'test page' |mail -s 'first mail' [email protected]
再切换到testb用户,通过mail 命令查看:
 1[testb@mail ~]$ mail
 2Heirloom Mail version 12.5 7/5/10.  Type ? for help.
 3"/var/spool/mail/testb": 1 message 1 new
 4>N  1 [email protected]      Tue Sep  1 21:22  18/556   "first mail"
 5& 1
 6Message  1:
 7From [email protected]  Tue Sep  1 21:22:48 2015
 8Return-Path: <[email protected]>
 9X-Original-To: [email protected]
10Delivered-To: [email protected]
11Date: Tue, 01 Sep 2015 21:22:48 +0800
12To: [email protected]
13Subject: first mail
14User-Agent: Heirloom mailx 12.5 7/5/10
15Content-Type: text/plain; charset=us-ascii
16From: [email protected]
17Status: R
18test page
19&
四、postfix 邮件过滤
邮件过滤是一个大范围的概念,具体细节有IP、域名、邮件地址的过滤、邮件内容的过滤(header、body、mime附件)等。同时根据过滤匹配表又分为regex(标准正则)表过滤、pcre(perl兼容正则)表过滤、CIDR表过滤等。
1、来源过滤
通过该文件设定最大的好处是,你不必重新启动 postfix,只要将数据库建立好, 立刻就生效了!其他功能还可以查看该文件内的注释
 1# 规则如下:
 2规范的范围或规则               Postfix 的动作 (范例如下)
 3IP/部分IP/主机名/Email等       OK/REJECT
 4[root@mail ~]# vim /etc/postfix/access
 5115.28.174.118      OK
 6.com                OK
 7av.com          REJECT
 8192.168.2.          REJECT
 9# OK 表示可接受,而 REJECT 则表示拒绝。
10[root@mail ~]# postmap hash:/etc/postfix/access
2、邮件头过滤
2.1 /etc/postfix/main.cf 中开启如下行,没有的加入如下行
1# For details, see "man header_checks".
2header_checks = regexp:/etc/postfix/header_checks
2.2 /etc/postfix/header_checks文件中增加如下规则:
1/^Subject: *lottery*/ REJECT Bye,spam mail!
上面的意思是主题中包含lottery(彩票)的邮件全部拒绝掉,自动回复拒绝理由是Bye,spam mail ! 。
2.3 通过以下方验证,使用testa 用户发送一个邮件头包含lottery关键词的邮件:
1[testa@mail ~]$ echo 'hi,money' |mail -s 'lottery mail' [email protected]
执行完成后,到testb用户下通过mail 命令查看发现未收到邮件,切回testa 用户会收到内容如下的退信:
 1[testa@mail ~]$ mail
 2"/var/spool/mail/testa": 1 message 1 new
 3>N  1 Mail Delivery System  Tue Sep  1 22:34  69/2166  "Undelivered Mail Returned to Sender"
 4& 1
 5Message  1:
 6From MAILER-DAEMON  Tue Sep  1 22:34:47 2015
 7Return-Path: <>
 8X-Original-To: [email protected]
 9Delivered-To: [email protected]
10Date: Tue,  1 Sep 2015 22:34:47 +0800 (CST)
11From: [email protected] (Mail Delivery System)
12Subject: Undelivered Mail Returned to Sender
13To: [email protected]
14Auto-Submitted: auto-replied
15Content-Type: multipart/report; report-type=delivery-status;
16        boundary="8B5D988435.1441118087/mail.361way.com"
17Status: R
18Part 1:
19Content-Description: Notification
20Content-Type: text/plain; charset=us-ascii
21This is the mail system at host mail.361way.com.
22I'm sorry to have to inform you that your message could not
23be delivered to one or more recipients. It's attached below.
24For further assistance, please send mail to postmaster.
25If you do so, please include this problem report. You can
26delete your own text from the attached returned message.
27                   The mail system
28<[email protected]>: Bye,spam mail!
29Part 2:
30Content-Description: Delivery report
31Content-Type: message/delivery-status
32Part 3:
33Content-Description: Undelivered Message Headers
34Content-Type: text/rfc822-headers
35Return-Path: <[email protected]>
36Received: by mail.361way.com (Postfix, from userid 1000)
37        id 8B5D988435; Tue,  1 Sep 2015 22:34:47 +0800 (CST)
38Date: Tue, 01 Sep 2015 22:34:47 +0800
39To: [email protected]
40Subject: lottery mail
41User-Agent: Heirloom mailx 12.5 7/5/10
42MIME-Version: 1.0
43Content-Type: text/plain; charset=us-ascii
44Content-Transfer-Encoding: 7bit
45Message-Id: <[email protected]>
46From: [email protected]
47& exit
注:上面的文件header_checks 每次修改后都需要重启postfix 服务生效感觉很不人性化,想不通过重启postfix 服务生效,也可以通过如下命令执行临时生效
1#postmap -q - regexp:/etc/postfix/header_checks < /etc/postfix/header_checks
2或
3#postmap -q - pcre:/etc/postfix/header_checks < /etc/postfix/header_checks
4具体要视使用的正则类型而定
3、邮件内容过滤
在main.cf文件中增加如下行:
1body_checks = regexp:/etc/postfix/body_checks
在/etc/postfix/body_checks 文件中增加如下内容:
/我爱你/ REJECT Bye,love spam mail!
/I love you/ REJECT ‘去你的爱情’
注意,body匹配是不区分大小写的,这点和header匹配不同。而且邮件内容中如果包含上面的字符串就会拒绝掉,无需前后加*号。通过testa用户进行发信测试:
1[testa@mail ~]$ echo 'testb,我爱你!' |mail -s 'love mail' [email protected]
2[testa@mail ~]$ echo 'testb,i love you !' |mail -s 'love mail' [email protected]
这个testa要伤心了,示爱信立马被邮件服务器拒绝掉了。
4、带附件的邮件
main.cf 中增加行:
1mime_header_checks = pcre:/etc/postfix/mime_header_checks
在/etc/postfix/mime_header_checks 文件中增加如下内容:
1# cat mime_header_checks
2/.exe|.doc|.bat$/     REJECT  'Not allow attach'
以下几种后缀的附件的邮件都不允许发送。测试使用mailx 或 mutt ,具体如下:
1echo 'testb,send you a file' |mailx -s 'attach mail'  -a /tmp/file.doc  [email protected]
2mutt [email protected] -s "361way文档" -a /tmp/test.doc
3echo "test attachment" | mutt [email protected] -s "361way脚本" -a /tmp/test.exe
5、CIDR过滤
CIDR过滤主要用于IP段过滤,其可以指定允许的网段和不允许的网段。这里简单说下:
1# vim /etc/postfix/main.cf 增加如下行
2smtpd_client_restrictions = cidr:/etc/postfix/client.cidr
3# vim /etc/postfix/client.cidr 增加如下配置
4# Sapm IP Groups
5220.163.0.0/16  DISCARD  spam
6218.62.0.0/16    DISCARD  spam
7# 重启生效
8#postmap -q - cidr:/etc/postfix/client.cidr < /etc/postfix/client.cidr 或者
9#postfix reload
6、总结
除此之外还有 nested_header_checks 过滤(邮件附件文件为邮件),更多详细部分可以通过man 查看header_checks、pcre_table、regexp_table、cidr_table等。由于篇幅局限关系,这部分讲的过去笼统,等这篇弄完以后,再单独拉一篇出来做一个简单的总结。
五、邮件别名
邮件别外使用的主要配置文件为/etc/aliases ,其分为两栏,左边为设定的用户名,右边为实际接收邮件的用户。类型如下:
1# vim /etc/aliases
2root:       root,www  信件会传给 root 与 www 这两个账号
3dev:    dev01,dev02,dev03,dev04...  这就是群组的例子了,如按部分名称发邮件时比较好用
4test:   test,[email protected]  可以同时指定一个名部邮箱
5# postalias hash:/etc/aliases   生成数据库
捐赠本站(Donate)
 如您感觉文章有用,可扫码捐赠本站!(If the article useful, you can scan the QR code to donate))
- Author: shisekong
- Link: https://blog.361way.com/mail-postfix/4678.html
- License: This work is under a 知识共享署名-非商业性使用-禁止演绎 4.0 国际许可协议. Kindly fulfill the requirements of the aforementioned License when adapting or creating a derivative of this work.
