RH134小结(六)nmcli配置IPv4与IPv6网络
Red Hat Enterprise Linux 7 与 CentOS 7 中默认的网络服务由 NetworkManager 提供,这是动态控制及配置网络的守护进程,它用于保持当前网络设备及连接处于工作状态,同时也支持传统的 ifcfg 类型的配置文件。可以用命令行工具 nmcli 来控制 NetworkManager,相应的也有一个图形化的配置工具nmtui。NetworkManager 可以用于以下类型的连接:Ethernet,VLANS,Bridges,Bonds,Teams,Wi-Fi,mobile boradband(如移动3G)以及 IP-over-InfiniBand。针对与这些网络类型,NetworkManager 可以配置他们的网络别名,IP 地址,静态路由,DNS,VPN连接以及很多其它的特殊参数。
一、nmcli 配置IPv4地址
下面是新增一个连接名为static对应的物理网口为eth0,并配置开机不自动启动,并配置相应的网关与地址
1# nmcli connection add conn-name "static" ifname eth0 autoconnect no type ethernet ipv4 192.168.0.100/24 gw4 192.168.0.1 //新增连接不自动连接
针对一个已存在的接口,我们也可以通过nmcli 修改其对应的IP地址
1# nmcli connection modify static ipv4.addr "192.168.1.23/24 192.168.1.1" ipv4.method manual //修改连接的IP地址
在centos 6中我们需要事行定义好几个cfg文件,也可以实现单个网口在多个环境下IP之间的随意切换,不过在centos7里明显加强了通过命令实现这种切换的概念,如下:
1# nmcli connection  add con-name "default" type ethernet ifname eth0
2Connection 'default' (f15e2684-7aaa-4fbc-83de-ad10c7dee0eb) successfully added.
3# nmcli conn up "static"     //启用上面的静态地址配置
4# nmcli conn up "default"   //切回dhcp
默认情况下通过nmcli add 或 modify的操作只是修改了配置文件,并不会立即生效,想要生效启用,需要通过“nmcli conn up 接口名” 来启用对应的配置。所以通过这两个配置文件,我们像上面一样来回切换。
1# nmcli conn mod "static" connection.autoconnect no   关闭开机自动连接
2# nmcli conn mod "static"  ipv4.dns 192.168.0.254     设置DNS
3# nmcli conn mod "static"  +ipv4.dns 192.168.0.254   +/-号用于增加或减少备用DNS
4# nmcli conn mod "static"  +ipv4.addresses "172.10.10.100/25"  增加第二地址,并且不设备网关
5# nmcli connection modify eth0 +ipv4.routes 192.168.122.0/24 ipv4.gateway 10.10.10.1   配置路由
nmcli命令实际上编辑的还是/etc/sysconfig/network-scripts/ifcfg-*文件。在不想使用该文件时,可以通过delete删除对应的接口:
1# nmcli connection delete ens3
二、nmcli 配置IPv6地址
ipv6下的配置与ipv4使用的差数差不多,只不过将ipv4换成了ipv6,如下:
1# nmcli connection modify eth1 ipv6.addresses '2001:ac18::132/64' ipv6.method manual
2# nmcli connection up eth1
3# ping6 2001:ac18::132
4PING 2001:ac18::132(2001:ac18::132) 56 data bytes
564 bytes from 2001:ac18::132: icmp_seq=1 ttl=64 time=0.052 ms
需要注意的是测试ipv6的连接性,使用ping6而不是ping 。
三、nmcli 的其他常用用法
设置主机名
1# nmcli general hostname  361way  其等价于
2# hostnamectl set-hostname 361way
查看当前的连接
 1# nmcli connection show
 2NAME                UUID                                  TYPE            DEVICE
 3vnet1               a9be8935-fde1-4768-9611-74475e1c7e01  generic         vnet1
 4Bridge eno16777736  d2d68553-f97e-7549-7a26-b34a26f29318  bridge          br0
 5System eno16777736  0756a150-f4ee-4502-a0fb-eff8caad35e6  802-3-ethernet  --
 6ens3                49d0dcc3-3e5e-49f0-80b7-2c8f3994c046  802-3-ethernet  ens3
 7# nmcli connection show --active
 8NAME                UUID                                  TYPE            DEVICE
 9vnet1               a9be8935-fde1-4768-9611-74475e1c7e01  generic         vnet1
10virbr0              cd0fd5d5-2b71-4c1a-b66d-1801c881e37f  bridge          virbr0
11Bridge eno16777736  d2d68553-f97e-7549-7a26-b34a26f29318  bridge          br0
12ens3                49d0dcc3-3e5e-49f0-80b7-2c8f3994c046  802-3-ethernet  ens3
查看连接接口的详细信息
 1# nmcli connection show br1  //对应的不是设备名,而是name
 2Error: br1 - no such connection profile.   //是不是看到报错了,我们换成name值再试下
 3# nmcli connection show "System eno16777736"
 4connection.id:                          System eno16777736
 5connection.uuid:                        0756a150-f4ee-4502-a0fb-eff8caad35e6
 6connection.interface-name:              eno16777736
 7connection.type:                        802-3-ethernet
 8connection.autoconnect:                 yes
 9connection.autoconnect-priority:        0
10connection.timestamp:                   1447576534
11connection.read-only:                   no
12connection.permissions:
13connection.zone:                        --
14connection.master:                      br0
15connection.slave-type:                  bridge
16connection.secondaries:
17connection.gateway-ping-timeout:        0
18802-3-ethernet.port:                    --
19802-3-ethernet.speed:                   0
20802-3-ethernet.duplex:                  --
21802-3-ethernet.auto-negotiate:          yes
22802-3-ethernet.mac-address:             --
23802-3-ethernet.cloned-mac-address:      --
24802-3-ethernet.mac-address-blacklist:
25802-3-ethernet.mtu:                     auto
26802-3-ethernet.s390-subchannels:
27802-3-ethernet.s390-nettype:            --
28802-3-ethernet.s390-options:
29bridge-port.priority:                   32
30bridge-port.path-cost:                  100
31bridge-port.hairpin-mode:               no
查看设备信息
 1# nmcli device status
 2DEVICE      TYPE      STATE      CONNECTION
 3br0         bridge    connected  Bridge eno16777736
 4ens3        ethernet  connected  ens3
 5lo          loopback  unmanaged  --
 6virbr0-nic  tap       unmanaged  --
 7
 8# nmcli device show ens3
 9GENERAL.DEVICE:                         ens3
10GENERAL.TYPE:                           ethernet
11GENERAL.HWADDR:                         52:54:00:12:34:22
12GENERAL.MTU:                            1500
13GENERAL.STATE:                          100 (connected)
14GENERAL.CONNECTION:                     ens3
15GENERAL.CON-PATH:                       /org/freedesktop/NetworkManager/ActiveConnection/2
16WIRED-PROPERTIES.CARRIER:               on
17IP4.ADDRESS[1]:                         192.168.0.105/25
18IP4.GATEWAY:
19IP6.ADDRESS[1]:                         fe80::5054:ff:fe12:3422/64
20IP6.GATEWAY:
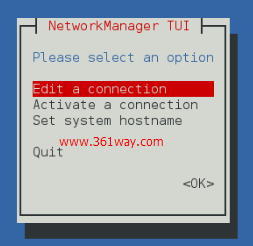
四、nmtui 图形化配置
1、通过nmtui 选择第一项,并选择相应的网卡后,可以配置IP地址

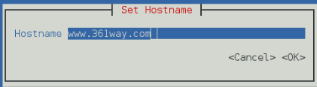
2、通过nmtui设置主机名
3、通过nm-connection-editor直接修改IP地址

上面只是对于nmcli命令的简单应用,更多的用法可以参看NetworkManager(8), nmcli(1), nmcli-examples(5), NetworkManager.conf(5) 几个的man手册。
捐赠本站(Donate)
 如您感觉文章有用,可扫码捐赠本站!(If the article useful, you can scan the QR code to donate))
- Author: shisekong
- Link: https://blog.361way.com/nmcli-ipv4-ipv6/4830.html
- License: This work is under a 知识共享署名-非商业性使用-禁止演绎 4.0 国际许可协议. Kindly fulfill the requirements of the aforementioned License when adapting or creating a derivative of this work.