Markdown电子书工具:hugo、mdbook和peach
专门用于制作电子书类文档的知名工具包括:gitbook和Read the Docs。不过前者的开源版本2018年末就不更新了,而Read the Docs则比较老,还需要多个工具配合。我个人倾向于单个二进制文件搞定一切。于是我找到了三个候选:hugo、mdbook和peach,这三个候选部署时都只有一个二进制文件。hugo和peach是Go语言实现的,而mdbook则是用Rust语言实现的。下面我们就来简单对比一下这三个基于Markdown格式的电子书制作工具。
1. mdbook
mdbook是模仿gitbook样式的从markdown文件生成电子书的工具和静态站点服务,它仅聚焦于“电子书制作和站点服务”。如果不是类似gitbook风格的其他类静态内容服务,那么它并不适合。因此,该工具采用了惯例优先原则(convention over configuration),使得使用时我们无需做太多的配置即可生成一个像模像样的电子书站点。
由于是rust实现的,mdbook本地部署时只需一个二进制文件,我们直接从它的github release上下载对应os平台的release文件(这里是macos的0.4.0版本):
1wget -c https://github.com/rust-lang/mdBook/releases/download/v0.4.0/mdbook-v0.4.0-x86_64-apple-darwin.tar.gz
解压后,将mdbook所在路径添加到PATH环境变量中:
 1$tar zxvf mdbook-v0.4.0-x86_64-apple-darwin.tar.gz
 2x mdbook
 3$ls
 4mdbook*                        mdbook-v0.4.0-x86_64-apple-darwin.tar.gz
 5
 6$mdbook -help
 7mdbook v0.4.0
 8Mathieu David <[email protected]>
 9Creates a book from markdown files
10
11USAGE:
12    mdbook [SUBCOMMAND]
13
14FLAGS:
15    -h, --help       Prints help information
16    -V, --version    Prints version information
17
18SUBCOMMANDS:
19    build    Builds a book from its markdown files
20    clean    Deletes a built book
21    help     Prints this message or the help of the given subcommand(s)
22    init     Creates the boilerplate structure and files for a new book
23    serve    Serves a book at http://localhost:3000, and rebuilds it on changes
24    test     Tests that a book's Rust code samples compile
25    watch    Watches a book's files and rebuilds it on changes
26
27For more information about a specific command, try `mdbook <command> --help`
28The source code for mdBook is available at: https://github.com/rust-lang/mdBook
接下来,我们就使用mdbook init命令创建一个电子书工程:
1$mdbook init go-ml
2
3Do you want a .gitignore to be created? (y/n)
4y
5What title would you like to give the book?
6go machine learning
72021-07-05 15:58:03 [INFO] (mdbook::book::init): Creating a new book with stub content
8
9All done, no errors...
我们看到mdbook init生成了一个目录,目录布局如下:
 1➜ /MyEbook/mdbook git:(master) ✗ $tree
 2.
 3└── go-ml
 4    ├── book
 5    ├── book.toml
 6    └── src
 7        ├── SUMMARY.md
 8        └── chapter_1.md
 9
103 directories, 3 files
接下来,我们直接运行mdbook serve即启动了一个服务,用于访问该电子书:
1➜ /MyEbook/mdbook git:(master) ✗ $mdbook serve go-ml
我们通过浏览器访问http://localhost:3000,可以看到如下页面:
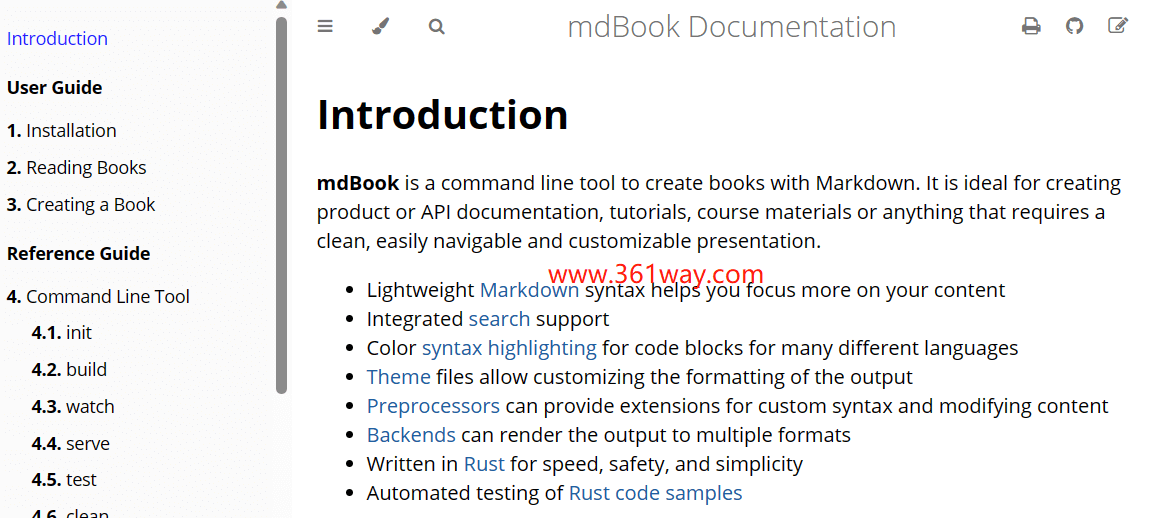
我们看到:我们没有做任何配置就生成了一个和gitbook样式差不多的电子书服务站点。该站点还支持选择页面显示模式(截图中使用的是默认的Light模式)、支持查询等。
如果我们要增加新章节、编排章节标题缩进,只需编辑电子书工程下面的src/SUMMARY.md:
1$cat SUMMARY.md
2# Summary
3
4- [Chapter 1](./chapter_1.md)
5  - [Chapter 1.1](./chapter_1_1.md)
6- [Chapter 2](./chapter_2.md)
这些对于多数人来说已经是足够了的,后续只需关注书籍内容即可,无需对mdbook生成的工程进行什么调整。mdbook会自动探测src目录下的文件变化并根据变化重新生成静态html文件。我们只需刷新页面即可看到最新变化。
2. peach
peach是一款由Go语言实现的多语言、实时同步以及全文搜索功能的 Web 文档服务器。它由gogs的作者无闻打造,该作者的很多开源项目的文档也都是由peach生成和提供文档服务支撑的。
我们可以直接使用go get安装peach:
1$export GONOSUMDB="github.com/russross/blackfriday"
2$go get github.com/peachdocs/peach
3go: github.com/peachdocs/peach upgrade => v0.9.8
4$peach -v
5Peach version 0.9.8.0810
接下来,我们用peach建立电子书工程:
1$peach new -target=go-ml.peach
2➜  Creating 'go-ml.peach'...
3➜  Creating 'templates'...
4➜  Creating 'public'...
5Do you want to use custom templates?[Y/n] n
6✓  Done!
我们这里直接使用peach项目自身文档的自定义模板:
下载配置好的自定义模板:
1$ cd go-ml.peach
2
3$ git clone https://github.com/peachdocs/peach.peach.git custom
4Cloning into 'custom'...
5remote: Enumerating objects: 62, done.
6remote: Total 62 (delta 0), reused 0 (delta 0), pack-reused 62
7Unpacking objects: 100% (62/62), done.
8Checking connectivity... done.
启动web服务:
 1$peach web
 2
 3intro/
 4     |__ installation
 5     |__ getting_started
 6     |__ roadmap
 7howto/
 8     |__ documentation
 9     |__ webhook
10     |__ templates
11     |__ static_resources
12     |__ navbar
13     |__ pages
14     |__ extension
15     |__ protect_resources
16     |__ upgrade
17advanced/
18        |__ config_cheat_sheet
19faqs/
20intro/
21     |__ installation
22     |__ getting_started
23     |__ roadmap
24howto/
25     |__ documentation
26     |__ webhook
27     |__ templates
28     |__ static_resources
29     |__ navbar
30     |__ pages
31     |__ extension
32     |__ protect_resources
33     |__ upgrade
34advanced/
35        |__ config_cheat_sheet
36faqs/
我们通过浏览器访问http://localhost:5556,可以看到如下页面:
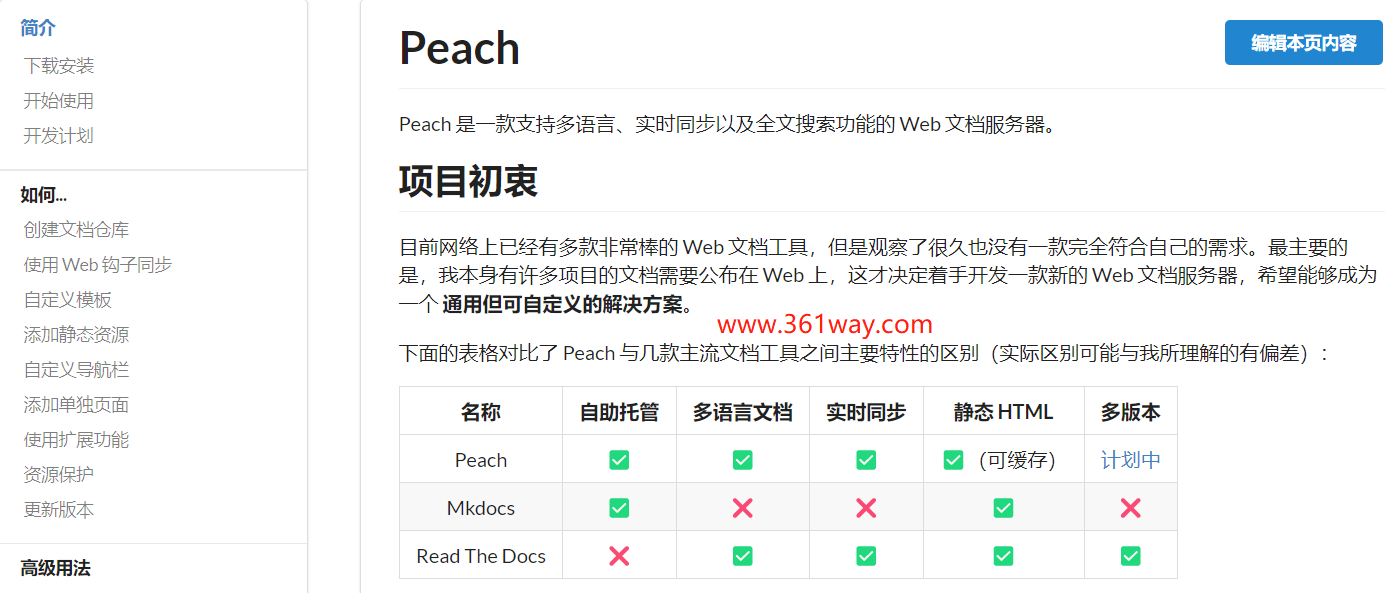
不过,和mdbook不同,上面peach加载并渲染的文档并不在本地,我们在custom/app.ini中看到如下配置:
1[docs]
2TYPE = remote
3TARGET = https://github.com/peachdocs/docs.git
4SECRET = peach
我们看到当前例子采用了remote模式,即使用Github上的仓库peachdocs/docs中的数据(markdown文件)作为源文件进行渲染,而这个仓库的结构如下:
 1$tree -L 2 docs
 2docs
 3├── TOC.ini
 4├── en-US
 5│   ├── advanced
 6│   ├── faqs
 7│   ├── howto
 8│   └── intro
 9├── images
10│   └── github_webhook.png
11└── zh-CN
12    ├── advanced
13    ├── faqs
14    ├── howto
15    └── intro
16
1711 directories, 2 files
TOC.ini文件描述了文档结构布局:
 1$cat TOC.ini
 2-: intro
 3-: howto
 4-: advanced
 5-: faqs
 6
 7[intro]
 8-: README
 9-: installation
10-: getting_started
11-: roadmap
12
13[howto]
14-: README
15-: documentation
16-: webhook
17-: templates
18-: static_resources
19-: navbar
20-: pages
21-: extension
22-: protect_resources
23-: upgrade
24
25[advanced]
26-: README
27-: config_cheat_sheet
28
29[faqs]
30-: README
我们看到,和mdbook相比,peach的门槛稍高一些,需要学习TOC.ini中的特殊配置语法,同时如果要改变peach的默认风格,还要学习peach使用的模板语法(Peach 使用 Go 语言 Pongo2 v3 版本 作为模板引擎,它使用的是 Django HTML 格式)。
3. hugo+git book theme
hugo是这几年最火的静态站点生成工具。和上面两个工具不同的是:它致力于成为一个通用的静态站点工具,与hexo等目标一致。结合hugo与git book风格的theme也能实现电子书制作与站点服务。
经过多年发展,hugo的安装十分方便:在macos上,我们既可以使用go get安装(hugo支持module),也可以使用预编译好的二进制文件直接使用。
通过hugo new site命令,我们来创建一个新的站点:
 1$hugo new site go-learning
 2
 3Congratulations! Your new Hugo site is created in /MyEbook/hugo/go-learning.
 4
 5Just a few more steps and you're ready to go:
 6
 71. Download a theme into the same-named folder.
 8   Choose a theme from https://themes.hugo.io/ or
 9   create your own with the "hugo new theme <THEMENAME>" command.
102. Perhaps you want to add some content. You can add single files
11   with "hugo new <SECTIONNAME>/<FILENAME>.<FORMAT>".
123. Start the built-in live server via "hugo server".
13
14Visit https://hugo.io/ for quickstart guide and full documentation.
下面是生成的站点的初始目录结构:
 1$tree
 2.
 3└── go-learning
 4    ├── archetypes
 5    │   └── default.md
 6    ├── config.toml
 7    ├── content
 8    ├── data
 9    ├── layouts
10    ├── static
11    └── themes
接下来我们来安装gitbook theme:
 1$cd go-learning
 2
 3$git submodule add https://github.com/alex-shpak/hugo-book themes/book
 4Cloning into '/MyEbook/hugo/go-learning/hugo-book'...
 5remote: Enumerating objects: 3555, done.
 6Receiving objects:  18% (664/3555), 692.01 KiB | 4.00 KiB/s
 7... ...
 8remote: Total 3555 (delta 0), reused 0 (delta 0), pack-reused 3555
 9Receiving objects: 100% (3555/3555), 5.74 MiB | 5.00 KiB/s, done.
10Resolving deltas: 100% (1809/1809), done.
我们可以修改一下顶层目录的config.toml,增加theme=”book”:
1baseURL = "http://example.org/"
2languageCode = "zh-cn"
3title = "Go学习"
4theme = "book"
启动该站点:
 1$hugo server --minify --theme book
 2
 3                   | EN
 4-------------------+-----
 5  Pages            |  7
 6  Paginator pages  |  0
 7  Non-page files   |  0
 8  Static files     | 80
 9  Processed images |  0
10  Aliases          |  0
11  Sitemaps         |  1
12  Cleaned          |  0
13
14Built in 26 ms
15Watching for changes in /Users/tonybai/MyEbook/hugo/go-machine-learning/{archetypes,content,data,layouts,static,themes}
16Watching for config changes in /Users/tonybai/MyEbook/hugo/go-machine-learning/config.toml
17Environment: "development"
18Serving pages from memory
19Running in Fast Render Mode. For full rebuilds on change: hugo server --disableFastRender
20Web Server is available at http://localhost:1313/ (bind address 127.0.0.1)
21Press Ctrl+C to stop
这时由于content目录为空,因此通过浏览器访问: localhost:1313后只能看到只有一个标题的空白页面。
我们将https://github.com/alex-shpak/hugo-book themes/book下面的样例站点的content拷贝到我们的站点中:
1 $cp -R themes/book/exampleSite/content .
2 $ll content
3total 8
4drwxr-xr-x   6 tonybai  staff   192  6 27 16:36 ./
5drwxr-xr-x  12 tonybai  staff   384  6 27 16:35 ../
6-rw-r--r--   1 tonybai  staff  1165  6 27 16:36 _index.md
7drwxr-xr-x   4 tonybai  staff   128  6 27 16:36 docs/
8drwxr-xr-x   3 tonybai  staff    96  6 27 16:36 menu/
9drwxr-xr-x   7 tonybai  staff   224  6 27 16:36 posts/
再次启动hugo server后,我们通过浏览器浏览,可以看到下面页面:
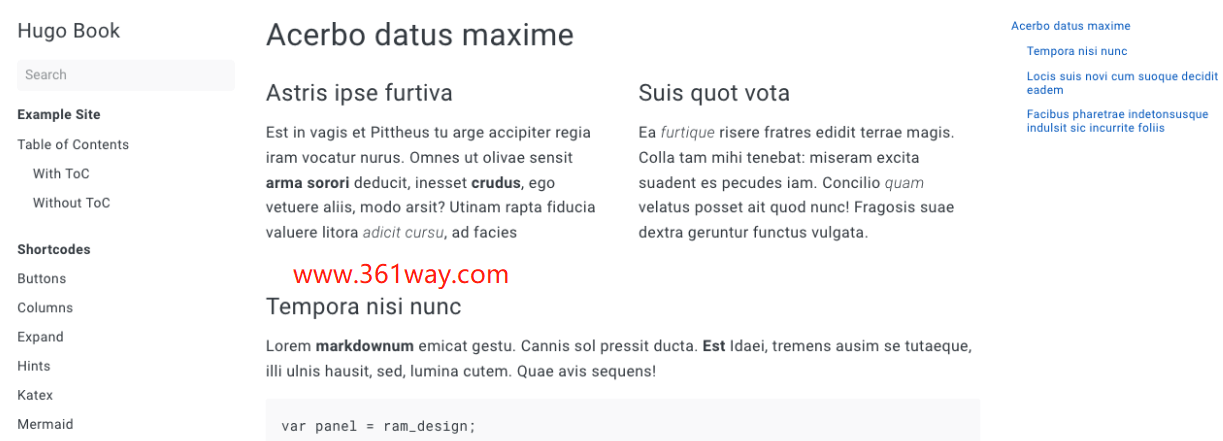
我们看到这个页面分为三栏,最左侧是站点目录栏,中间是章节内容,右侧显示的是内容中的标题结构。电子书源文件分布在content目录下,该目录的结构如下:
 1$tree -L 2 content
 2content
 3├── _index.md
 4├── docs
 5│   ├── example
 6│   └── shortcodes
 7├── menu
 8│   └── index.md
 9└── posts
10    ├── _index.md
11    ├── chapter_1.md
12    ├── creating-a-new-theme.md
13    ├── goisforlovers.md
14    ├── hugoisforlovers.md
15    └── migrate-from-jekyll.md
16
175 directories, 8 files
- _index.md是首页布局
- menu/index.md是左侧栏的布局
其他均为文章内容源文件。如果我们要调整首页布局或左侧栏的书籍结构,我们只需调整上述两个文件即可。
4. 小结
我们粗略、快速对mdbook、peach和hugo工具做了比较,三者部署时都是单二进制文件。
我们的目标是利用工具生成电子书,仅从达到这个目的难易度来看:
- mdbook是“门槛”最低的,几乎无需配置,就能搭建出一个像模像样的类似gitbook的图书站点;
- peach门槛较高一些,要配置的东西多一些;
- hugo门槛适中,但却最为灵活和强大。如果对hugo的模板语法十分熟悉,可以定义出一套满足自己风格的电子书浏览页面风格。
捐赠本站(Donate)
 如您感觉文章有用,可扫码捐赠本站!(If the article useful, you can scan the QR code to donate))
- Author: shisekong
- Link: https://blog.361way.com/mdbook-hugo-peach/8488.html
- License: This work is under a 知识共享署名-非商业性使用-禁止演绎 4.0 国际许可协议. Kindly fulfill the requirements of the aforementioned License when adapting or creating a derivative of this work.