RH134小结(四)初识SElinux
一、SElinux概述
SELinux 即『 Security Enhanced Linux 』的缩写,字面上的意义就是安全强化的 Linux 。它是NSA (United States National Security Agency)和SELinux社区的联合项目。它通过LSM(Linux Security Modules)框架被集成到Linux Kernel 中。 SELinux提供了一种灵活的强制访问控制(MAC)系统 。在开启SElinux的主机上, 只有同时满足了【标准Linux访问控制】和【SELinux访问控制】时,主体才能访问客体。
标准的LINUX访问控制(DAC)即是我们平常提到的用户、组、rwx这些权限。DAC的一个弱点就是:如果一个用户被授权允许访问,意味着程序也被授权访问,如果程序被授权访问,那么恶意程序也将有同样的访问权。而MAC可以通过一些rules将用户的访问限定在一定的范围内--- 如果你了解chroot,可以将其想象成chroot,但其限制方式和实现原理和chroot不同。
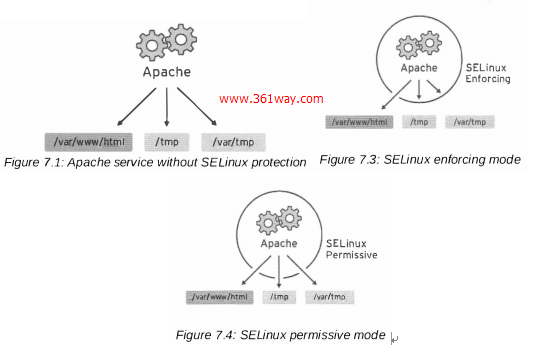
如上图所示,在一台启用apache 应用的linux主机上。分别是不使用selinux、开启selinux和permissive selinux下的情况。在不使用selinux时,web程序所具有的权限和apache用户的权限相同,图示中的几个目录都可以访问。开启了selinux以后,process只能访问指定的目录,而对于其他未授权目录不能进行访问和读写。
二、SELinux的构成及原理
1、SELinux的构成
SELinux的权限控制是由subject、Object、policy、security context四块构成的:
主体 (Subject):SELinux 主要想要管理的就是程序 ,所认主体我们可以看做是ps中查看到的进程;
目标 (Object):主体程序能否存取的『目标资源』一般就是文件系统,所以可以将目标看作文件系统;
策略 (Policy):由於程序与文件数量庞大,因此 SELinux 会依据某些服务来制订基本的存取安全性策略。策略可以理解为rule,在rhel7里大的策略分为三种(这点之前的版本不同,之前分有targeted和strict两种):
1# SELINUXTYPE= can take one of three two values:
2#     targeted - Targeted processes are protected,
3#     minimum - Modification of targeted policy. Only selected processes are protected.
4#     mls - Multi Level Security protection.
5SELINUXTYPE=targeted
安全性上下文 (security context):我们刚刚谈到了主体、目标与政策面,但是主体能不能存取目标除了政策指定之外,主体与目标的安全性本文必须一致才能够顺利存取。 这个安全性本文 (security context) 有点类似文件系统的 rwx 啦!安全性本文的内容与配置是非常重要的! 如果配置错误,你的某些服务(主体程序)就无法存取文件系统(目标资源),当然就会一直出现『权限不符』的错误信息了!
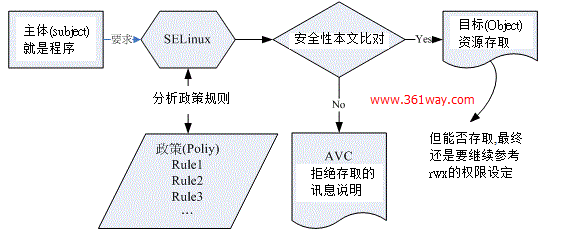
主体程序必须要通过 SELinux 策略内的规则放行后,就可以与目标资源进行安全性本文的比对, 若比对失败则无法存取目标,若比对成功则可以开始存取目标。问题是,最终能否存取目标还是与文件系统的 rwx 权限配置有关。
2、安全上下文
安全性上下文存在于程序和目标文件中,由于程序运行在内存中,所认其安全性文本也存在于内存中。文件存放在disk上,由于inode是唯一的,所以其安全性文本存在于inode中。具体如下:
1[root@361way ~]# ps -Z
2LABEL                             PID TTY          TIME CMD
3unconfined_u:unconfined_r:unconfined_t:s0-s0:c0.c1023 7124 pts/0 00:00:00 bash
4unconfined_u:unconfined_r:unconfined_t:s0-s0:c0.c1023 7153 pts/0 00:00:00 ps
5[root@361way ~]# ls -Z
6-rw-------. root root system_u:object_r:admin_home_t:s0 anaconda-ks.cfg
安全性本文主要用冒号分为四栏(之前的版本为三栏),我们平时主要关注前面三栏:
1Identify:role:type
2身份识别:角色:类型
以下对三栏分别介绍。
身份识别 (Identify):相当於帐号方面的身份识别!主要的身份识别则有底下三种常见的类型。
- root:表示 root 的帐号身份,如同上面的表格显示的是 root 家目录下的数据啊!
- system_u:表示系统程序方面的识别,通常就是程序罗;
- user_u:代表的是一般使用者帐号相关的身份。
角色 (Role):用于表示这个数据是属於程序、文件资源还是代表使用者。一般的角色有:
- object_r:代表的是文件或目录等文件资源,这应该是最常见的;
- system_r:代表的就是程序啦!不过,一般使用者也会被指定成为 system_r 喔!
类型 (Type) (最重要!):在默认的 targeted 政策中, Identify 与 Role 栏位基本上是不重要的!重要的在於这个类型 (type) 栏位! 基本上,一个主体程序能不能读取到这个文件资源,与类型栏位有关!而类型栏位在文件与程序的定义不太相同,分别是:
- type:在文件资源 (Object) 上面称为类型 (Type);
- domain:在主体程序 (Subject) 则称为域 (domain) !
角色与类型之前的关系可以看下下面的示例:
1[root@361way targeted]#  ll -Zd /usr/sbin/httpd /var/www/html
2-rwxr-xr-x. root root system_u:object_r:httpd_exec_t:s0 /usr/sbin/httpd
3drwxr-xr-x. root root system_u:object_r:httpd_sys_content_t:s0 /var/www/html
4# 两者的角色栏位都是 object_r ,代表都是文件!而 httpd 属於 httpd_exec_t 类型,
5# /var/www/html 则属於 httpd_sys_content_t 这个类型!
httpd 属於 httpd_exec_t 这个可以运行的类型,而 /var/www/html 则属於 httpd_sys_content_t 这个可以让 httpd 领域 (domain) 读取的类型。更多文件安全上下文规则可以在/etc/selinux/targeted 目录查找。
三、SELinux相关指令
SELinux相关的指令有:
 1sestatus #查看SELinux的状态
 2sestatus -b#查看application管理状态
 3getenforce#显示目前SELinux工作模式
 4setenforce 0#临时将SELinux模式设为宽容模式
 5setenforce 1#临时将SELinux模式设为强制模式
 6注:setenforce必需在SELinux enable状态才有用
 7ls -Z 文档名#查看SELinux对档案管理状态
 8ls -dZ 资料夹#查看SELinux对资料夹管理状态
 9chcon#变更档案、资料夹管理
10getsebool#查看application管理状态
11setsebool#变更application管理
12restorecon#恢复成原有的SELinux type
13semanage#安全性文件的查询与修改
14semanage port -l |grep http#查看SELinux管理http套件所使用的端口
15semanage port -a -t http_port_t -p tcp 90#加入90端口给httpd使用
16注:必需安装policycoreutils-python套件,在加入Port时需先检查该port是否已经被使用了。
17seinfo#查看政策中规则数量
18注:必需安装setools-console套件
19sealert -l **#SELinux错误信息详细列出,**为错误代码。
20注:必需安装setroubleshoot及setroubleshoot-server套件,安装完后需要重启系统。
1、chcon 更改安全上下文
假如,我们从home目录mv一个文件到/var/www/html 目录,该文件会继承原/home目录文件上下文的规则。所以通过httpd访问时会出现403报错,这里可以通过chcon更改文件的上下文。如下:
1[root@361way html]# mv /home/usera/index.html .
2[root@361way html]# ls -lZ index.html
3-rw-r--r--. root root unconfined_u:object_r:user_home_t:s0 index.html
chcon更改的方法如下:
 1[root@www ~]# chcon [-R] [-t type] [-u user] [-r role] 文件
 2[root@www ~]# chcon [-R] --reference=范例档 文件
 3选项与参数:
 4-R  :连同该目录下的次目录也同时修改;
 5-t  :后面接安全性本文的类型栏位!例如 httpd_sys_content_t ;
 6-u  :后面接身份识别,例如 system_u;
 7-r  :后面街角色,例如 system_r;
 8--reference=范例档:拿某个文件当范例来修改后续接的文件的类型!
 9#这里将上面的index.html类型更改为 httpd_sys_content_t 类型
10[root@361way html]# chcon -t httpd_sys_content_t /var/www/html/index.html
11[root@361way html]# ls -lZ index.html
12-rw-r--r--. root root unconfined_u:object_r:httpd_sys_content_t:s0 index.html
13#以一个文件的权限为范本,修改另一个文件的权限
14[root@361way html]# ll -Z /etc/passwd
15-rw-r--r--. root root system_u:object_r:passwd_file_t:s0 /etc/passwd
16[root@361way html]# chcon --reference=/etc/passwd /var/www/html/index.html
17[root@361way html]# ll -Z /var/www/html/index.html
18-rw-r--r--. root root system_u:object_r:passwd_file_t:s0 /var/www/html/index.html
2、restorecon恢复文件上下文
chcon 是透过直接指定的方式来处理安全性本文的类型数据。那我们知道其实系统默认的目录都有特殊的 SELinux 安全性本文, 举例来说, /var/www/html 原本就是 httpd 可以读取的目录(具体看/etc/selinux/target时的规则)。所以这里也可以使用restorecon 恢复文件或目录的默认权限。
1[root@www ~]# restorecon [-Rv] 文件或目录
2选项与参数:
3-R  :连同次目录一起修改;
4-v  :将过程显示到萤幕上
5[root@361way html]# restorecon -Rv /var/www/html/index.html
6restorecon reset /var/www/html/index.html context system_u:object_r:passwd_file_t:s0->system_u:object_r:httpd_sys_content_t:s0
3、getsebool 与setsebool
getsebool 主要用于查看所有的布林值,setsebool 指令用于更改布林值。而布林值有什么用呢?默认SELinux规则会对很多服务设置一些权限,比如:vsftpd不允许进行匿名上传,如果想要开启匿名上传,就需要将ftp匿名上传的权限设置为on。
1[root@www ~]# getsebool [-a] [布林值条款]
2选项与参数:
3-a  :列出目前系统上面的所有布林值条款配置为开启或关闭值
4[root@www ~]# setsebool [-P] 布林值=[0|1] 或
5[root@www ~]# setsebool [-P] 布林值 [on|off]
6选项与参数:
7-P  :直接将配置值写入配置档,这样重启后也生效,不加该参数,重启后失效!
还以上面提到的ftp匿名写入为例,具体布林值的修改如下:
 1[root@361way html]# getsebool -a|grep ftp
 2ftp_home_dir --> off
 3ftpd_anon_write --> off
 4ftpd_connect_all_unreserved --> off
 5………………省略
 6[root@361way html]# setsebool -P ftpd_anon_write=1
 7[root@361way html]# getsebool ftpd_anon_write
 8ftpd_anon_write --> on
 9[root@361way html]# setsebool -P ftpd_anon_write off
10[root@361way html]# getsebool ftpd_anon_write
11ftpd_anon_write --> off
4、semanage安全上下文件的查询与修改
一般情况下我们不会直接修改SELinux的规则文件(/etc/selinux/targeted下的文件),官方为我们提供了工具semanage进行规则的增删改查。常用方法如下:
1[root@www ~]# semanage {login|user|port|interface|fcontext|translation} -l
2[root@www ~]# semanage fcontext -{a|d|m} [-frst] file_spec
3选项与参数:
4fcontext :主要用在安全性本文方面的用途,
5-l :为list查询;
6-a :添加的意思,你可以添加一些目录的默认安全性本文类型配置;
7-m :修改的意思;
8-d :删除的意思。
这里假设,我们samba共享的目录为/srv/samba ,我们默认想让/srv/samba目录下的文件为 public_content_t 的类型,可以通过如下设置:
 1[root@361way srv]# mkdir -p /srv/samba
 2#这里在/srv目录下生成的类型为var_t
 3[root@361way srv]# ls -dZ /srv/samba/
 4drwxr-xr-x. root root unconfined_u:object_r:var_t:s0   /srv/samba/
 5[root@361way srv]# semanage fcontext -l | grep '/srv'
 6#以下只取部分输出,输出中找不到/srv/samba的规则
 7/etc/rc\.d/init\.d/srvsvcd                         regular file       system_u:object_r:likewise_initrc_exec_t:s0
 8/srv/([^/]*/)?ftp(/.*)?                            all files          system_u:object_r:public_content_t:s0
 9/srv/([^/]*/)?rsync(/.*)?                          all files          system_u:object_r:public_content_t:s0
10[root@361way srv]# semanage fcontext -a -t public_content_t "/srv/samba(/.*)?"
11[root@361way srv]# semanage fcontext -l | grep '/srv/samba'
12/srv/samba(/.*)?                                   all files          system_u:object_r:public_content_t:s0
13[root@361way srv]# cat /etc/selinux/targeted/contexts/files/file_contexts.local
14# This file is auto-generated by libsemanage
15# Do not edit directly.
16/srv/samba(/.*)?    system_u:object_r:public_content_t:s0
17[root@361way srv]#
semanage的功能除了这里提到的,还有上面常用方法里用的将某个端口加入某个服务。对规则进行导入导出等。
四、Setools与Setroubleshoot工具
setroubleshoot可以提供访问失败时的解决方法。安装setroubleshoot之后,如果有文件被SELinux阻止了访问,那么/var/log/message下可以看到setroubleshoot的相关条目。相关包如下:
1[root@361way srv]# yum list|egrep 'setrouble|setools'
2setools-console.x86_64                 3.3.7-46.el7                    @Server
3setools-libs.x86_64                    3.3.7-46.el7                    @Server
4setroubleshoot.x86_64                  3.2.17-3.el7                    @Server
5setroubleshoot-plugins.noarch          3.0.59-1.el7                    @Server
6setroubleshoot-server.x86_64           3.2.17-3.el7                    @Server
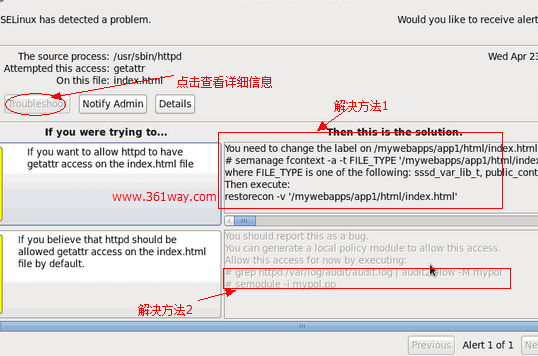
安装完成后,在文件访问受阻后,会在messages里获取到类似如下信息:
 1[root@361way ~]# cat /var/log/messages | grep setroubleshoot
 2Aug 1 17:18:44 www setroubleshoot: SELinux is preventing the httpd from using
 3potentially mislabeled files (/var/www/html/index.html). For complete SELinux
 4messages. run sealert -l 6c028f77-ddb6-4515-91f4-4e3e719994d4
 5# 根据上面的提示进行操作后,会出现解决提示
 6[root@361way ~]# sealert -l 6c028f77-ddb6-4515-91f4-4e3e719994d4
 7……………………省略
 8Do
 9# chcon -t httpd_sys_content_t '/var/www/html/index.html'
10……………………省略
11You can generate a local policy module to allow this access.
12Do
13allow this access for now by executing:
14# grep httpd /var/log/audit/audit.log | audit2allow -M mypol
15# semodule -i mypol.pp
如果开启的图形化界面也会收到相关的信息,具体如下图
selinux 在其他服务下的配置后面还会在具体服务时介绍到。SELinux比较强大,在redhat的培训中有专门的一个科目RHS429 。
捐赠本站(Donate)
 如您感觉文章有用,可扫码捐赠本站!(If the article useful, you can scan the QR code to donate))
- Author: shisekong
- Link: https://blog.361way.com/rh134-selinux/4653.html
- License: This work is under a 知识共享署名-非商业性使用-禁止演绎 4.0 国际许可协议. Kindly fulfill the requirements of the aforementioned License when adapting or creating a derivative of this work.