pyinstaller打包exe文件
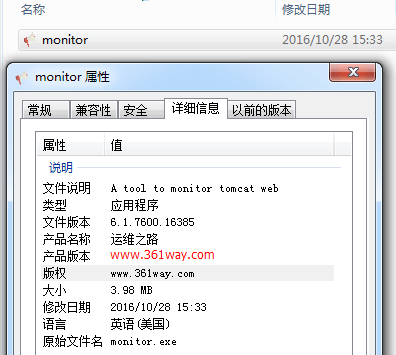
本篇算是 python编写windows tomcat守护进程 篇的延续 。之前写的代码没事想要打包成exe文件,可以将python打包成exe的工具主要有py2exe、pyinstaller、cx_freeze 。其中py2exe感觉是最难用,打包最烂的;cx_freeze打包比较简单,但是功能没有另外两个强大,所以个人感觉pyinstaller是最好用的。pyinstaller支持打包压缩、打包成单个文件、增加个性图标、设置版权信息。效果如下:
一、安装
pyinstaller安装比较简单,支持pip 安装,直接使用如下命令即可完成安装:
1pip install pyinstaller
不怕麻烦的也可以通过下载源码python setup.py install 进行安装 。
需要注意的是,pyinstaller在windows平台下依赖pywin32模块。在使用pyinstaller前,需要安装好pywin32模块(exe 的包,安装非常简单)。
二、使用
默认安装完成后,pyinstaller程序位于C:\Python27\Scripts目录下,可以通过执行pyinstaller python_script.py 生成可执行文件 ,生成的可执行文件位于执行所在目录下的dist目录下。其高级参数如下:
- –distpath=path_to_executable 指定生成的可执行文件存放的目录,默认存放在dist目录下
- –workpath=path_to_work_files 指定编译中临时文件存放的目录,默认存放在build目录下
- –clean 清理编译时的临时文件 -F, –onefile 生成单独的exe文件而不是文件夹
- -d, –debug 编译为debug模式,有助于运行中获取日志信息
- –version-file=version_text_file 为exe文件添加版本信息,版本信息可以通过运行pyi-grab_version加上要获取版本信息的exe文件的路径来生成,生成后的版本信息文件可以按需求修改并作为–version-file的参数添加到要生成的exe文件中去
- -i , -i , –icon=, –icon= 为exe文件添加图标,可以指定图标路径或者从已存在的exe文件中抽取特定的ID的图标作为要生成的exe文件的图标
另外,还可以通过spec文件来生成可执行文件 。具体命令如下:
1pyinstaller specfile
2或者
3pyi-build specfile
注: spec文件每次通过命令生成时都会存在,可以通过简单的修改增加相应的功能,如加图标,指定版权文件 。
这里以之前写的程序为例,可以通过如下命令生成一个可执行文件
1C:\Users\thinkpad>cd /d C:\Users\thinkpad\Desktop\monitor
2C:\Users\thinkpad\Desktop\monitor>C:\Python27\Scripts\pyinstaller.exe -F monitor.py
3
4在monitor增加一个ico图标文件,操作方法如下:
5C:\Users\thinkpad\Desktop\monitor>C:\Python27\Scripts\pyinstaller.exe -i alert.ico  -F  monitor.py
6
7增加版本信息文件方法如下:
8C:\Users\thinkpad\Desktop\monitor>C:\Python27\Scripts\pyinstaller.exe -i alert.ico --version-file=file_version_info.txt -F  monitor.py
版本信息的写法看后面 。
此时的spec文件内容如下:
 1# -*- mode: python -*-
 2block_cipher = None
 3a = Analysis(['monitor.py'],
 4             pathex=['C:\\Users\\thinkpad\\Desktop\\monitor'],
 5             binaries=None,
 6             datas=None,
 7             hiddenimports=[],
 8             hookspath=[],
 9             runtime_hooks=[],
10             excludes=[],
11             win_no_prefer_redirects=False,
12             win_private_assemblies=False,
13             cipher=block_cipher)
14pyz = PYZ(a.pure, a.zipped_data,
15             cipher=block_cipher)
16exe = EXE(pyz,
17          a.scripts,
18          a.binaries,
19          a.zipfiles,
20          a.datas,
21          name='monitor',
22          debug=False,
23          strip=False,
24          upx=True,
25          console=True , version-file=file_version_info.txt , icon='alert.ico')
三、upx压缩
默认生成的python可执行文件有点大,可以通过upx程序进行压缩,upx程序的主页位于:https://upx.github.io/ ,目前windows版的最新upx为upx391w.zip ,下载后,将其中的upx.exe文件放到C:\Python27目录下(python可执行程序的安装目录),再次执行的时候,可以跟上–upx进行压缩。默认存在时不指定也会进行压缩,生成exe文件时,在其日志中可以发现如下内容:
11087 INFO: PyInstaller: 3.2
21087 INFO: Python: 2.7.12
31088 INFO: Platform: Windows-7-6.1.7600-SP0
41090 INFO: wrote C:\Users\thinkpad\Desktop\monitor\monitor.spec
51172 INFO: UPX is available.
61174 INFO: Extending PYTHONPATH with paths
7['C:\\Users\\thinkpad\\Desktop\\monitor',
8 'C:\\Users\\thinkpad\\Desktop\\monitor']
可以看到上面的upx是可用的。通过spec文件也一样,增加upx=True即可。
四、版本信息文件的生成
可以通过grab_version.py先读取一个已经存在的exe文件,获取其版本信息,如下:
1C:\Users\thinkpad\Desktop\monitor>C:\Python27\Lib\site-packages\PyInstaller\utils\cliutils\grab_version.py C:\Windows\System32\sc.exe
2Version info written to: file_version_info.txt
将file_version_info.txt放到对应的目录,并将内部的信息修改后,可以按步骤2中的方法,生成带有版权信息的可执行文件。
捐赠本站(Donate)
 如您感觉文章有用,可扫码捐赠本站!(If the article useful, you can scan the QR code to donate))
- Author: shisekong
- Link: https://blog.361way.com/pyinstaller-exe/5247.html
- License: This work is under a 知识共享署名-非商业性使用-禁止演绎 4.0 国际许可协议. Kindly fulfill the requirements of the aforementioned License when adapting or creating a derivative of this work.
