k8s helm安装redis
一、helm 安装 redis
通过 helm 安装redis的方法如下:
 1[root@testcce-92497 ~]# helm install my-release oci://registry-1.docker.io/bitnamicharts/redis  --set global.storageClass=csi-disk
 2[root@testcce-92497 ~]# export REDIS_PASSWORD=$(kubectl get secret --namespace default my-release-redis -o jsonpath="{.data.redis-password}" | base64 -d)
 3[root@testcce-92497 ~]# echo $REDIS_PASSWORD
 4ejL6JhgNNs
 5[root@testcce-92497 ~]# kubectl get pods
 6NAME                          READY   STATUS    RESTARTS   AGE
 7my-release-redis-master-0     1/1     Running   0          2m41s
 8my-release-redis-replicas-0   1/1     Running   0          2m41s
 9my-release-redis-replicas-1   1/1     Running   0          100s
10my-release-redis-replicas-2   1/1     Running   0          62s
11[root@testcce-92497 ~]# kubectl get svc
12NAME                        TYPE        CLUSTER-IP      EXTERNAL-IP   PORT(S)    AGE
13kubernetes                  ClusterIP   10.247.0.1      <none>        443/TCP    8d
14my-release-redis-headless   ClusterIP   None            <none>        6379/TCP   13m
15my-release-redis-master     ClusterIP   10.247.153.87   <none>        6379/TCP   13m
16my-release-redis-replicas   ClusterIP   10.247.3.245    <none>        6379/TCP   13m
这里默认安装的是 1 master 3 replicas 架构,这个可以从 artifacthub 网站上查到。安装完成后,可以通过如下命令进行连接:
1REDISCLI_AUTH="$REDIS_PASSWORD" redis-cli -h my-release-redis-master
2REDISCLI_AUTH="$REDIS_PASSWORD" redis-cli -h my-release-redis-replicas
二、helm 安装 redis cluster
bitnami 除了提供便捷的 redis 安装外,还提供了 redis cluster的 helm 安装包,具体安装命令如下:
 1[root@testcce-92497 ~]# helm install my-release oci://registry-1.docker.io/bitnamicharts/redis-cluster  --set global.storageClass=csi-disk
 2[root@testcce-92497 ~]# export REDIS_PASSWORD=$(kubectl get secret --namespace "default" my-release-redis-cluster -o jsonpath="{.data.redis-password}" | base64 -d)
 3[root@testcce-92497 ~]# echo $REDIS_PASSWORD
 4iYcK8ISfoF
 5[root@testcce-92497 ~]# kubectl get pods
 6NAME                         READY   STATUS    RESTARTS   AGE
 7my-release-redis-cluster-0   1/1     Running   0          87s
 8my-release-redis-cluster-1   1/1     Running   0          87s
 9my-release-redis-cluster-2   1/1     Running   0          87s
10my-release-redis-cluster-3   1/1     Running   0          87s
11my-release-redis-cluster-4   1/1     Running   0          87s
12my-release-redis-cluster-5   1/1     Running   0          87s
13[root@testcce-92497 ~]# kubectl get svc
14NAME                                TYPE        CLUSTER-IP     EXTERNAL-IP   PORT(S)              AGE
15kubernetes                          ClusterIP   10.247.0.1     <none>        443/TCP              8d
16my-release-redis-cluster            ClusterIP   10.247.1.249   <none>        6379/TCP             12m
17my-release-redis-cluster-headless   ClusterIP   None           <none>        6379/TCP,16379/TCP   12m
18[root@testcce-92497 ~]# kubectl get pvc
19NAME                                    STATUS   VOLUME                                     CAPACITY   ACCESS MODES   STORAGECLASS   AGE
20redis-data-my-release-redis-cluster-0   Bound    pvc-55a55e1d-66ac-4c38-9d57-e3407de450e9   8Gi        RWO            csi-disk       15s
21redis-data-my-release-redis-cluster-1   Bound    pvc-78fcbc7c-7909-4462-834d-38342cae9dea   8Gi        RWO            csi-disk       15s
22redis-data-my-release-redis-cluster-2   Bound    pvc-ad7ffaee-a6fe-4273-b03d-648b5bf10072   8Gi        RWO            csi-disk       15s
23redis-data-my-release-redis-cluster-3   Bound    pvc-5cb0e3f7-57a9-4694-9350-c1325f93cef9   8Gi        RWO            csi-disk       15s
24redis-data-my-release-redis-cluster-4   Bound    pvc-c1b16f6a-bce1-4e87-a016-c573e77008f3   8Gi        RWO            csi-disk       15s
25redis-data-my-release-redis-cluster-5   Bound    pvc-5c14c80b-197e-412b-af74-674d5cd9ed1f   8Gi        RWO            csi-disk       15
执行连接测试:
1[root@testcce-92497 ~]# kubectl exec -it my-release-redis-cluster-0 -- /bin/bash
2I have no name!@my-release-redis-cluster-0:/$ redis-cli -c -h my-release-redis-cluster -a $REDIS_PASSWORD
3Warning: Using a password with '-a' or '-u' option on the command line interface may not be safe.
4my-release-redis-cluster:6379> set site www.361way.com
5-> Redirected to slot [9421] located at 10.0.0.10:6379
6OK
710.0.0.10:6379> get site
8"www.361way.com"
910.0.0.10:6379>
查看其对应的配置文件内容如下:
 1my-release-redis-cluster-0:/etc$ cat /opt/bitnami/redis/etc/redis.conf |grep -v ^#|grep -v ^$
 2bind 0.0.0.0 ::
 3bind 0.0.0.0 ::
 4bind 0.0.0.0 ::
 5bind 0.0.0.0 ::
 6protected-mode yes
 7port 6379
 8tcp-backlog 511
 9timeout 0
10tcp-keepalive 300
11port 6379
12daemonize no
13pidfile /opt/bitnami/redis/tmp/redis_6379.pid
14loglevel notice
15logfile ""
16databases 16
17always-show-logo yes
18set-proc-title yes
19proc-title-template "{title} {listen-addr} {server-mode}"
20save 900 1
21save 300 10
22save 60 10000
23stop-writes-on-bgsave-error yes
24rdbcompression yes
25rdbchecksum yes
26dbfilename dump.rdb
27rdb-del-sync-files no
28dir /bitnami/redis/data
29replica-serve-stale-data yes
30replica-read-only yes
31repl-diskless-sync no
32repl-diskless-sync-delay 5
33repl-diskless-sync-max-replicas 0
34repl-diskless-load disabled
35repl-disable-tcp-nodelay no
36replica-priority 100
37acllog-max-len 128
38requirepass iYcK8ISfoF
39lazyfree-lazy-eviction no
40lazyfree-lazy-expire no
41lazyfree-lazy-server-del no
42replica-lazy-flush no
43lazyfree-lazy-user-del no
44lazyfree-lazy-user-flush no
45oom-score-adj no
46oom-score-adj-values 0 200 800
47disable-thp yes
48appendonly yes
49appendfilename "appendonly.aof"
50appenddirname "appendonlydir"
51appendfsync everysec
52no-appendfsync-on-rewrite no
53auto-aof-rewrite-percentage 100
54auto-aof-rewrite-min-size 64mb
55aof-load-truncated yes
56aof-use-rdb-preamble yes
57aof-timestamp-enabled no
58lua-time-limit 5000
59cluster-enabled yes
60cluster-config-file /bitnami/redis/data/nodes.conf
61cluster-preferred-endpoint-type ip
62cluster-announce-ip 10.0.0.12
63slowlog-log-slower-than 10000
64slowlog-max-len 128
65latency-monitor-threshold 0
66notify-keyspace-events ""
67hash-max-listpack-entries 512
68hash-max-listpack-value 64
69list-max-listpack-size -2
70list-compress-depth 0
71set-max-intset-entries 512
72zset-max-listpack-entries 128
73zset-max-listpack-value 64
74hll-sparse-max-bytes 3000
75stream-node-max-bytes 4096
76stream-node-max-entries 100
77activerehashing yes
78client-output-buffer-limit normal 0 0 0
79client-output-buffer-limit replica 256mb 64mb 60
80client-output-buffer-limit pubsub 32mb 8mb 60
81hz 10
82dynamic-hz yes
83aof-rewrite-incremental-fsync yes
84rdb-save-incremental-fsync yes
85jemalloc-bg-thread yes
86save ""
三、两者之间的区别
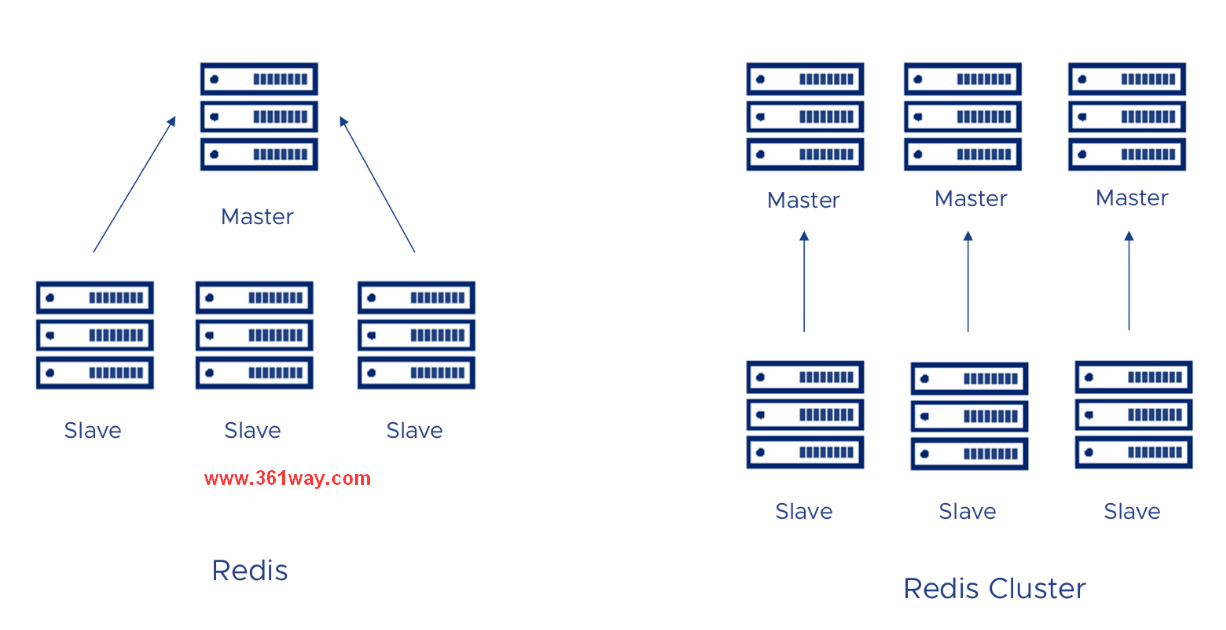
部署 Redis 集群有两种不同的方法,即使用Redis Helm chart 或 Redis cluster Helm chart 。这两种解决方案都提供了一种在生产环境中运行 Redis 的简单可靠的方法。
- Redis cluster Helm chart 默认配置了一个6个节点的集群,多个写入点(三个master)和三个slave节点。Redis Helm Chart 默认部署 4 个节点,其中只有 1 个写入点(1 个主节点)和 3 个副本节点(从节点)。
- Redis Cluster Helm Chart 将部署带有分片的 Redis Cluster 拓扑,Redis Cluster 使用Redis Sentinel部署主从集群。
- Redis Cluster 仅支持一个数据库(如果您有一个大数据集则表明),而 Redis 支持多个数据库。
- Redis Cluster客户端必须使用重定向,而用于Redis的客户端则不需要。
- Redis Cluster Helm chart 允许用户从外部和内部访问集群,并且在两种访问中都可以对集群进行扩容和缩容。
Redis Cluster Helm chart 还包括一项附加功能:灾难恢复和故障转移。如果主节点甚至所有节点宕机,集群会自动恢复并提升新的主节点,以维持集群的平衡并确保读写操作继续不间断。
四、Redis 主要的架构
Redis Helm chart 支持的架构如下:
Default: Master-Replicas
When installing the chart with architecture=replication, it will deploy a Redis™ master StatefulSet (only one master node allowed) and a Redis™ replicas StatefulSet. The replicas will be read-replicas of the master. Two services will be exposed:
- Redis™ Master service: Points to the master, where read-write operations can be performed
- Redis™ Replicas service: Points to the replicas, where only read operations are allowed.
In case the master crashes, the replicas will wait until the master node is respawned again by the Kubernetes Controller Manager.
Standalone
When installing the chart with architecture=standalone, it will deploy a standalone Redis™ StatefulSet (only one node allowed) and a Redis™ replicas StatefulSet. A single service will be exposed:
- Redis™ Master service: Points to the master, where read-write operations can be performed
Master-Replicas with Sentinel
When installing the chart with architecture=replication and sentinel.enabled=true, it will deploy a Redis™ master StatefulSet (only one master allowed) and a Redis™ replicas StatefulSet. In this case, the pods will contain an extra container with Redis™ Sentinel. This container will form a cluster of Redis™ Sentinel nodes, which will promote a new master in case the actual one fails. In addition to this, only one service is exposed:
- Redis™ service: Exposes port 6379 for Redis™ read-only operations and port 26379 for accessing Redis™ Sentinel.
For read-only operations, access the service using port 6379. For write operations, it’s necessary to access the Redis™ Sentinel cluster and query the current master using the command below (using redis-cli or similar):
1SENTINEL get-master-addr-by-name <name of your MasterSet. e.g: mymaster>
This command will return the address of the current master, which can be accessed from inside the cluster.
In case the current master crashes, the Sentinel containers will elect a new master node.
捐赠本站(Donate)
 如您感觉文章有用,可扫码捐赠本站!(If the article useful, you can scan the QR code to donate))
- Author: shisekong
- Link: https://blog.361way.com/k8s-helm-redis/8581.html
- License: This work is under a 知识共享署名-非商业性使用-禁止演绎 4.0 国际许可协议. Kindly fulfill the requirements of the aforementioned License when adapting or creating a derivative of this work.